HP d640 HP D640 High-Volume Printer - User Manual (Printer and Accessories), C - Page 131
Drum Kit - Replacing Drum and Transfer Assembly, Setting Up the Printer for Drum Kit Replacement
 |
View all HP d640 manuals
Add to My Manuals
Save this manual to your list of manuals |
Page 131 highlights
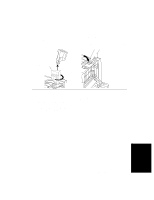
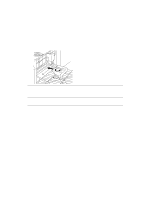
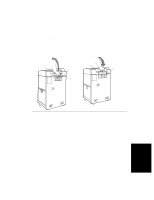
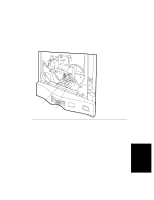
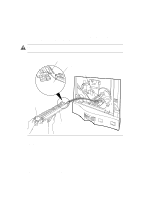
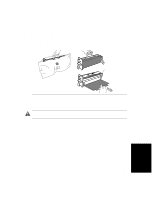
Drum Kit - Replacing Drum and Transfer Assembly Drum Kit - Replacing Drum and Transfer Assembly The drum and transfer charger are always replaced together. The drum is replaced when the Control Panel indicates: Drum at end life Replace drum Caution The drum surface is easily damaged. Avoid contact with the drum surface and don't expose the drum to light for extended periods of time. Scratches will appear as dark lines or marks on the printed page. A scratched drum should be replaced. This section provides maintenance procedures for: • Removing the old transfer assembly and installing the new transfer assembly (See "Removing the Transfer Assembly" on page 4-19). • Removing the old drum and installing the new drum (See "Installing the Drum" on page 4-24). Setting Up the Printer for Drum Kit Replacement 1. Press the Menu button on the Main Screen. 2. Press Ĭ to highlight Maintenance. 3. Press Ǡ to display Maintenance selections. 4. Press Ǡ to enter the Replace submenu. 5. Press Ĭ to highlight DRUM UNIT. 6. Press Ǡ to display drum instructions as shown in Figure 4-22. Drum Replacement Replace Drum unit and Press Done Online Figure 4-22 Replace Drum Done 4-18 Ordering and Replacing Consumables
-
 1
1 -
2
-
3
-
4
-
5
-
6
-
7
-
8
-
9
-
10
-
11
-
12
-
13
-
14
-
15
-
16
-
17
-
18
-
19
-
20
-
21
-
22
-
23
-
24
-
25
-
26
-
27
-
28
-
29
-
30
-
31
-
32
-
33
-
34
-
35
-
36
-
37
-
38
-
39
-
40
-
41
-
42
-
43
-
44
-
45
-
46
-
47
-
48
-
49
-
50
-
51
-
52
-
53
-
54
-
55
-
56
-
57
-
58
-
59
-
60
-
61
-
62
-
63
-
64
-
65
-
66
-
67
-
68
-
69
-
70
-
71
-
72
-
73
-
74
-
75
-
76
-
77
-
78
-
79
-
80
-
81
-
82
-
83
-
84
-
85
-
86
-
87
-
88
-
89
-
90
-
91
-
92
-
93
-
94
-
95
-
96
-
97
-
98
-
99
-
100
-
101
-
102
-
103
-
104
-
105
-
106
-
107
-
108
-
109
-
110
-
111
-
112
-
113
-
114
-
115
-
116
-
117
-
118
-
119
-
120
-
121
-
122
-
123
-
124
-
125
-
 126
126 -
 127
127 -
 128
128 -
 129
129 -
 130
130 -
 131
131 -
 132
132 -
 133
133 -
 134
134 -
 135
135 -
 136
136 -
137
-
138
-
139
-
140
-
141
-
142
-
143
-
144
-
145
-
146
-
147
-
148
-
149
-
150
-
151
-
152
-
153
-
154
-
155
-
156
-
157
-
158
-
159
-
160
-
161
-
162
-
163
-
164
-
165
-
166
-
167
-
168
-
169
-
170
-
171
-
172
-
173
-
174
-
175
-
176
-
177
-
178
-
179
-
180
-
181
-
182
-
183
-
184
-
185
-
186
-
187
-
188
-
189
-
190
-
191
-
192
-
193
-
194
-
195
-
196
-
197
-
198
-
199
-
200
-
201
-
202
-
203
-
204
-
205
-
206
-
207
-
208
-
209
-
210
-
211
-
212
-
213
-
214
-
215
-
216
-
217
-
218
-
219
-
220
-
221
-
222
-
223
-
224
-
225
-
226
-
227
-
228
-
229
-
230
-
231
-
232
-
233
-
234
-
235
-
236
-
237
-
238
-
239
-
240
-
241
-
242
-
243
-
244
-
245
-
246
-
247
-
248
-
249
-
250
-
251
-
252
-
253
-
254
-
255
-
256
-
257
-
258
-
259
-
260
-
261
-
262
-
263
-
264
-
265
-
266
-
267
-
268
-
269
-
270
-
271
-
272
-
273
-
274
-
275
-
276
-
277
-
278
-
279
-
280
-
281
-
282
-
283
-
284
-
285
-
286
-
287
-
288
-
289
-
290
-
291
-
292
-
293
 |
 |
