HP d640 HP D640 High-Volume Printer - User Manual (Printer and Accessories), C - Page 127
Opening the Developer Fill Flap, Filling the Developer and tapping the Developer Bottle
 |
View all HP d640 manuals
Add to My Manuals
Save this manual to your list of manuals |
Page 127 highlights
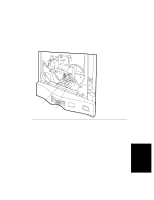
Replacing Developer 7. Open the developer fill flap, as shown in Figure 4-17. Developer fill flap Figure 4-17 Opening the Developer Fill Flap Caution Never reinstall used developer. Doing so may result in poor print quality. 8. Line up the guide pins on the new developer bottle with the guide pin openings on the developer fill. Insert and turn the developer bottle clockwise 180° to start filling, as shown in Figure 4-18. Developer bottle Developer bottle Guide pin Guide pin slot Figure 4-18 Filling the Developer and tapping the Developer Bottle 4-14 Ordering and Replacing Consumables
-
 1
1 -
2
-
3
-
4
-
5
-
6
-
7
-
8
-
9
-
10
-
11
-
12
-
13
-
14
-
15
-
16
-
17
-
18
-
19
-
20
-
21
-
22
-
23
-
24
-
25
-
26
-
27
-
28
-
29
-
30
-
31
-
32
-
33
-
34
-
35
-
36
-
37
-
38
-
39
-
40
-
41
-
42
-
43
-
44
-
45
-
46
-
47
-
48
-
49
-
50
-
51
-
52
-
53
-
54
-
55
-
56
-
57
-
58
-
59
-
60
-
61
-
62
-
63
-
64
-
65
-
66
-
67
-
68
-
69
-
70
-
71
-
72
-
73
-
74
-
75
-
76
-
77
-
78
-
79
-
80
-
81
-
82
-
83
-
84
-
85
-
86
-
87
-
88
-
89
-
90
-
91
-
92
-
93
-
94
-
95
-
96
-
97
-
98
-
99
-
100
-
101
-
102
-
103
-
104
-
105
-
106
-
107
-
108
-
109
-
110
-
111
-
112
-
113
-
114
-
115
-
116
-
117
-
118
-
119
-
120
-
121
-
 122
122 -
 123
123 -
 124
124 -
 125
125 -
 126
126 -
 127
127 -
 128
128 -
 129
129 -
 130
130 -
 131
131 -
 132
132 -
133
-
134
-
135
-
136
-
137
-
138
-
139
-
140
-
141
-
142
-
143
-
144
-
145
-
146
-
147
-
148
-
149
-
150
-
151
-
152
-
153
-
154
-
155
-
156
-
157
-
158
-
159
-
160
-
161
-
162
-
163
-
164
-
165
-
166
-
167
-
168
-
169
-
170
-
171
-
172
-
173
-
174
-
175
-
176
-
177
-
178
-
179
-
180
-
181
-
182
-
183
-
184
-
185
-
186
-
187
-
188
-
189
-
190
-
191
-
192
-
193
-
194
-
195
-
196
-
197
-
198
-
199
-
200
-
201
-
202
-
203
-
204
-
205
-
206
-
207
-
208
-
209
-
210
-
211
-
212
-
213
-
214
-
215
-
216
-
217
-
218
-
219
-
220
-
221
-
222
-
223
-
224
-
225
-
226
-
227
-
228
-
229
-
230
-
231
-
232
-
233
-
234
-
235
-
236
-
237
-
238
-
239
-
240
-
241
-
242
-
243
-
244
-
245
-
246
-
247
-
248
-
249
-
250
-
251
-
252
-
253
-
254
-
255
-
256
-
257
-
258
-
259
-
260
-
261
-
262
-
263
-
264
-
265
-
266
-
267
-
268
-
269
-
270
-
271
-
272
-
273
-
274
-
275
-
276
-
277
-
278
-
279
-
280
-
281
-
282
-
283
-
284
-
285
-
286
-
287
-
288
-
289
-
290
-
291
-
292
-
293
 |
 |

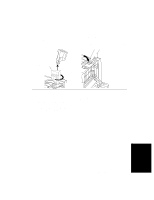
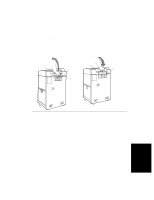
Replacing Developer
4-14
Ordering and Replacing Consumables
7.
Open the developer fill flap, as shown in Figure 4-17.
Figure 4-17
Opening the Developer Fill Flap
Caution
Never reinstall used developer. Doing so may result in poor print quality.
8.
Line up the guide pins on the new developer bottle with the guide pin openings on the
developer fill. Insert and turn the developer bottle clockwise 180
°
to start filling, as
shown in Figure 4-18.
Figure 4-18
Filling the Developer and tapping the Developer Bottle
Developer fill flap
Developer bottle
Guide pin
Guide pin slot
Developer bottle