HP d640 HP D640 High-Volume Printer - User Manual (Printer and Accessories), C - Page 161
Holding Upper Roller Assembly in place, Installing Thumbscrews
 |
View all HP d640 manuals
Add to My Manuals
Save this manual to your list of manuals |
Page 161 highlights
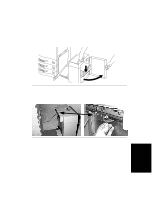
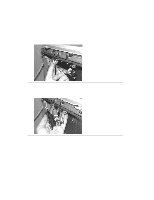
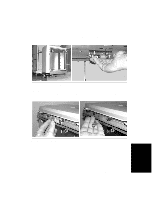
HCI Pick Roller Kit - Replacing the HCI Pick Rollers 2. Once the upper roller assembly is in place, gently hold it up and push it slightly to the left (to help the screws engage). See Figure 4-66. Figure 4-66 Holding Upper Roller Assembly in place 3. With your other hand, place the thumbscrews removed previously into the holes on the back side of the HCI (shown in Figure 4-67). To get the proper screw engagement, you may need to push the upper roller assembly slightly to the left. If necessary, look through the screw holes to judge if the hole is aligned correctly. Tighten the thumbscrews clockwise until they are snug. Figure 4-67 Installing Thumbscrews 4-48 Ordering and Replacing Consumables
-
 1
1 -
2
-
3
-
4
-
5
-
6
-
7
-
8
-
9
-
10
-
11
-
12
-
13
-
14
-
15
-
16
-
17
-
18
-
19
-
20
-
21
-
22
-
23
-
24
-
25
-
26
-
27
-
28
-
29
-
30
-
31
-
32
-
33
-
34
-
35
-
36
-
37
-
38
-
39
-
40
-
41
-
42
-
43
-
44
-
45
-
46
-
47
-
48
-
49
-
50
-
51
-
52
-
53
-
54
-
55
-
56
-
57
-
58
-
59
-
60
-
61
-
62
-
63
-
64
-
65
-
66
-
67
-
68
-
69
-
70
-
71
-
72
-
73
-
74
-
75
-
76
-
77
-
78
-
79
-
80
-
81
-
82
-
83
-
84
-
85
-
86
-
87
-
88
-
89
-
90
-
91
-
92
-
93
-
94
-
95
-
96
-
97
-
98
-
99
-
100
-
101
-
102
-
103
-
104
-
105
-
106
-
107
-
108
-
109
-
110
-
111
-
112
-
113
-
114
-
115
-
116
-
117
-
118
-
119
-
120
-
121
-
122
-
123
-
124
-
125
-
126
-
127
-
128
-
129
-
130
-
131
-
132
-
133
-
134
-
135
-
136
-
137
-
138
-
139
-
140
-
141
-
142
-
143
-
144
-
145
-
146
-
147
-
148
-
149
-
150
-
151
-
152
-
153
-
154
-
155
-
 156
156 -
 157
157 -
 158
158 -
 159
159 -
 160
160 -
 161
161 -
 162
162 -
 163
163 -
 164
164 -
 165
165 -
 166
166 -
167
-
168
-
169
-
170
-
171
-
172
-
173
-
174
-
175
-
176
-
177
-
178
-
179
-
180
-
181
-
182
-
183
-
184
-
185
-
186
-
187
-
188
-
189
-
190
-
191
-
192
-
193
-
194
-
195
-
196
-
197
-
198
-
199
-
200
-
201
-
202
-
203
-
204
-
205
-
206
-
207
-
208
-
209
-
210
-
211
-
212
-
213
-
214
-
215
-
216
-
217
-
218
-
219
-
220
-
221
-
222
-
223
-
224
-
225
-
226
-
227
-
228
-
229
-
230
-
231
-
232
-
233
-
234
-
235
-
236
-
237
-
238
-
239
-
240
-
241
-
242
-
243
-
244
-
245
-
246
-
247
-
248
-
249
-
250
-
251
-
252
-
253
-
254
-
255
-
256
-
257
-
258
-
259
-
260
-
261
-
262
-
263
-
264
-
265
-
266
-
267
-
268
-
269
-
270
-
271
-
272
-
273
-
274
-
275
-
276
-
277
-
278
-
279
-
280
-
281
-
282
-
283
-
284
-
285
-
286
-
287
-
288
-
289
-
290
-
291
-
292
-
293
 |
 |

HCI Pick Roller Kit - Replacing the HCI Pick Rollers
4-48
Ordering and Replacing Consumables
2.
Once the upper roller assembly is in place, gently hold it up and push it slightly to the
left (to help the screws engage). See Figure 4-66.
Figure 4-66
Holding Upper Roller Assembly in place
3.
With your other hand, place the thumbscrews removed previously into the holes on the
back side of the HCI (shown in Figure 4-67). To get the proper screw engagement, you
may need to push the upper roller assembly slightly to the left. If necessary, look
through the screw holes to judge if the hole is aligned correctly. Tighten the
thumbscrews clockwise until they are snug.
Figure 4-67
Installing Thumbscrews