HP d640 HP D640 High-Volume Printer - User Manual (Printer and Accessories), C - Page 59
Replace, Alignment.tray1, tray2, hci, duplex, and, Density, Test s, Monitor, Date-Time
 |
View all HP d640 manuals
Add to My Manuals
Save this manual to your list of manuals |
Page 59 highlights
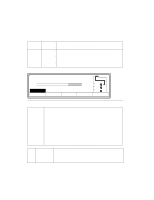
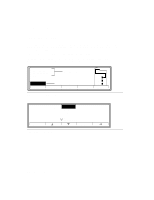
Control Panel Maintenance Menu Settings Replace Alignment.tray1, tray2, tray3, hci, duplex, and duplexv Density Testpages Monitor Date-Time The Replace selection initiates the replacement procedure for the consumable items you are removing and replacing. Follow the instructions in "Overview of Consumable Supplies" on page 4-1 for replacing consumables. Sets the alignment correction values. See "Using Virtual Font Cartridges" on page 6-26 for the paper path alignment procedure. 1 (min) = 10 15 (max) cont 1 (min) = 30 30000 (max) = OFF ON minute =0-59 hour = 0-23 date = 1-31 month = JAN-DEC year = (last 2 digits of year) This setting specifies the relative darkness of the print on a scale of 1 to 15, with 15 being the darkest setting. Gray scale patterns show the most visible effect. The effect of changing Density can be seen immediately. Note: The higher the density number, the quicker toner is used. To conserve toner, use a lower setting. Sets the number of pages printed when you print the testpage in the Test menu. The cont selection causes printing to continue until you press End and select ABANDON. Turns on a special area on the Control Panel which displays printer registers. This should only be set to ON when directed by your service provider for troubleshooting. Sets the current date and time. The date and time is displayed on the Control Panel and printed on all test reports. Control Panel 2-25
-
 1
1 -
2
-
3
-
4
-
5
-
6
-
7
-
8
-
9
-
10
-
11
-
12
-
13
-
14
-
15
-
16
-
17
-
18
-
19
-
20
-
21
-
22
-
23
-
24
-
25
-
26
-
27
-
28
-
29
-
30
-
31
-
32
-
33
-
34
-
35
-
36
-
37
-
38
-
39
-
40
-
41
-
42
-
43
-
44
-
45
-
46
-
47
-
48
-
49
-
50
-
51
-
52
-
53
-
 54
54 -
 55
55 -
 56
56 -
 57
57 -
 58
58 -
 59
59 -
 60
60 -
 61
61 -
 62
62 -
 63
63 -
 64
64 -
65
-
66
-
67
-
68
-
69
-
70
-
71
-
72
-
73
-
74
-
75
-
76
-
77
-
78
-
79
-
80
-
81
-
82
-
83
-
84
-
85
-
86
-
87
-
88
-
89
-
90
-
91
-
92
-
93
-
94
-
95
-
96
-
97
-
98
-
99
-
100
-
101
-
102
-
103
-
104
-
105
-
106
-
107
-
108
-
109
-
110
-
111
-
112
-
113
-
114
-
115
-
116
-
117
-
118
-
119
-
120
-
121
-
122
-
123
-
124
-
125
-
126
-
127
-
128
-
129
-
130
-
131
-
132
-
133
-
134
-
135
-
136
-
137
-
138
-
139
-
140
-
141
-
142
-
143
-
144
-
145
-
146
-
147
-
148
-
149
-
150
-
151
-
152
-
153
-
154
-
155
-
156
-
157
-
158
-
159
-
160
-
161
-
162
-
163
-
164
-
165
-
166
-
167
-
168
-
169
-
170
-
171
-
172
-
173
-
174
-
175
-
176
-
177
-
178
-
179
-
180
-
181
-
182
-
183
-
184
-
185
-
186
-
187
-
188
-
189
-
190
-
191
-
192
-
193
-
194
-
195
-
196
-
197
-
198
-
199
-
200
-
201
-
202
-
203
-
204
-
205
-
206
-
207
-
208
-
209
-
210
-
211
-
212
-
213
-
214
-
215
-
216
-
217
-
218
-
219
-
220
-
221
-
222
-
223
-
224
-
225
-
226
-
227
-
228
-
229
-
230
-
231
-
232
-
233
-
234
-
235
-
236
-
237
-
238
-
239
-
240
-
241
-
242
-
243
-
244
-
245
-
246
-
247
-
248
-
249
-
250
-
251
-
252
-
253
-
254
-
255
-
256
-
257
-
258
-
259
-
260
-
261
-
262
-
263
-
264
-
265
-
266
-
267
-
268
-
269
-
270
-
271
-
272
-
273
-
274
-
275
-
276
-
277
-
278
-
279
-
280
-
281
-
282
-
283
-
284
-
285
-
286
-
287
-
288
-
289
-
290
-
291
-
292
-
293
 |
 |
