HP d640 HP D640 High-Volume Printer - User Manual (Printer and Accessories), C - Page 66
Adjusting Standard Tray Paper Guides, Installing Custom Tray, Table 3-1
 |
View all HP d640 manuals
Add to My Manuals
Save this manual to your list of manuals |
Page 66 highlights
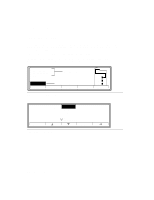
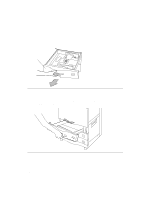
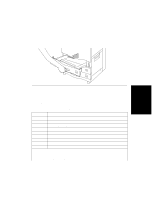
Adjusting Standard Tray Paper Guides 4. Install the custom tray as shown in Figure 3-3. Angle the tray down slightly until it engages the tray guides on either side of the printer, then push the tray in as if it were a standard tray. Printer Tasks LTR LTR Figure 3-3 Installing Custom Tray Adjusting Standard Tray Paper Guides The printer's standard tray accepts all the standard paper formats listed in and illustrated in Figure 3-4. A set of moveable paper positioning guides lock into place in the paper trays, with the paper size visible through a cutout on the guide. Table 3-1 Paper size settings in Standard Tray Category Dimensions Letter 8.5 x 11 in (216 x 279 mm) Legal 8.5 x 14 in (216 x 356 mm) Ledger 11 x 17 in (280 x 432 mm) Executive 7.25 x 10.5 in (184 x 267 mm) A3 11.69 x 16.53 in (297 x 420 mm) A4 8.26 x 11.69 in (210 x 297 mm) A5 5.84 x 8.26 in (149 x 210 mm) B4 (JIS) 10.11 x 14.32 in (257 x 364 mm) B5 (JIS) 7.16 x 10.11 in (182 x 257 mm) * LGR note: Ledger paper extends across the entire tray bottom. When you install ledger paper, lift and remove the left guide and store it in the molded pocket (located on front panel) labeled LGR. JIS: Japan Industrial Standards Committee Printer Tasks 3-3
-
 1
1 -
2
-
3
-
4
-
5
-
6
-
7
-
8
-
9
-
10
-
11
-
12
-
13
-
14
-
15
-
16
-
17
-
18
-
19
-
20
-
21
-
22
-
23
-
24
-
25
-
26
-
27
-
28
-
29
-
30
-
31
-
32
-
33
-
34
-
35
-
36
-
37
-
38
-
39
-
40
-
41
-
42
-
43
-
44
-
45
-
46
-
47
-
48
-
49
-
50
-
51
-
52
-
53
-
54
-
55
-
56
-
57
-
58
-
59
-
60
-
 61
61 -
 62
62 -
 63
63 -
 64
64 -
 65
65 -
 66
66 -
 67
67 -
 68
68 -
 69
69 -
 70
70 -
 71
71 -
72
-
73
-
74
-
75
-
76
-
77
-
78
-
79
-
80
-
81
-
82
-
83
-
84
-
85
-
86
-
87
-
88
-
89
-
90
-
91
-
92
-
93
-
94
-
95
-
96
-
97
-
98
-
99
-
100
-
101
-
102
-
103
-
104
-
105
-
106
-
107
-
108
-
109
-
110
-
111
-
112
-
113
-
114
-
115
-
116
-
117
-
118
-
119
-
120
-
121
-
122
-
123
-
124
-
125
-
126
-
127
-
128
-
129
-
130
-
131
-
132
-
133
-
134
-
135
-
136
-
137
-
138
-
139
-
140
-
141
-
142
-
143
-
144
-
145
-
146
-
147
-
148
-
149
-
150
-
151
-
152
-
153
-
154
-
155
-
156
-
157
-
158
-
159
-
160
-
161
-
162
-
163
-
164
-
165
-
166
-
167
-
168
-
169
-
170
-
171
-
172
-
173
-
174
-
175
-
176
-
177
-
178
-
179
-
180
-
181
-
182
-
183
-
184
-
185
-
186
-
187
-
188
-
189
-
190
-
191
-
192
-
193
-
194
-
195
-
196
-
197
-
198
-
199
-
200
-
201
-
202
-
203
-
204
-
205
-
206
-
207
-
208
-
209
-
210
-
211
-
212
-
213
-
214
-
215
-
216
-
217
-
218
-
219
-
220
-
221
-
222
-
223
-
224
-
225
-
226
-
227
-
228
-
229
-
230
-
231
-
232
-
233
-
234
-
235
-
236
-
237
-
238
-
239
-
240
-
241
-
242
-
243
-
244
-
245
-
246
-
247
-
248
-
249
-
250
-
251
-
252
-
253
-
254
-
255
-
256
-
257
-
258
-
259
-
260
-
261
-
262
-
263
-
264
-
265
-
266
-
267
-
268
-
269
-
270
-
271
-
272
-
273
-
274
-
275
-
276
-
277
-
278
-
279
-
280
-
281
-
282
-
283
-
284
-
285
-
286
-
287
-
288
-
289
-
290
-
291
-
292
-
293
 |
 |
