HP d640 HP D640 High-Volume Printer - User Manual (Printer and Accessories), C - Page 162
Installing the HCI Lower Pick Rollers, Installing Lower Roller Assembly
 |
View all HP d640 manuals
Add to My Manuals
Save this manual to your list of manuals |
Page 162 highlights
HCI Pick Roller Kit - Replacing the HCI Pick Rollers Installing the HCI Lower Pick Rollers 1. Hold the lower roller assembly and slide the front (closest) shaft into the front metal retaining clip. Slide the back shaft into the back retaining clip. See Figure 4-68. Figure 4-68 Installing Lower Roller Assembly 2. Snap the white plastic clip into place. It fits over a groove on the back end of the shaft to secure the lower rollers (See Figure 4-69.) If you don't see this groove, the rollers may not be completely seated all the way onto the shaft. Figure 4-69 Installing Clip onto Lower Roller Assembly Ordering and Replacing Consumables 4-49 Consumables
-
 1
1 -
2
-
3
-
4
-
5
-
6
-
7
-
8
-
9
-
10
-
11
-
12
-
13
-
14
-
15
-
16
-
17
-
18
-
19
-
20
-
21
-
22
-
23
-
24
-
25
-
26
-
27
-
28
-
29
-
30
-
31
-
32
-
33
-
34
-
35
-
36
-
37
-
38
-
39
-
40
-
41
-
42
-
43
-
44
-
45
-
46
-
47
-
48
-
49
-
50
-
51
-
52
-
53
-
54
-
55
-
56
-
57
-
58
-
59
-
60
-
61
-
62
-
63
-
64
-
65
-
66
-
67
-
68
-
69
-
70
-
71
-
72
-
73
-
74
-
75
-
76
-
77
-
78
-
79
-
80
-
81
-
82
-
83
-
84
-
85
-
86
-
87
-
88
-
89
-
90
-
91
-
92
-
93
-
94
-
95
-
96
-
97
-
98
-
99
-
100
-
101
-
102
-
103
-
104
-
105
-
106
-
107
-
108
-
109
-
110
-
111
-
112
-
113
-
114
-
115
-
116
-
117
-
118
-
119
-
120
-
121
-
122
-
123
-
124
-
125
-
126
-
127
-
128
-
129
-
130
-
131
-
132
-
133
-
134
-
135
-
136
-
137
-
138
-
139
-
140
-
141
-
142
-
143
-
144
-
145
-
146
-
147
-
148
-
149
-
150
-
151
-
152
-
153
-
154
-
155
-
156
-
 157
157 -
 158
158 -
 159
159 -
 160
160 -
 161
161 -
 162
162 -
 163
163 -
 164
164 -
 165
165 -
 166
166 -
 167
167 -
168
-
169
-
170
-
171
-
172
-
173
-
174
-
175
-
176
-
177
-
178
-
179
-
180
-
181
-
182
-
183
-
184
-
185
-
186
-
187
-
188
-
189
-
190
-
191
-
192
-
193
-
194
-
195
-
196
-
197
-
198
-
199
-
200
-
201
-
202
-
203
-
204
-
205
-
206
-
207
-
208
-
209
-
210
-
211
-
212
-
213
-
214
-
215
-
216
-
217
-
218
-
219
-
220
-
221
-
222
-
223
-
224
-
225
-
226
-
227
-
228
-
229
-
230
-
231
-
232
-
233
-
234
-
235
-
236
-
237
-
238
-
239
-
240
-
241
-
242
-
243
-
244
-
245
-
246
-
247
-
248
-
249
-
250
-
251
-
252
-
253
-
254
-
255
-
256
-
257
-
258
-
259
-
260
-
261
-
262
-
263
-
264
-
265
-
266
-
267
-
268
-
269
-
270
-
271
-
272
-
273
-
274
-
275
-
276
-
277
-
278
-
279
-
280
-
281
-
282
-
283
-
284
-
285
-
286
-
287
-
288
-
289
-
290
-
291
-
292
-
293
 |
 |

HCI Pick Roller Kit - Replacing the HCI Pick Rollers
Ordering and Replacing Consumables
4-49
Consumables
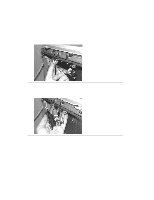
Installing the HCI Lower Pick Rollers
1.
Hold the lower roller assembly and slide the front (closest) shaft into the front metal
retaining clip. Slide the back shaft into the back retaining clip. See Figure 4-68.
Figure 4-68
Installing Lower Roller Assembly
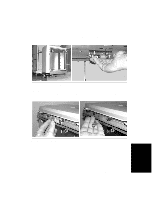
2.
Snap the white plastic clip into place. It fits over a groove on the back end of the shaft to
secure the lower rollers (See Figure
4-69.) If you don’t see this groove, the rollers may
not be completely seated all the way onto the shaft.
Figure 4-69
Installing Clip onto Lower Roller Assembly