HP d640 HP D640 High-Volume Printer - User Manual (Printer and Accessories), C - Page 140
Installing the New Transfer Assembly, assembly, insert the alignment
 |
View all HP d640 manuals
Add to My Manuals
Save this manual to your list of manuals |
Page 140 highlights
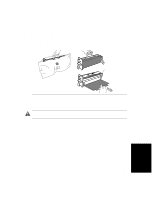
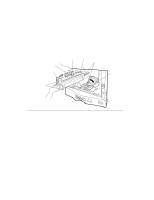
Drum Kit - Replacing Drum and Transfer Assembly Installing the New Transfer Assembly 1. Remove the transfer assembly from its packaging. Caution As you handle the transfer assembly, take care not to touch or damage the transfer wire. 2. Using the alignment pin located on the end of the transfer assembly, insert the alignment pin of the transfer assembly into the left rail of the transfer assembly guide and push in to the end of the guide as shown in Figure 4-31. Transfer assembly guide Transfer assembly Transfer assembly guide Pin Transfer assembly Wire LTR Figure 4-31 Inserting the Transfer Assembly into the Guide Consumables Ordering and Replacing Consumables 4-27
-
 1
1 -
2
-
3
-
4
-
5
-
6
-
7
-
8
-
9
-
10
-
11
-
12
-
13
-
14
-
15
-
16
-
17
-
18
-
19
-
20
-
21
-
22
-
23
-
24
-
25
-
26
-
27
-
28
-
29
-
30
-
31
-
32
-
33
-
34
-
35
-
36
-
37
-
38
-
39
-
40
-
41
-
42
-
43
-
44
-
45
-
46
-
47
-
48
-
49
-
50
-
51
-
52
-
53
-
54
-
55
-
56
-
57
-
58
-
59
-
60
-
61
-
62
-
63
-
64
-
65
-
66
-
67
-
68
-
69
-
70
-
71
-
72
-
73
-
74
-
75
-
76
-
77
-
78
-
79
-
80
-
81
-
82
-
83
-
84
-
85
-
86
-
87
-
88
-
89
-
90
-
91
-
92
-
93
-
94
-
95
-
96
-
97
-
98
-
99
-
100
-
101
-
102
-
103
-
104
-
105
-
106
-
107
-
108
-
109
-
110
-
111
-
112
-
113
-
114
-
115
-
116
-
117
-
118
-
119
-
120
-
121
-
122
-
123
-
124
-
125
-
126
-
127
-
128
-
129
-
130
-
131
-
132
-
133
-
134
-
 135
135 -
 136
136 -
 137
137 -
 138
138 -
 139
139 -
 140
140 -
 141
141 -
 142
142 -
 143
143 -
 144
144 -
 145
145 -
146
-
147
-
148
-
149
-
150
-
151
-
152
-
153
-
154
-
155
-
156
-
157
-
158
-
159
-
160
-
161
-
162
-
163
-
164
-
165
-
166
-
167
-
168
-
169
-
170
-
171
-
172
-
173
-
174
-
175
-
176
-
177
-
178
-
179
-
180
-
181
-
182
-
183
-
184
-
185
-
186
-
187
-
188
-
189
-
190
-
191
-
192
-
193
-
194
-
195
-
196
-
197
-
198
-
199
-
200
-
201
-
202
-
203
-
204
-
205
-
206
-
207
-
208
-
209
-
210
-
211
-
212
-
213
-
214
-
215
-
216
-
217
-
218
-
219
-
220
-
221
-
222
-
223
-
224
-
225
-
226
-
227
-
228
-
229
-
230
-
231
-
232
-
233
-
234
-
235
-
236
-
237
-
238
-
239
-
240
-
241
-
242
-
243
-
244
-
245
-
246
-
247
-
248
-
249
-
250
-
251
-
252
-
253
-
254
-
255
-
256
-
257
-
258
-
259
-
260
-
261
-
262
-
263
-
264
-
265
-
266
-
267
-
268
-
269
-
270
-
271
-
272
-
273
-
274
-
275
-
276
-
277
-
278
-
279
-
280
-
281
-
282
-
283
-
284
-
285
-
286
-
287
-
288
-
289
-
290
-
291
-
292
-
293
 |
 |

Drum Kit - Replacing Drum and Transfer Assembly
Ordering and Replacing Consumables
4-27
Consumables
Installing the New Transfer Assembly
1.
Remove the transfer
assembly from its packaging.
Caution
As you handle the transfer assembly, take care not to touch or damage the
transfer wire.
2.
Using the alignment pin located on the end of the transfer
assembly, insert the alignment
pin of the transfer
assembly into the left rail of the transfer
assembly guide and push in
to the end of the guide as shown in Figure 4-31.
Figure 4-31
Inserting the Transfer Assembly into the Guide
Transfer assembly
Wire
Transfer assembly guide
LTR
Transfer assembly
Transfer assembly guide
Pin