HP d640 HP D640 High-Volume Printer - User Manual (Printer and Accessories), C - Page 143
Removing the Fuser, Fuser
 |
View all HP d640 manuals
Add to My Manuals
Save this manual to your list of manuals |
Page 143 highlights
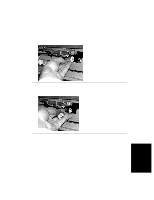
Fuser Kit - Replacing the Fuser Removing the Fuser To remove the fuser: 1. Open the front door. 2. Turn the fuser locking knob counterclockwise several times to release the fuser, as shown in Figure 4-34. Fuser locking knob LTR Figure 4-34 Releasing the Fuser Locking Knob WARNING! The fuser may be hot. Avoid touching the fuser surfaces labeled as hot. 3. Pull the fuser out, supporting it with your hand, as shown in Figure 4-35. Fuser LTR Figure 4-35 Pulling the Fuser out 4-30 Ordering and Replacing Consumables
-
 1
1 -
2
-
3
-
4
-
5
-
6
-
7
-
8
-
9
-
10
-
11
-
12
-
13
-
14
-
15
-
16
-
17
-
18
-
19
-
20
-
21
-
22
-
23
-
24
-
25
-
26
-
27
-
28
-
29
-
30
-
31
-
32
-
33
-
34
-
35
-
36
-
37
-
38
-
39
-
40
-
41
-
42
-
43
-
44
-
45
-
46
-
47
-
48
-
49
-
50
-
51
-
52
-
53
-
54
-
55
-
56
-
57
-
58
-
59
-
60
-
61
-
62
-
63
-
64
-
65
-
66
-
67
-
68
-
69
-
70
-
71
-
72
-
73
-
74
-
75
-
76
-
77
-
78
-
79
-
80
-
81
-
82
-
83
-
84
-
85
-
86
-
87
-
88
-
89
-
90
-
91
-
92
-
93
-
94
-
95
-
96
-
97
-
98
-
99
-
100
-
101
-
102
-
103
-
104
-
105
-
106
-
107
-
108
-
109
-
110
-
111
-
112
-
113
-
114
-
115
-
116
-
117
-
118
-
119
-
120
-
121
-
122
-
123
-
124
-
125
-
126
-
127
-
128
-
129
-
130
-
131
-
132
-
133
-
134
-
135
-
136
-
137
-
 138
138 -
 139
139 -
 140
140 -
 141
141 -
 142
142 -
 143
143 -
 144
144 -
 145
145 -
 146
146 -
 147
147 -
 148
148 -
149
-
150
-
151
-
152
-
153
-
154
-
155
-
156
-
157
-
158
-
159
-
160
-
161
-
162
-
163
-
164
-
165
-
166
-
167
-
168
-
169
-
170
-
171
-
172
-
173
-
174
-
175
-
176
-
177
-
178
-
179
-
180
-
181
-
182
-
183
-
184
-
185
-
186
-
187
-
188
-
189
-
190
-
191
-
192
-
193
-
194
-
195
-
196
-
197
-
198
-
199
-
200
-
201
-
202
-
203
-
204
-
205
-
206
-
207
-
208
-
209
-
210
-
211
-
212
-
213
-
214
-
215
-
216
-
217
-
218
-
219
-
220
-
221
-
222
-
223
-
224
-
225
-
226
-
227
-
228
-
229
-
230
-
231
-
232
-
233
-
234
-
235
-
236
-
237
-
238
-
239
-
240
-
241
-
242
-
243
-
244
-
245
-
246
-
247
-
248
-
249
-
250
-
251
-
252
-
253
-
254
-
255
-
256
-
257
-
258
-
259
-
260
-
261
-
262
-
263
-
264
-
265
-
266
-
267
-
268
-
269
-
270
-
271
-
272
-
273
-
274
-
275
-
276
-
277
-
278
-
279
-
280
-
281
-
282
-
283
-
284
-
285
-
286
-
287
-
288
-
289
-
290
-
291
-
292
-
293
 |
 |

Fuser Kit - Replacing the Fuser
4-30
Ordering and Replacing Consumables
Removing the Fuser
To remove the
fuser:
1.
Open the front door.
2.
Turn the fuser
locking
knob counterclockwise several times to release the fuser, as
shown in Figure 4-34.
Figure 4-34
Releasing the Fuser Locking Knob
WARNING!
The fuser may be hot. Avoid touching the fuser surfaces labeled as hot.
3.
Pull the fuser
out, supporting it with your hand, as shown in Figure 4-35.
Figure 4-35
Pulling the Fuser out
LTR
Fuser locking knob
Fuser
LTR