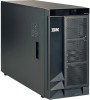
IBM 88410EU User Manual - Page 107
Small, computer, system, interface, messages, Recovering
 |
View all IBM 88410EU manuals
Add to My Manuals
Save this manual to your list of manuals |
Page 107 highlights
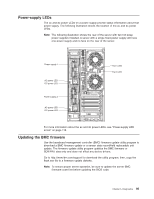
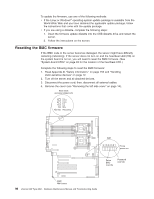
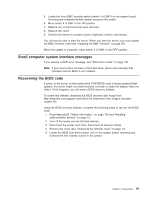
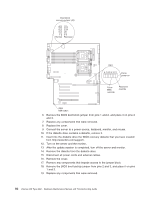
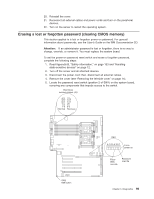
5. Locate the force BMC override switch (switch 4 of SW1) on the system board, removing any components that impede access to the switch. 6. Move switch 4 of SW1 to the ON position. 7. Replace any components that were removed. 8. Replace the cover. 9. Connect the server to a power source, keyboard, monitor, and mouse. You will now be able to start the server. When you start the server, you must update the BMC firmware code (see "Updating the BMC firmware" on page 95). When the update is complete, return switch 4 of SW1 to the OFF position. Small computer system interface messages If you receive a SCSI error message, see "SCSI error codes" on page 132. Note: If your server does not have a hard disk drive, ignore any message that indicates that the BIOS is not installed. Recovering the BIOS code If power to the server is interrupted while POST/BIOS code is being updated (flash update), the server might not restart (reboot) correctly or might not display video (no video). If this happens, you will need a BIOS recovery diskette. To create this diskette, download the BIOS recovery disk image from http://www.ibm.com/support/ and follow the directions in the image's included readme file. Using the BIOS recovery diskette, complete the following steps to recover the BIOS code: 1. Read Appendix B, "Safety information," on page 153 and "Handling static-sensitive devices" on page 12. 2. Turn off the server and all attached devices. 3. Disconnect the power cord; then, disconnect all external cables. 4. Remove the cover (see "Removing the left-side cover" on page 14). 5. Locate the BIOS boot block jumper (J5) on the system board, removing any components that impede access to the jumper. Chapter 5. Diagnostics 97
-
 1
1 -
2
-
3
-
4
-
5
-
6
-
7
-
8
-
9
-
10
-
11
-
12
-
13
-
14
-
15
-
16
-
17
-
18
-
19
-
20
-
21
-
22
-
23
-
24
-
25
-
26
-
27
-
28
-
29
-
30
-
31
-
32
-
33
-
34
-
35
-
36
-
37
-
38
-
39
-
40
-
41
-
42
-
43
-
44
-
45
-
46
-
47
-
48
-
49
-
50
-
51
-
52
-
53
-
54
-
55
-
56
-
57
-
58
-
59
-
60
-
61
-
62
-
63
-
64
-
65
-
66
-
67
-
68
-
69
-
70
-
71
-
72
-
73
-
74
-
75
-
76
-
77
-
78
-
79
-
80
-
81
-
82
-
83
-
84
-
85
-
86
-
87
-
88
-
89
-
90
-
91
-
92
-
93
-
94
-
95
-
96
-
97
-
98
-
99
-
100
-
101
-
 102
102 -
 103
103 -
 104
104 -
 105
105 -
 106
106 -
 107
107 -
 108
108 -
 109
109 -
 110
110 -
 111
111 -
 112
112 -
113
-
114
-
115
-
116
-
117
-
118
-
119
-
120
-
121
-
122
-
123
-
124
-
125
-
126
-
127
-
128
-
129
-
130
-
131
-
132
-
133
-
134
-
135
-
136
-
137
-
138
-
139
-
140
-
141
-
142
-
143
-
144
-
145
-
146
-
147
-
148
-
149
-
150
-
151
-
152
-
153
-
154
-
155
-
156
-
157
-
158
-
159
-
160
-
161
-
162
-
163
-
164
-
165
-
166
-
167
-
168
-
169
-
170
-
171
-
172
-
173
-
174
-
175
-
176
-
177
-
178
-
179
-
180
-
181
-
182
-
183
-
184
-
185
-
186
-
187
-
188
-
189
-
190
-
191
-
192
-
193
-
194
-
195
-
196
-
197
-
198
-
199
-
200
-
201
-
202
-
203
-
204
-
205
-
206
-
207
-
208
-
209
-
210
 |
 |
