IBM 88410EU User Manual - Page 29
Replacing, center
 |
View all IBM 88410EU manuals
Add to My Manuals
Save this manual to your list of manuals |
Page 29 highlights
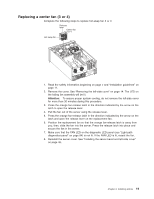
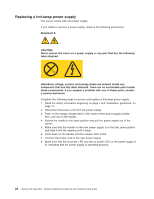
Replacing a center fan (3 or 4) Complete the following steps to replace hot-swap fan 3 or 4: Release lever Center fan 3 or 4 Hot-swap fan 1. Read the safety information beginning on page v and "Installation guidelines" on page 11. 2. Remove the cover. See "Removing the left-side cover" on page 14. The LED on the failing fan assembly will be lit. Attention: To ensure proper system cooling, do not remove the left-side cover for more than 30 minutes during this procedure. 3. Press the orange fan-release latch in the direction indicated by the arrow on the latch to open the release lever. 4. Pull the fan out of the server using the release lever. 5. Press the orange fan-release latch in the direction indicated by the arrow on the latch and open the release lever on the replacement fan. 6. Position the replacement fan so that the orange fan-release latch is away from you; then, slide the fan into the server. Press the release latch into place and secure the fan in the server. 7. Make sure that the FAN LED on the diagnostic LED panel (see "Light path diagnostics panel" on page 84) is not lit. If the FAN LED is lit, reseat the fan. 8. Reinstall the server cover. See "Installing the server bezel and left-side cover" on page 46. Chapter 3. Installing options 19
-
 1
1 -
2
-
3
-
4
-
5
-
6
-
7
-
8
-
9
-
10
-
11
-
12
-
13
-
14
-
15
-
16
-
17
-
18
-
19
-
20
-
21
-
22
-
23
-
 24
24 -
 25
25 -
 26
26 -
 27
27 -
 28
28 -
 29
29 -
 30
30 -
 31
31 -
 32
32 -
 33
33 -
 34
34 -
35
-
36
-
37
-
38
-
39
-
40
-
41
-
42
-
43
-
44
-
45
-
46
-
47
-
48
-
49
-
50
-
51
-
52
-
53
-
54
-
55
-
56
-
57
-
58
-
59
-
60
-
61
-
62
-
63
-
64
-
65
-
66
-
67
-
68
-
69
-
70
-
71
-
72
-
73
-
74
-
75
-
76
-
77
-
78
-
79
-
80
-
81
-
82
-
83
-
84
-
85
-
86
-
87
-
88
-
89
-
90
-
91
-
92
-
93
-
94
-
95
-
96
-
97
-
98
-
99
-
100
-
101
-
102
-
103
-
104
-
105
-
106
-
107
-
108
-
109
-
110
-
111
-
112
-
113
-
114
-
115
-
116
-
117
-
118
-
119
-
120
-
121
-
122
-
123
-
124
-
125
-
126
-
127
-
128
-
129
-
130
-
131
-
132
-
133
-
134
-
135
-
136
-
137
-
138
-
139
-
140
-
141
-
142
-
143
-
144
-
145
-
146
-
147
-
148
-
149
-
150
-
151
-
152
-
153
-
154
-
155
-
156
-
157
-
158
-
159
-
160
-
161
-
162
-
163
-
164
-
165
-
166
-
167
-
168
-
169
-
170
-
171
-
172
-
173
-
174
-
175
-
176
-
177
-
178
-
179
-
180
-
181
-
182
-
183
-
184
-
185
-
186
-
187
-
188
-
189
-
190
-
191
-
192
-
193
-
194
-
195
-
196
-
197
-
198
-
199
-
200
-
201
-
202
-
203
-
204
-
205
-
206
-
207
-
208
-
209
-
210
 |
 |
