IBM 88410EU User Manual - Page 44
Disabled, Memory, Settings, Attention
 |
View all IBM 88410EU manuals
Add to My Manuals
Save this manual to your list of manuals |
Page 44 highlights
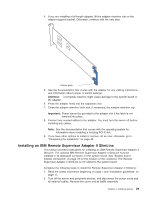
v You do not have to save new configuration information when installing or removing DIMMs. The only exception is if you replace a faulty DIMM that was marked as Disabled in the Memory Settings menu. In this case, you must re-enable that memory row in the Configuration/Setup Utility program or reload the default memory settings. See the User's Guide on the IBM xSeries Documentation CD for more information. v When you restart the server after adding or removing a DIMM, the server displays a message that the memory configuration has changed. The following illustration shows how to install a pair of DIMMs on the system board. DIMM 8 DIMM 7 DIMM 6 DIMM 5 DIMM 4 DIMM 3 DIMM 2 DIMM 1 Complete the following steps to install a pair of DIMMs: 1. Read the safety information beginning on page v and "Installation guidelines" on page 11. 2. Turn off the server and peripheral devices, and disconnect the power cords and all external cables. Remove the cover and air-baffle assembly. Attention: To avoid breaking the retaining clips or damaging the DIMM connectors, open and close the clips gently. 3. Open the retaining clip on each end of the DIMM connector. 4. Touch the static-protective package containing the DIMM to any unpainted metal surface on the server. Then, remove the DIMM from the package. 5. Turn the DIMM so that the DIMM keys align correctly with the slot. 6. Insert the DIMM into the connector. 7. Repeat steps 1 through 6 for the second DIMM; then, continue to step 8. If you are replacing a single DIMM, continue to step 8. 8. If you have other options to install or remove, do so now. 9. Replace the air-baffle assembly and cover. Go to "Completing the installation" on page 45. 34 xSeries 236 Type 8841: Hardware Maintenance Manual and Troubleshooting Guide
-
 1
1 -
2
-
3
-
4
-
5
-
6
-
7
-
8
-
9
-
10
-
11
-
12
-
13
-
14
-
15
-
16
-
17
-
18
-
19
-
20
-
21
-
22
-
23
-
24
-
25
-
26
-
27
-
28
-
29
-
30
-
31
-
32
-
33
-
34
-
35
-
36
-
37
-
38
-
 39
39 -
 40
40 -
 41
41 -
 42
42 -
 43
43 -
 44
44 -
 45
45 -
 46
46 -
 47
47 -
 48
48 -
 49
49 -
50
-
51
-
52
-
53
-
54
-
55
-
56
-
57
-
58
-
59
-
60
-
61
-
62
-
63
-
64
-
65
-
66
-
67
-
68
-
69
-
70
-
71
-
72
-
73
-
74
-
75
-
76
-
77
-
78
-
79
-
80
-
81
-
82
-
83
-
84
-
85
-
86
-
87
-
88
-
89
-
90
-
91
-
92
-
93
-
94
-
95
-
96
-
97
-
98
-
99
-
100
-
101
-
102
-
103
-
104
-
105
-
106
-
107
-
108
-
109
-
110
-
111
-
112
-
113
-
114
-
115
-
116
-
117
-
118
-
119
-
120
-
121
-
122
-
123
-
124
-
125
-
126
-
127
-
128
-
129
-
130
-
131
-
132
-
133
-
134
-
135
-
136
-
137
-
138
-
139
-
140
-
141
-
142
-
143
-
144
-
145
-
146
-
147
-
148
-
149
-
150
-
151
-
152
-
153
-
154
-
155
-
156
-
157
-
158
-
159
-
160
-
161
-
162
-
163
-
164
-
165
-
166
-
167
-
168
-
169
-
170
-
171
-
172
-
173
-
174
-
175
-
176
-
177
-
178
-
179
-
180
-
181
-
182
-
183
-
184
-
185
-
186
-
187
-
188
-
189
-
190
-
191
-
192
-
193
-
194
-
195
-
196
-
197
-
198
-
199
-
200
-
201
-
202
-
203
-
204
-
205
-
206
-
207
-
208
-
209
-
210
 |
 |
