IBM 88410EU User Manual - Page 33
electrical
 |
View all IBM 88410EU manuals
Add to My Manuals
Save this manual to your list of manuals |
Page 33 highlights
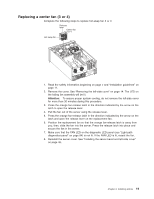
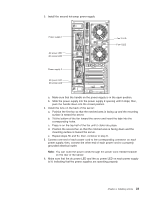
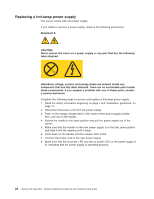
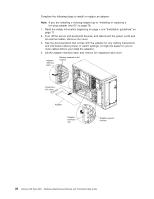
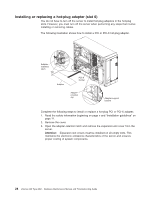
3. Install the second hot-swap power-supply. Power supply 1 AC power LED DC power LED Power supply 2 AC power LED DC power LED Fan 5 LED Fan 6 LED a. Make sure that the handle on the power supply is in the open position. b. Slide the power supply into the power supply 2 opening until it stops; then, push the handle down into the closed position. 4. Install the fans on the back of the server: a. Position the first fan so that the notched area is facing up and the mounting surface is toward the server. b. Tilt the bottom of the fan toward the server and insert the tabs into the corresponding holes. c. Press in on the top half of the fan until it clicks into place. d. Position the second fan so that the notched area is facing down and the mounting surface is toward the server. e. Repeat steps 5b and 5c; then, continue to step 6. 5. Connect one end of each power cord to the corresponding connector on each power supply; then, connect the other end of each power cord to a properly grounded electrical outlet. Note: You can route the power cords through the power-cord restraint bracket on the rear of the server. 6. Make sure that the dc power LED and the ac power LED on each power supply is lit, indicating that the power supplies are operating properly. Chapter 3. Installing options 23
-
 1
1 -
2
-
3
-
4
-
5
-
6
-
7
-
8
-
9
-
10
-
11
-
12
-
13
-
14
-
15
-
16
-
17
-
18
-
19
-
20
-
21
-
22
-
23
-
24
-
25
-
26
-
27
-
 28
28 -
 29
29 -
 30
30 -
 31
31 -
 32
32 -
 33
33 -
 34
34 -
 35
35 -
 36
36 -
 37
37 -
 38
38 -
39
-
40
-
41
-
42
-
43
-
44
-
45
-
46
-
47
-
48
-
49
-
50
-
51
-
52
-
53
-
54
-
55
-
56
-
57
-
58
-
59
-
60
-
61
-
62
-
63
-
64
-
65
-
66
-
67
-
68
-
69
-
70
-
71
-
72
-
73
-
74
-
75
-
76
-
77
-
78
-
79
-
80
-
81
-
82
-
83
-
84
-
85
-
86
-
87
-
88
-
89
-
90
-
91
-
92
-
93
-
94
-
95
-
96
-
97
-
98
-
99
-
100
-
101
-
102
-
103
-
104
-
105
-
106
-
107
-
108
-
109
-
110
-
111
-
112
-
113
-
114
-
115
-
116
-
117
-
118
-
119
-
120
-
121
-
122
-
123
-
124
-
125
-
126
-
127
-
128
-
129
-
130
-
131
-
132
-
133
-
134
-
135
-
136
-
137
-
138
-
139
-
140
-
141
-
142
-
143
-
144
-
145
-
146
-
147
-
148
-
149
-
150
-
151
-
152
-
153
-
154
-
155
-
156
-
157
-
158
-
159
-
160
-
161
-
162
-
163
-
164
-
165
-
166
-
167
-
168
-
169
-
170
-
171
-
172
-
173
-
174
-
175
-
176
-
177
-
178
-
179
-
180
-
181
-
182
-
183
-
184
-
185
-
186
-
187
-
188
-
189
-
190
-
191
-
192
-
193
-
194
-
195
-
196
-
197
-
198
-
199
-
200
-
201
-
202
-
203
-
204
-
205
-
206
-
207
-
208
-
209
-
210
 |
 |
