IBM 88410EU User Manual - Page 40
Interposer
 |
View all IBM 88410EU manuals
Add to My Manuals
Save this manual to your list of manuals |
Page 40 highlights
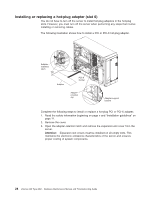
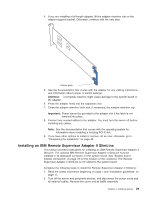
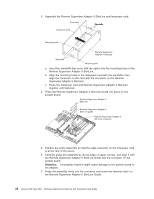
3. Assemble the Remote Supervisor Adapter II SlimLine and Interposer card: Connector Standoffs Interposer card Mounting hole Remote Supervisor Adapter II SlimLine Standoffs Mounting hole a. Insert the standoffs that come with the option into the mounting holes in the Remote Supervisor Adapter II SlimLine. b. Align the mounting holes in the Interposer card with the standoffs; then, align the connector on the card with the connector on the Remote Supervisor Adapter II SlimLine. c. Press the Interposer card and Remote Supervisor Adapter II SlimLine together until fastened. 4. Press the Remote Supervisor Adapter II SlimLine Guide into place on the system board. Remote Supervisor Adapter II SlimLine Remote Supervisor Adapter II SlimLine guide Remote Supervisor Adapter II SlimLine connector 5. Position the entire assembly so that the edge connector on the Interposer card is at the rear of the server. 6. Carefully grasp the assembly by its top edge or upper corners, and align it with the Remote Supervisor Adapter II SlimLine Guide and the connector on the system board. Attention: Incomplete insertion might cause damage to the system board or the adapter. 7. Press the assembly firmly into the connector and under the retention latch on the Remote Supervisor Adapter II SlimLine Guide. 30 xSeries 236 Type 8841: Hardware Maintenance Manual and Troubleshooting Guide
-
 1
1 -
2
-
3
-
4
-
5
-
6
-
7
-
8
-
9
-
10
-
11
-
12
-
13
-
14
-
15
-
16
-
17
-
18
-
19
-
20
-
21
-
22
-
23
-
24
-
25
-
26
-
27
-
28
-
29
-
30
-
31
-
32
-
33
-
34
-
 35
35 -
 36
36 -
 37
37 -
 38
38 -
 39
39 -
 40
40 -
 41
41 -
 42
42 -
 43
43 -
 44
44 -
 45
45 -
46
-
47
-
48
-
49
-
50
-
51
-
52
-
53
-
54
-
55
-
56
-
57
-
58
-
59
-
60
-
61
-
62
-
63
-
64
-
65
-
66
-
67
-
68
-
69
-
70
-
71
-
72
-
73
-
74
-
75
-
76
-
77
-
78
-
79
-
80
-
81
-
82
-
83
-
84
-
85
-
86
-
87
-
88
-
89
-
90
-
91
-
92
-
93
-
94
-
95
-
96
-
97
-
98
-
99
-
100
-
101
-
102
-
103
-
104
-
105
-
106
-
107
-
108
-
109
-
110
-
111
-
112
-
113
-
114
-
115
-
116
-
117
-
118
-
119
-
120
-
121
-
122
-
123
-
124
-
125
-
126
-
127
-
128
-
129
-
130
-
131
-
132
-
133
-
134
-
135
-
136
-
137
-
138
-
139
-
140
-
141
-
142
-
143
-
144
-
145
-
146
-
147
-
148
-
149
-
150
-
151
-
152
-
153
-
154
-
155
-
156
-
157
-
158
-
159
-
160
-
161
-
162
-
163
-
164
-
165
-
166
-
167
-
168
-
169
-
170
-
171
-
172
-
173
-
174
-
175
-
176
-
177
-
178
-
179
-
180
-
181
-
182
-
183
-
184
-
185
-
186
-
187
-
188
-
189
-
190
-
191
-
192
-
193
-
194
-
195
-
196
-
197
-
198
-
199
-
200
-
201
-
202
-
203
-
204
-
205
-
206
-
207
-
208
-
209
-
210
 |
 |
