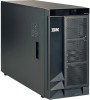
IBM 88410EU User Manual - Page 30
Replacing
 |
View all IBM 88410EU manuals
Add to My Manuals
Save this manual to your list of manuals |
Page 30 highlights
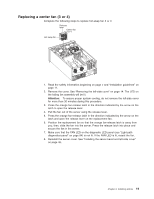
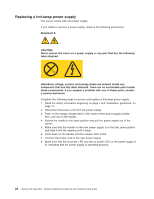
Replacing a rear fan (5 or 6) Hot-swap fans 5 and 6 are included in the power-supply option. With these two additional hot-swap fans installed, the server supports the variable fan-speed control and redundant cooling features. For information on installing the option see "Installing the 670-Watt hot-swap power-supply option" on page 21. Rear fan 5 or 6 Fan-release latch Complete the following steps to replace hot-swap-fans 5 and 6: 1. Read the safety information beginning on page v and "Installation guidelines" on page 11. 2. Press in on the orange fan-release latch on the side of the fan; then, rotate the fan away from the server. 3. Pull the fan off the server. 4. Slide the two tabs of the replacement fan into the back of the server; then, rotate the fan toward the server until the fan-release latch clicks. 5. Make sure that the FAN LED on the diagnostic LED panel (see "Light path diagnostics panel" on page 84) is not lit. If the FAN LED is lit, reseat the fan. 20 xSeries 236 Type 8841: Hardware Maintenance Manual and Troubleshooting Guide
-
 1
1 -
2
-
3
-
4
-
5
-
6
-
7
-
8
-
9
-
10
-
11
-
12
-
13
-
14
-
15
-
16
-
17
-
18
-
19
-
20
-
21
-
22
-
23
-
24
-
 25
25 -
 26
26 -
 27
27 -
 28
28 -
 29
29 -
 30
30 -
 31
31 -
 32
32 -
 33
33 -
 34
34 -
 35
35 -
36
-
37
-
38
-
39
-
40
-
41
-
42
-
43
-
44
-
45
-
46
-
47
-
48
-
49
-
50
-
51
-
52
-
53
-
54
-
55
-
56
-
57
-
58
-
59
-
60
-
61
-
62
-
63
-
64
-
65
-
66
-
67
-
68
-
69
-
70
-
71
-
72
-
73
-
74
-
75
-
76
-
77
-
78
-
79
-
80
-
81
-
82
-
83
-
84
-
85
-
86
-
87
-
88
-
89
-
90
-
91
-
92
-
93
-
94
-
95
-
96
-
97
-
98
-
99
-
100
-
101
-
102
-
103
-
104
-
105
-
106
-
107
-
108
-
109
-
110
-
111
-
112
-
113
-
114
-
115
-
116
-
117
-
118
-
119
-
120
-
121
-
122
-
123
-
124
-
125
-
126
-
127
-
128
-
129
-
130
-
131
-
132
-
133
-
134
-
135
-
136
-
137
-
138
-
139
-
140
-
141
-
142
-
143
-
144
-
145
-
146
-
147
-
148
-
149
-
150
-
151
-
152
-
153
-
154
-
155
-
156
-
157
-
158
-
159
-
160
-
161
-
162
-
163
-
164
-
165
-
166
-
167
-
168
-
169
-
170
-
171
-
172
-
173
-
174
-
175
-
176
-
177
-
178
-
179
-
180
-
181
-
182
-
183
-
184
-
185
-
186
-
187
-
188
-
189
-
190
-
191
-
192
-
193
-
194
-
195
-
196
-
197
-
198
-
199
-
200
-
201
-
202
-
203
-
204
-
205
-
206
-
207
-
208
-
209
-
210
 |
 |
