Konica Minolta AccurioPress C2060 IC-314 User Guide - Page 106
Tools, Profiling Tool, Print and measure chart, Measuring device, Warm up copies, Screening
 |
View all Konica Minolta AccurioPress C2060 manuals
Add to My Manuals
Save this manual to your list of manuals |
Page 106 highlights
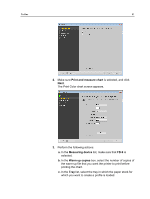
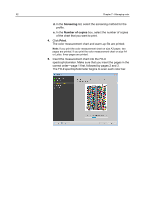
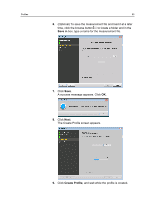
96 Chapter 7-Managing color Follow the procedure below to measure a color chart and create a profile using the Konica Minolta FD-5/FD-7 spectrophotometer. 1. From the Tools menu, select Profiling Tool. 2. Select Print and measure chart. 3. Click Next. 4. Perform the following actions: a. In the Measuring device list, select the FD-5/FD-7 spectrophotometer as the measuring device that you will use to measure the color chart. b. In the Warm up copies box, select the number of copies of the warm-up file that you want to print. c. In the Tray list, select the tray in which the paper stock for which you want to create a profile is loaded. d. In the Screening list, select the screening method for the profile. e. In the Calibration list, select the relevant calibration table. Latest is the default setting (highly recommended). f. In the Number of copies box, select the number of copies of the chart that you want to print. 5. Click Print. The color measurement chart and the warm-up file are printed. 6. Place the color measurement chart on a clean flat surface. 7. Click Measure and perform the following actions. a. Place the ruler on the chart and align the opening to the first row of the chart indicated by the arrow in the wizard screen. b. Place the instrument's two feet in the ruler grooves and align the specimen measuring port with the position where it touches the ruler's opening (on the left side of the ruler). c. Press the measuring button. After approximately one second the device beeps.
-
 1
1 -
2
-
3
-
4
-
5
-
6
-
7
-
8
-
9
-
10
-
11
-
12
-
13
-
14
-
15
-
16
-
17
-
18
-
19
-
20
-
21
-
22
-
23
-
24
-
25
-
26
-
27
-
28
-
29
-
30
-
31
-
32
-
33
-
34
-
35
-
36
-
37
-
38
-
39
-
40
-
41
-
42
-
43
-
44
-
45
-
46
-
47
-
48
-
49
-
50
-
51
-
52
-
53
-
54
-
55
-
56
-
57
-
58
-
59
-
60
-
61
-
62
-
63
-
64
-
65
-
66
-
67
-
68
-
69
-
70
-
71
-
72
-
73
-
74
-
75
-
76
-
77
-
78
-
79
-
80
-
81
-
82
-
83
-
84
-
85
-
86
-
87
-
88
-
89
-
90
-
91
-
92
-
93
-
94
-
95
-
96
-
97
-
98
-
99
-
100
-
 101
101 -
 102
102 -
 103
103 -
 104
104 -
 105
105 -
 106
106 -
 107
107 -
 108
108 -
 109
109 -
 110
110 -
 111
111 -
112
-
113
-
114
-
115
-
116
-
117
-
118
-
119
-
120
-
121
-
122
-
123
-
124
-
125
-
126
-
127
-
128
-
129
-
130
-
131
-
132
-
133
-
134
-
135
-
136
-
137
-
138
-
139
-
140
-
141
-
142
-
143
-
144
-
145
-
146
-
147
-
148
-
149
-
150
-
151
-
152
-
153
-
154
-
155
-
156
-
157
-
158
-
159
-
160
-
161
-
162
-
163
-
164
-
165
-
166
-
167
-
168
-
169
-
170
-
171
-
172
-
173
-
174
-
175
-
176
-
177
-
178
-
179
-
180
-
181
-
182
-
183
-
184
-
185
-
186
-
187
-
188
-
189
-
190
-
191
-
192
-
193
-
194
-
195
-
196
-
197
-
198
-
199
-
200
-
201
-
202
-
203
-
204
-
205
-
206
-
207
-
208
-
209
-
210
-
211
-
212
-
213
-
214
-
215
-
216
-
217
-
218
-
219
-
220
-
221
-
222
-
223
-
224
-
225
-
226
-
227
-
228
-
229
-
230
-
231
-
232
-
233
-
234
-
235
-
236
-
237
-
238
-
239
-
240
-
241
-
242
-
243
-
244
-
245
-
246
-
247
-
248
-
249
-
250
-
251
-
252
-
253
-
254
-
255
-
256
-
257
-
258
-
259
-
260
-
261
-
262
-
263
-
264
-
265
-
266
-
267
-
268
-
269
-
270
-
271
-
272
-
273
-
274
-
275
-
276
-
277
-
278
-
279
-
280
-
281
 |
 |
