Konica Minolta AccurioPress C2060 IC-314 User Guide - Page 37
Calibration, Calibration overview
 |
View all Konica Minolta AccurioPress C2060 manuals
Add to My Manuals
Save this manual to your list of manuals |
Page 37 highlights
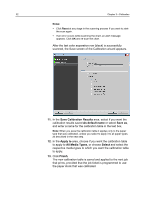
3 Calibration Calibration overview One of the most important issues is steady toner density. Toner density is affected by diverse factors, such as heat, humidity, and service settings. Toner density also tends to vary over time. Such variations cannot be totally eliminated, but you can perform the calibration process to compensate for them. The calibration process consists of creating calibration tables that are mapped to a specific media type and screening method. You create calibration tables using the Color Calibration wizard. The Color Calibration wizard guides you through printing a color chart, scanning the streams of color patches in the color chart, and creating a calibration table based on the scanned measurements. The IC‑314 print controller version 1.0 uses the data in this table to compensate for the differences between the actual, measured density level and the target density level. You should create calibration tables in the following instances: ● Every 24 hours, to compensate for potential variations in toner density ● When prints show "color casts" ● After machine maintenance or hardware changes ● If there are drastic ambient changes (temperature and humidity) In the job parameters window, under Color > Calibration, the option is selected by default. Any job that meets the media attributes that you selected during the calibration process will automatically be mapped or linked to that calibration table. When you send your job to print, the linked calibration table is automatically used for printing the job. Creating calibration tables with the X-Rite i1/iSis/ i1iO spectrophotometer This section describes how to connect and use the X-Rite i1/iSis/ i1iO spectrophotometer to create calibration tables.
-
 1
1 -
2
-
3
-
4
-
5
-
6
-
7
-
8
-
9
-
10
-
11
-
12
-
13
-
14
-
15
-
16
-
17
-
18
-
19
-
20
-
21
-
22
-
23
-
24
-
25
-
26
-
27
-
28
-
29
-
30
-
31
-
 32
32 -
 33
33 -
 34
34 -
 35
35 -
 36
36 -
 37
37 -
 38
38 -
 39
39 -
 40
40 -
 41
41 -
 42
42 -
43
-
44
-
45
-
46
-
47
-
48
-
49
-
50
-
51
-
52
-
53
-
54
-
55
-
56
-
57
-
58
-
59
-
60
-
61
-
62
-
63
-
64
-
65
-
66
-
67
-
68
-
69
-
70
-
71
-
72
-
73
-
74
-
75
-
76
-
77
-
78
-
79
-
80
-
81
-
82
-
83
-
84
-
85
-
86
-
87
-
88
-
89
-
90
-
91
-
92
-
93
-
94
-
95
-
96
-
97
-
98
-
99
-
100
-
101
-
102
-
103
-
104
-
105
-
106
-
107
-
108
-
109
-
110
-
111
-
112
-
113
-
114
-
115
-
116
-
117
-
118
-
119
-
120
-
121
-
122
-
123
-
124
-
125
-
126
-
127
-
128
-
129
-
130
-
131
-
132
-
133
-
134
-
135
-
136
-
137
-
138
-
139
-
140
-
141
-
142
-
143
-
144
-
145
-
146
-
147
-
148
-
149
-
150
-
151
-
152
-
153
-
154
-
155
-
156
-
157
-
158
-
159
-
160
-
161
-
162
-
163
-
164
-
165
-
166
-
167
-
168
-
169
-
170
-
171
-
172
-
173
-
174
-
175
-
176
-
177
-
178
-
179
-
180
-
181
-
182
-
183
-
184
-
185
-
186
-
187
-
188
-
189
-
190
-
191
-
192
-
193
-
194
-
195
-
196
-
197
-
198
-
199
-
200
-
201
-
202
-
203
-
204
-
205
-
206
-
207
-
208
-
209
-
210
-
211
-
212
-
213
-
214
-
215
-
216
-
217
-
218
-
219
-
220
-
221
-
222
-
223
-
224
-
225
-
226
-
227
-
228
-
229
-
230
-
231
-
232
-
233
-
234
-
235
-
236
-
237
-
238
-
239
-
240
-
241
-
242
-
243
-
244
-
245
-
246
-
247
-
248
-
249
-
250
-
251
-
252
-
253
-
254
-
255
-
256
-
257
-
258
-
259
-
260
-
261
-
262
-
263
-
264
-
265
-
266
-
267
-
268
-
269
-
270
-
271
-
272
-
273
-
274
-
275
-
276
-
277
-
278
-
279
-
280
-
281
 |
 |