Konica Minolta AccurioPress C2060 IC-314 User Guide - Page 133
Creating and editing a gradation table, Important, Refresh, After
 |
View all Konica Minolta AccurioPress C2060 manuals
Add to My Manuals
Save this manual to your list of manuals |
Page 133 highlights
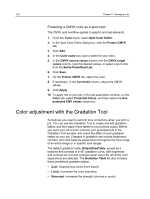
Creating and editing a gradation table 123 ● Sharp: Increases the contrast ● Warm: Sets the hues in the low densities to a bright reddish color Creating and editing a gradation table Correct gradation, brightness, and contrast in RTP files, and preview your changes before you send your job to print. Important: Gradation curves affect spot colors when applied to your job. 1. From the Tools menu, select Gradation. 2. Next to the Preview File box, click Browse. 3. Select the job that you want to preview, and then click Open. The Gradation Tool window appears with the Before and After views displaying your job. 4. Select the separations that you want to edit by performing one of the following actions: ○ Click the All Colors button simultaneously. to edit all the separations ○ Click the individual separation buttons for the separations that you want to edit-for example, click the cyan separation button only. 5. Click the curve in the graph to add a point, and then drag the point to modify the separation. The value appears in the Input or Output boxes. 6. To remove a point on the curve, select the point and then click Remove. 7. To reset the gradation curve to a 45° curve, click Reset. 8. To revert to the original gradation settings, click Revert. 9. To remove the last change you made to the gradation graph, click Undo. 10. To edit the brightness or contrast, move the slider. 11. To view gradation changes in your job, click Refresh. Changes are automatically applied to the displayed image in the After view. Note: When you change gradation table definitions in the Gradation Tool and click Refresh, you can see that the changes have affected the image in its entirety. Despite what you see in the After view, changes made to the gradation tables do not affect spot colors. 12. Click Save .
-
 1
1 -
2
-
3
-
4
-
5
-
6
-
7
-
8
-
9
-
10
-
11
-
12
-
13
-
14
-
15
-
16
-
17
-
18
-
19
-
20
-
21
-
22
-
23
-
24
-
25
-
26
-
27
-
28
-
29
-
30
-
31
-
32
-
33
-
34
-
35
-
36
-
37
-
38
-
39
-
40
-
41
-
42
-
43
-
44
-
45
-
46
-
47
-
48
-
49
-
50
-
51
-
52
-
53
-
54
-
55
-
56
-
57
-
58
-
59
-
60
-
61
-
62
-
63
-
64
-
65
-
66
-
67
-
68
-
69
-
70
-
71
-
72
-
73
-
74
-
75
-
76
-
77
-
78
-
79
-
80
-
81
-
82
-
83
-
84
-
85
-
86
-
87
-
88
-
89
-
90
-
91
-
92
-
93
-
94
-
95
-
96
-
97
-
98
-
99
-
100
-
101
-
102
-
103
-
104
-
105
-
106
-
107
-
108
-
109
-
110
-
111
-
112
-
113
-
114
-
115
-
116
-
117
-
118
-
119
-
120
-
121
-
122
-
123
-
124
-
125
-
126
-
127
-
 128
128 -
 129
129 -
 130
130 -
 131
131 -
 132
132 -
 133
133 -
 134
134 -
 135
135 -
 136
136 -
 137
137 -
 138
138 -
139
-
140
-
141
-
142
-
143
-
144
-
145
-
146
-
147
-
148
-
149
-
150
-
151
-
152
-
153
-
154
-
155
-
156
-
157
-
158
-
159
-
160
-
161
-
162
-
163
-
164
-
165
-
166
-
167
-
168
-
169
-
170
-
171
-
172
-
173
-
174
-
175
-
176
-
177
-
178
-
179
-
180
-
181
-
182
-
183
-
184
-
185
-
186
-
187
-
188
-
189
-
190
-
191
-
192
-
193
-
194
-
195
-
196
-
197
-
198
-
199
-
200
-
201
-
202
-
203
-
204
-
205
-
206
-
207
-
208
-
209
-
210
-
211
-
212
-
213
-
214
-
215
-
216
-
217
-
218
-
219
-
220
-
221
-
222
-
223
-
224
-
225
-
226
-
227
-
228
-
229
-
230
-
231
-
232
-
233
-
234
-
235
-
236
-
237
-
238
-
239
-
240
-
241
-
242
-
243
-
244
-
245
-
246
-
247
-
248
-
249
-
250
-
251
-
252
-
253
-
254
-
255
-
256
-
257
-
258
-
259
-
260
-
261
-
262
-
263
-
264
-
265
-
266
-
267
-
268
-
269
-
270
-
271
-
272
-
273
-
274
-
275
-
276
-
277
-
278
-
279
-
280
-
281
 |
 |
