Konica Minolta AccurioPress C2060 IC-314 User Guide - Page 189
Submitting s from Prinergy versions 6 or 7, The Kodak Prinergy Workspace client application
 |
View all Konica Minolta AccurioPress C2060 manuals
Add to My Manuals
Save this manual to your list of manuals |
Page 189 highlights
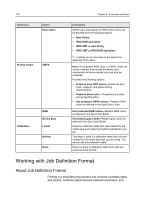
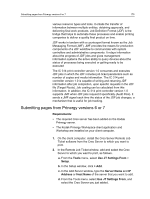
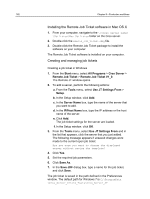
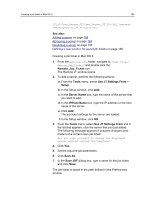
Submitting pages from Prinergy versions 6 or 7 179 various resource types and tools. It entails the transfer of information between multiple entities, obtaining approvals, and delivering final work products. Job Definition Format (JDF) is the bridge that helps to automate these processes and enable printing companies to deliver a quality final product on time. JDF works in tandem with a counterpart format known as the Job Messaging Format (JMF). JMF provides the means for production components of a JDF workflow to communicate with system controllers and administrative components. It relays information about the progress of JDF jobs and gives management information systems the active ability to query devices about the status of processes being executed or getting ready to be executed The IC‑314 print controller version 1.0 consumes and executes JDF jobs in which the JDF includes job ticket parameters such as number of copies and media information. The IC‑314 print controller version 1.0 is capable of writing and returning JDF information after job completion, upon specific requests in the JDF file (Target Route). Job costing can be calculated from this information. In addition, the IC‑314 print controller version 1.0 supports JMF when JDF jobs request it specifically (Audit Pool). It sends a JMF signal each time the status of the JDF job changes, a mechanism that is useful for job tracking. Submitting pages from Prinergy versions 6 or 7 Requirements: ● The required Creo server has been added on the Kodak Prinergy server. ● The Kodak Prinergy Workspace client application and Workshop are installed on your client computer. 1. On the client computer, install the Creo Server Remote Job Ticket software from the Creo Server to which you want to print. 2. In the Remote Job Ticket window, add and select the Creo Server to which you want to print, as follows. a. From the Tools menu, select Use JT Settings From > Setup. b. In the Setup window, click + Add. c. In the Add Server window, type the Server Name and IP Address or Host Name of the server that you want to add. d. From the Tools menu, select Use JT Settings From, and select the Creo Server you just added.
-
 1
1 -
2
-
3
-
4
-
5
-
6
-
7
-
8
-
9
-
10
-
11
-
12
-
13
-
14
-
15
-
16
-
17
-
18
-
19
-
20
-
21
-
22
-
23
-
24
-
25
-
26
-
27
-
28
-
29
-
30
-
31
-
32
-
33
-
34
-
35
-
36
-
37
-
38
-
39
-
40
-
41
-
42
-
43
-
44
-
45
-
46
-
47
-
48
-
49
-
50
-
51
-
52
-
53
-
54
-
55
-
56
-
57
-
58
-
59
-
60
-
61
-
62
-
63
-
64
-
65
-
66
-
67
-
68
-
69
-
70
-
71
-
72
-
73
-
74
-
75
-
76
-
77
-
78
-
79
-
80
-
81
-
82
-
83
-
84
-
85
-
86
-
87
-
88
-
89
-
90
-
91
-
92
-
93
-
94
-
95
-
96
-
97
-
98
-
99
-
100
-
101
-
102
-
103
-
104
-
105
-
106
-
107
-
108
-
109
-
110
-
111
-
112
-
113
-
114
-
115
-
116
-
117
-
118
-
119
-
120
-
121
-
122
-
123
-
124
-
125
-
126
-
127
-
128
-
129
-
130
-
131
-
132
-
133
-
134
-
135
-
136
-
137
-
138
-
139
-
140
-
141
-
142
-
143
-
144
-
145
-
146
-
147
-
148
-
149
-
150
-
151
-
152
-
153
-
154
-
155
-
156
-
157
-
158
-
159
-
160
-
161
-
162
-
163
-
164
-
165
-
166
-
167
-
168
-
169
-
170
-
171
-
172
-
173
-
174
-
175
-
176
-
177
-
178
-
179
-
180
-
181
-
182
-
183
-
 184
184 -
 185
185 -
 186
186 -
 187
187 -
 188
188 -
 189
189 -
 190
190 -
 191
191 -
 192
192 -
 193
193 -
 194
194 -
195
-
196
-
197
-
198
-
199
-
200
-
201
-
202
-
203
-
204
-
205
-
206
-
207
-
208
-
209
-
210
-
211
-
212
-
213
-
214
-
215
-
216
-
217
-
218
-
219
-
220
-
221
-
222
-
223
-
224
-
225
-
226
-
227
-
228
-
229
-
230
-
231
-
232
-
233
-
234
-
235
-
236
-
237
-
238
-
239
-
240
-
241
-
242
-
243
-
244
-
245
-
246
-
247
-
248
-
249
-
250
-
251
-
252
-
253
-
254
-
255
-
256
-
257
-
258
-
259
-
260
-
261
-
262
-
263
-
264
-
265
-
266
-
267
-
268
-
269
-
270
-
271
-
272
-
273
-
274
-
275
-
276
-
277
-
278
-
279
-
280
-
281
 |
 |
