Konica Minolta AccurioPress C2060 IC-314 User Guide - Page 172
Setting up the IPDS host, IPDS printer parameters, Based on, Configuration, IPDS tray mapping
 |
View all Konica Minolta AccurioPress C2060 manuals
Add to My Manuals
Save this manual to your list of manuals |
Page 172 highlights
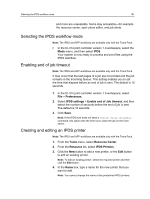
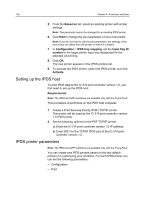
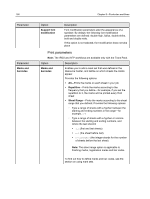
162 Chapter 8-Production workflows 5. From the Based on list, select an existing printer with similar settings. Note: This parameter cannot be changed for an existing IPDS printer. 6. Click Edit to change the job parameters of your new printer. Note: If you do not need to edit the job parameters, the settings of the new printer are taken from the printer on which it is based. 7. In Configuration > IPDS tray mapping, set the Input tray ID number to the target printer input tray designated for the selected job printing. 8. Click OK. The new printer appears in the IPDS printers list. 9. To activate the IPDS printer, select the IPDS printer and click Activate. Setting up the IPDS host To print IPDS data to the IC‑314 print controller version 1.0, you first need to set up the IPDS host. Requirements: Note: The IPDS and AFP workflows are available only with the Trans Pack. This procedure is performed on the IPDS host computer. 1. Create a Print Services Facility (PSF) TCP/IP printer. This printer will be used as the IC‑314 print controller version 1.0 IPDS printer. 2. Set the following options for the PSF TCP/IP printer: a. Enter the IC‑314 print controller version 1.0 IP address. b. Enter 5001 for the TCP/IP IPDS port of the IC‑314 print controller version 1.0. IPDS printer parameters Note: The IPDS and AFP workflows are available only with the Trans Pack. You can create new IPDS printers based on the two default printers for customizing your workflow. For each IPDS printer you can set the following parameters: ● Configuration ● Print
-
 1
1 -
2
-
3
-
4
-
5
-
6
-
7
-
8
-
9
-
10
-
11
-
12
-
13
-
14
-
15
-
16
-
17
-
18
-
19
-
20
-
21
-
22
-
23
-
24
-
25
-
26
-
27
-
28
-
29
-
30
-
31
-
32
-
33
-
34
-
35
-
36
-
37
-
38
-
39
-
40
-
41
-
42
-
43
-
44
-
45
-
46
-
47
-
48
-
49
-
50
-
51
-
52
-
53
-
54
-
55
-
56
-
57
-
58
-
59
-
60
-
61
-
62
-
63
-
64
-
65
-
66
-
67
-
68
-
69
-
70
-
71
-
72
-
73
-
74
-
75
-
76
-
77
-
78
-
79
-
80
-
81
-
82
-
83
-
84
-
85
-
86
-
87
-
88
-
89
-
90
-
91
-
92
-
93
-
94
-
95
-
96
-
97
-
98
-
99
-
100
-
101
-
102
-
103
-
104
-
105
-
106
-
107
-
108
-
109
-
110
-
111
-
112
-
113
-
114
-
115
-
116
-
117
-
118
-
119
-
120
-
121
-
122
-
123
-
124
-
125
-
126
-
127
-
128
-
129
-
130
-
131
-
132
-
133
-
134
-
135
-
136
-
137
-
138
-
139
-
140
-
141
-
142
-
143
-
144
-
145
-
146
-
147
-
148
-
149
-
150
-
151
-
152
-
153
-
154
-
155
-
156
-
157
-
158
-
159
-
160
-
161
-
162
-
163
-
164
-
165
-
166
-
 167
167 -
 168
168 -
 169
169 -
 170
170 -
 171
171 -
 172
172 -
 173
173 -
 174
174 -
 175
175 -
 176
176 -
 177
177 -
178
-
179
-
180
-
181
-
182
-
183
-
184
-
185
-
186
-
187
-
188
-
189
-
190
-
191
-
192
-
193
-
194
-
195
-
196
-
197
-
198
-
199
-
200
-
201
-
202
-
203
-
204
-
205
-
206
-
207
-
208
-
209
-
210
-
211
-
212
-
213
-
214
-
215
-
216
-
217
-
218
-
219
-
220
-
221
-
222
-
223
-
224
-
225
-
226
-
227
-
228
-
229
-
230
-
231
-
232
-
233
-
234
-
235
-
236
-
237
-
238
-
239
-
240
-
241
-
242
-
243
-
244
-
245
-
246
-
247
-
248
-
249
-
250
-
251
-
252
-
253
-
254
-
255
-
256
-
257
-
258
-
259
-
260
-
261
-
262
-
263
-
264
-
265
-
266
-
267
-
268
-
269
-
270
-
271
-
272
-
273
-
274
-
275
-
276
-
277
-
278
-
279
-
280
-
281
 |
 |
