Konica Minolta AccurioPress C2060 IC-314 User Guide - Page 70
Importing and printing a job, Importing a file using drag and drop, Import, Virtual printer
 |
View all Konica Minolta AccurioPress C2060 manuals
Add to My Manuals
Save this manual to your list of manuals |
Page 70 highlights
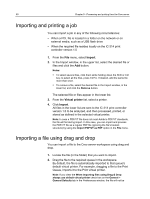
60 Chapter 5-Processing and printing from the Creo server Importing and printing a job You can import a job in any of the following circumstances: ● When a PDL file is located in a folder on the network or on external media, such as a USB flash drive ● When the required file resides locally on the IC‑314 print controller version 1.0 1. From the File menu, select Import. 2. In the Import window, in the upper list, select the desired file or files and click the Add button. Notes: ● To select several files, click them while holding down the Shift or Ctrl key; to select all the files, press Ctrl+A. If desired, add the same file more than once. ● To remove a file, select the desired file in the Import window, in the lower list, and click the Remove button. The selected file or files appear in the lower list. 3. From the Virtual printer list, select a printer. 4. Click Import. All files in the lower list are sent to the IC‑314 print controller version 1.0 to be analyzed, and then processed, printed, or stored as defined in the selected virtual printer. Note: In case a PDF/VT file does not meet Adobe's PDF/VT standards, the file will fail during import. In this case, you can import and process the PDF/VT file as a regular PDF file (ignoring the file's booklet structure) by using the Import PDF/VT as PDF option in the File menu. Importing a file using drag and drop You can import a file to the Creo server workspace using drag and drop. 1. Locate the file (in the folder) that you want to import. 2. Drag the file to the required queue in the workspace. By default, the file is automatically imported to that queue's default virtual printer. For example, dragging a file to the Print Queue, imports it to the Print virtual printer. Note: If you clear the When importing files using Drag & Drop always use default virtual printer check box on the General > General Defaults tab in the Preferences window, the file will not be
-
 1
1 -
2
-
3
-
4
-
5
-
6
-
7
-
8
-
9
-
10
-
11
-
12
-
13
-
14
-
15
-
16
-
17
-
18
-
19
-
20
-
21
-
22
-
23
-
24
-
25
-
26
-
27
-
28
-
29
-
30
-
31
-
32
-
33
-
34
-
35
-
36
-
37
-
38
-
39
-
40
-
41
-
42
-
43
-
44
-
45
-
46
-
47
-
48
-
49
-
50
-
51
-
52
-
53
-
54
-
55
-
56
-
57
-
58
-
59
-
60
-
61
-
62
-
63
-
64
-
 65
65 -
 66
66 -
 67
67 -
 68
68 -
 69
69 -
 70
70 -
 71
71 -
 72
72 -
 73
73 -
 74
74 -
 75
75 -
76
-
77
-
78
-
79
-
80
-
81
-
82
-
83
-
84
-
85
-
86
-
87
-
88
-
89
-
90
-
91
-
92
-
93
-
94
-
95
-
96
-
97
-
98
-
99
-
100
-
101
-
102
-
103
-
104
-
105
-
106
-
107
-
108
-
109
-
110
-
111
-
112
-
113
-
114
-
115
-
116
-
117
-
118
-
119
-
120
-
121
-
122
-
123
-
124
-
125
-
126
-
127
-
128
-
129
-
130
-
131
-
132
-
133
-
134
-
135
-
136
-
137
-
138
-
139
-
140
-
141
-
142
-
143
-
144
-
145
-
146
-
147
-
148
-
149
-
150
-
151
-
152
-
153
-
154
-
155
-
156
-
157
-
158
-
159
-
160
-
161
-
162
-
163
-
164
-
165
-
166
-
167
-
168
-
169
-
170
-
171
-
172
-
173
-
174
-
175
-
176
-
177
-
178
-
179
-
180
-
181
-
182
-
183
-
184
-
185
-
186
-
187
-
188
-
189
-
190
-
191
-
192
-
193
-
194
-
195
-
196
-
197
-
198
-
199
-
200
-
201
-
202
-
203
-
204
-
205
-
206
-
207
-
208
-
209
-
210
-
211
-
212
-
213
-
214
-
215
-
216
-
217
-
218
-
219
-
220
-
221
-
222
-
223
-
224
-
225
-
226
-
227
-
228
-
229
-
230
-
231
-
232
-
233
-
234
-
235
-
236
-
237
-
238
-
239
-
240
-
241
-
242
-
243
-
244
-
245
-
246
-
247
-
248
-
249
-
250
-
251
-
252
-
253
-
254
-
255
-
256
-
257
-
258
-
259
-
260
-
261
-
262
-
263
-
264
-
265
-
266
-
267
-
268
-
269
-
270
-
271
-
272
-
273
-
274
-
275
-
276
-
277
-
278
-
279
-
280
-
281
 |
 |
