Konica Minolta AccurioPress C2060 IC-314 User Guide - Page 66
Office Hot Folder tool, Installing the Office Hot Folder tool
 |
View all Konica Minolta AccurioPress C2060 manuals
Add to My Manuals
Save this manual to your list of manuals |
Page 66 highlights
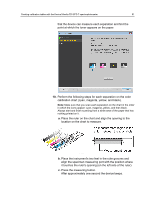
56 Chapter 4-Printing a file in Windows and Mac OS 2. Locate the IC‑314 print controller version 1.0, and double-click it. A list of all the shared folders, hot folders, and printers appears. 3. Double-click the desired hot folder-for example, HF_Print. Tip: You can drag the hot folder icon to your desktop to create a shortcut to the hot folder for future use. 4. Drag the desired files to the hot folder. All the files are processed and printed automatically, according to the hot folder workflow. Office Hot Folder tool The Office Hot Folder tool enables you to automate the printing of Microsoft Office files when you work remotely. You can drag Microsoft Office files to a hot folder and then submit the files for printing on the Creo server. The following Microsoft Office versions are supported: ● Microsoft Office 2010 ● Microsoft Office 2013 Installing the Office Hot Folder tool Requirements: Microsoft Office must be installed on your computer in order to work with Office Hot Folder tool. 1. From the Windows Start menu, select Run. 2. In the Open box, type \\, followed by the host name or IP address of the server, and click OK. The server window opens. 3. Navigate to Utilities\PC Utilities. 4. Double-click the Office_HF.exe file. The Office Hot Folder tool is installed on your computer, the Office HF icon appears on your taskbar, and the Office Hot Folder tool appears. All network printers that are currently on your computer appear in the window. 5. Right-click this icon to perform the following actions: ○ Open: Open the Office Hot Folders tool and create and manage hot folders ○ Start: Activate file processing in the tool ○ Stop: Deactivate file processing in the tool
-
 1
1 -
2
-
3
-
4
-
5
-
6
-
7
-
8
-
9
-
10
-
11
-
12
-
13
-
14
-
15
-
16
-
17
-
18
-
19
-
20
-
21
-
22
-
23
-
24
-
25
-
26
-
27
-
28
-
29
-
30
-
31
-
32
-
33
-
34
-
35
-
36
-
37
-
38
-
39
-
40
-
41
-
42
-
43
-
44
-
45
-
46
-
47
-
48
-
49
-
50
-
51
-
52
-
53
-
54
-
55
-
56
-
57
-
58
-
59
-
60
-
 61
61 -
 62
62 -
 63
63 -
 64
64 -
 65
65 -
 66
66 -
 67
67 -
 68
68 -
 69
69 -
 70
70 -
 71
71 -
72
-
73
-
74
-
75
-
76
-
77
-
78
-
79
-
80
-
81
-
82
-
83
-
84
-
85
-
86
-
87
-
88
-
89
-
90
-
91
-
92
-
93
-
94
-
95
-
96
-
97
-
98
-
99
-
100
-
101
-
102
-
103
-
104
-
105
-
106
-
107
-
108
-
109
-
110
-
111
-
112
-
113
-
114
-
115
-
116
-
117
-
118
-
119
-
120
-
121
-
122
-
123
-
124
-
125
-
126
-
127
-
128
-
129
-
130
-
131
-
132
-
133
-
134
-
135
-
136
-
137
-
138
-
139
-
140
-
141
-
142
-
143
-
144
-
145
-
146
-
147
-
148
-
149
-
150
-
151
-
152
-
153
-
154
-
155
-
156
-
157
-
158
-
159
-
160
-
161
-
162
-
163
-
164
-
165
-
166
-
167
-
168
-
169
-
170
-
171
-
172
-
173
-
174
-
175
-
176
-
177
-
178
-
179
-
180
-
181
-
182
-
183
-
184
-
185
-
186
-
187
-
188
-
189
-
190
-
191
-
192
-
193
-
194
-
195
-
196
-
197
-
198
-
199
-
200
-
201
-
202
-
203
-
204
-
205
-
206
-
207
-
208
-
209
-
210
-
211
-
212
-
213
-
214
-
215
-
216
-
217
-
218
-
219
-
220
-
221
-
222
-
223
-
224
-
225
-
226
-
227
-
228
-
229
-
230
-
231
-
232
-
233
-
234
-
235
-
236
-
237
-
238
-
239
-
240
-
241
-
242
-
243
-
244
-
245
-
246
-
247
-
248
-
249
-
250
-
251
-
252
-
253
-
254
-
255
-
256
-
257
-
258
-
259
-
260
-
261
-
262
-
263
-
264
-
265
-
266
-
267
-
268
-
269
-
270
-
271
-
272
-
273
-
274
-
275
-
276
-
277
-
278
-
279
-
280
-
281
 |
 |
