Konica Minolta AccurioPress C2060 IC-314 User Guide - Page 53
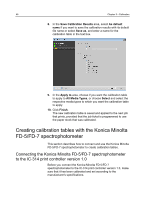
Creating calibration tables with the Konica Minolta FD-9 spectrophotometer
 |
View all Konica Minolta AccurioPress C2060 manuals
Add to My Manuals
Save this manual to your list of manuals |
Page 53 highlights
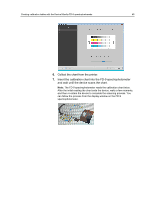
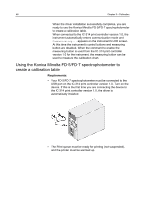
Creating calibration tables with the Konica Minolta FD-9 spectrophotometer 43 15. In the Apply to area, choose if you want the calibration table to apply to All Media Types, or choose Select and select the respective media types to which you want the calibration table to apply. 16. Click Finish. The new calibration table is saved and applied to the next job that prints, provided that the job ticket is programmed to use the paper stock that was calibrated. Creating calibration tables with the Konica Minolta FD-9 spectrophotometer This section describes how to use the Konica Minolta FD-9 spectrophotometer to create calibration tables. Using the Konica Minolta FD‑9 spectrophotometer to create a calibration table Requirements: ● Your FD-9 spectrophotometer must be connected to the USB port on the IC‑314 print controller version 1.0, and then turned on. The first time that you connect the device to the IC‑314 print controller version 1.0, you are notified that the driver is being installed. Wait for the driver installation to finish before proceeding further. ● Make sure that your spectrophotometer is calibrated. Refer to the spectrophotometer product documentation for more information. ● The Print queue must be enabled and the printer must be in Ready mode. Note: (Recommended) Before starting the procedure, set the Default Calibration Device that you want to use to scan the calibration chart(s) on the Preferences > Calibration tab.
-
 1
1 -
2
-
3
-
4
-
5
-
6
-
7
-
8
-
9
-
10
-
11
-
12
-
13
-
14
-
15
-
16
-
17
-
18
-
19
-
20
-
21
-
22
-
23
-
24
-
25
-
26
-
27
-
28
-
29
-
30
-
31
-
32
-
33
-
34
-
35
-
36
-
37
-
38
-
39
-
40
-
41
-
42
-
43
-
44
-
45
-
46
-
47
-
 48
48 -
 49
49 -
 50
50 -
 51
51 -
 52
52 -
 53
53 -
 54
54 -
 55
55 -
 56
56 -
 57
57 -
 58
58 -
59
-
60
-
61
-
62
-
63
-
64
-
65
-
66
-
67
-
68
-
69
-
70
-
71
-
72
-
73
-
74
-
75
-
76
-
77
-
78
-
79
-
80
-
81
-
82
-
83
-
84
-
85
-
86
-
87
-
88
-
89
-
90
-
91
-
92
-
93
-
94
-
95
-
96
-
97
-
98
-
99
-
100
-
101
-
102
-
103
-
104
-
105
-
106
-
107
-
108
-
109
-
110
-
111
-
112
-
113
-
114
-
115
-
116
-
117
-
118
-
119
-
120
-
121
-
122
-
123
-
124
-
125
-
126
-
127
-
128
-
129
-
130
-
131
-
132
-
133
-
134
-
135
-
136
-
137
-
138
-
139
-
140
-
141
-
142
-
143
-
144
-
145
-
146
-
147
-
148
-
149
-
150
-
151
-
152
-
153
-
154
-
155
-
156
-
157
-
158
-
159
-
160
-
161
-
162
-
163
-
164
-
165
-
166
-
167
-
168
-
169
-
170
-
171
-
172
-
173
-
174
-
175
-
176
-
177
-
178
-
179
-
180
-
181
-
182
-
183
-
184
-
185
-
186
-
187
-
188
-
189
-
190
-
191
-
192
-
193
-
194
-
195
-
196
-
197
-
198
-
199
-
200
-
201
-
202
-
203
-
204
-
205
-
206
-
207
-
208
-
209
-
210
-
211
-
212
-
213
-
214
-
215
-
216
-
217
-
218
-
219
-
220
-
221
-
222
-
223
-
224
-
225
-
226
-
227
-
228
-
229
-
230
-
231
-
232
-
233
-
234
-
235
-
236
-
237
-
238
-
239
-
240
-
241
-
242
-
243
-
244
-
245
-
246
-
247
-
248
-
249
-
250
-
251
-
252
-
253
-
254
-
255
-
256
-
257
-
258
-
259
-
260
-
261
-
262
-
263
-
264
-
265
-
266
-
267
-
268
-
269
-
270
-
271
-
272
-
273
-
274
-
275
-
276
-
277
-
278
-
279
-
280
-
281
 |
 |
