Konica Minolta AccurioPress C2060 IC-314 User Guide - Page 107
Save in, Create Profile, Profile Name, Profile Manager, Other
 |
View all Konica Minolta AccurioPress C2060 manuals
Add to My Manuals
Save this manual to your list of manuals |
Page 107 highlights
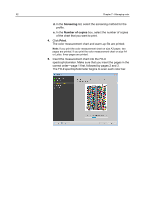
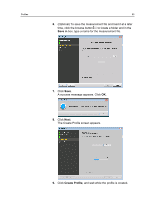
Profiles 97 d. While pressing the measuring button, slide the instrument along the ruler from left to right. Note: Try to slide the instrument at a constant speed. if the speed is too fast or too slow, an error may occur. e. When the specimen measuring port comes to the position where it touches the other end of the ruler's opening on the right, release the measuring button. When you release the measuring button the device beeps. If the scan is successful, a check mark appears in the wizard screen on the left of the row you have just scanned, and an arrow appears on the next line in the wizard, indicating the next row to scan. If the scan is not successful a red icon appears in the wizard on the left of the row you have just scanned indicating that the scan was not successful. You must rescan that row until a check mark appears in the wizard on the left of the row indicating a successful scan. f. Move the ruler to the next row on the chart and align the opening to the next row of the chart indicated by the arrow in the wizard screen. g. Repeat the above steps until you have successfully measured each row in the printed chart. Note: The chart may comprise more than one page, depending on the tray chosen in step 4d on page 85. 8. (Optional) To save the measurement file and load it at a later time, locate a folder and in the Save in box, type a name for the measurement file. 9. (Optional) Click Save. 10. Click Next. 11. Click Create Profile. This process might take a few minutes 12. In the Profile Name box, type a new name for the profile, or leave the name that the Profiling Tool automatically created based on the screening method. 13. To define the location for saving the destination profile, select one of the following options: ○ Profile Manager-The profile automatically appears in the Profile Manager area. ○ Other-The profile is saved in a specified location, and you can later import the profile to the Profile Manager area in the Resource Center. 14. Click Save to save the profile.
-
 1
1 -
2
-
3
-
4
-
5
-
6
-
7
-
8
-
9
-
10
-
11
-
12
-
13
-
14
-
15
-
16
-
17
-
18
-
19
-
20
-
21
-
22
-
23
-
24
-
25
-
26
-
27
-
28
-
29
-
30
-
31
-
32
-
33
-
34
-
35
-
36
-
37
-
38
-
39
-
40
-
41
-
42
-
43
-
44
-
45
-
46
-
47
-
48
-
49
-
50
-
51
-
52
-
53
-
54
-
55
-
56
-
57
-
58
-
59
-
60
-
61
-
62
-
63
-
64
-
65
-
66
-
67
-
68
-
69
-
70
-
71
-
72
-
73
-
74
-
75
-
76
-
77
-
78
-
79
-
80
-
81
-
82
-
83
-
84
-
85
-
86
-
87
-
88
-
89
-
90
-
91
-
92
-
93
-
94
-
95
-
96
-
97
-
98
-
99
-
100
-
101
-
 102
102 -
 103
103 -
 104
104 -
 105
105 -
 106
106 -
 107
107 -
 108
108 -
 109
109 -
 110
110 -
 111
111 -
 112
112 -
113
-
114
-
115
-
116
-
117
-
118
-
119
-
120
-
121
-
122
-
123
-
124
-
125
-
126
-
127
-
128
-
129
-
130
-
131
-
132
-
133
-
134
-
135
-
136
-
137
-
138
-
139
-
140
-
141
-
142
-
143
-
144
-
145
-
146
-
147
-
148
-
149
-
150
-
151
-
152
-
153
-
154
-
155
-
156
-
157
-
158
-
159
-
160
-
161
-
162
-
163
-
164
-
165
-
166
-
167
-
168
-
169
-
170
-
171
-
172
-
173
-
174
-
175
-
176
-
177
-
178
-
179
-
180
-
181
-
182
-
183
-
184
-
185
-
186
-
187
-
188
-
189
-
190
-
191
-
192
-
193
-
194
-
195
-
196
-
197
-
198
-
199
-
200
-
201
-
202
-
203
-
204
-
205
-
206
-
207
-
208
-
209
-
210
-
211
-
212
-
213
-
214
-
215
-
216
-
217
-
218
-
219
-
220
-
221
-
222
-
223
-
224
-
225
-
226
-
227
-
228
-
229
-
230
-
231
-
232
-
233
-
234
-
235
-
236
-
237
-
238
-
239
-
240
-
241
-
242
-
243
-
244
-
245
-
246
-
247
-
248
-
249
-
250
-
251
-
252
-
253
-
254
-
255
-
256
-
257
-
258
-
259
-
260
-
261
-
262
-
263
-
264
-
265
-
266
-
267
-
268
-
269
-
270
-
271
-
272
-
273
-
274
-
275
-
276
-
277
-
278
-
279
-
280
-
281
 |
 |
