LG VS750 Owner's Manual - Page 56
History/ From Sent History/From
 |
UPC - 652810814379
View all LG VS750 manuals
Add to My Manuals
Save this manual to your list of manuals |
Page 56 highlights
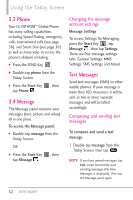
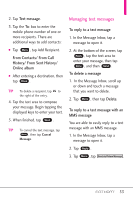
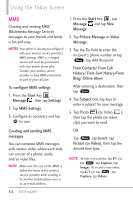
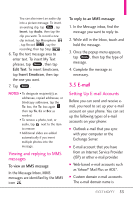
Using the Today Screen MMS Creating and sending MMS (Multimedia Message Service) messages to your friends and family is fun and easy. NOTES Your phone is already preconfigured with your wireless service provider's MMS settings. MMS is a charged service and must be provisioned with your mobile phone plan. Contact your wireless service provider to have MMS provisioned as part of your call plan. To configure MMS settings 1. Press the Start Key , Message , then tap Settings. 2. Tap MMS Settings. 3. Configure as necessary and tap OK to save. 1. Press the Start Key , tap Message and tap New Message. 2. Tap Picture Message or Video Message. 3. Tap the To: field to enter the recipient's phone number or tap Menu , tap Add Recipient. From Contacts/ From Call History/ From Sent History/From Blog/ Online album After entering a destination, then tap Done . 4. Tap Subject box, tap keys to enter a subject for your message. 5. Tap Photo (or Video ), then tap the photo (or video clip) you want to send. Creating and sending MMS messages You can compose MMS messages with various slides, where each slide can consist of a photo, audio, and/or video files. NOTE Make sure the size of the MMS is within the limits of the wireless service provider while sending it to another mobile phone user or to an e-mail address. OR Tap Menu , tap Insert, tap Picture (or Video), then tap the desired item type. NOTE To take a new photo, tap (or tap Menu , tap Capture, tap Image). To record a new video, tap (or tap Menu , tap Capture, tap Video). 54
-
 1
1 -
2
-
3
-
4
-
5
-
6
-
7
-
8
-
9
-
10
-
11
-
12
-
13
-
14
-
15
-
16
-
17
-
18
-
19
-
20
-
21
-
22
-
23
-
24
-
25
-
26
-
27
-
28
-
29
-
30
-
31
-
32
-
33
-
34
-
35
-
36
-
37
-
38
-
39
-
40
-
41
-
42
-
43
-
44
-
45
-
46
-
47
-
48
-
49
-
50
-
 51
51 -
 52
52 -
 53
53 -
 54
54 -
 55
55 -
 56
56 -
 57
57 -
 58
58 -
 59
59 -
 60
60 -
 61
61 -
62
-
63
-
64
-
65
-
66
-
67
-
68
-
69
-
70
-
71
-
72
-
73
-
74
-
75
-
76
-
77
-
78
-
79
-
80
-
81
-
82
-
83
-
84
-
85
-
86
-
87
-
88
-
89
-
90
-
91
-
92
-
93
-
94
-
95
-
96
-
97
-
98
-
99
-
100
-
101
-
102
-
103
-
104
-
105
-
106
-
107
-
108
-
109
-
110
-
111
-
112
-
113
-
114
-
115
-
116
-
117
-
118
-
119
-
120
-
121
-
122
-
123
-
124
-
125
-
126
-
127
-
128
-
129
-
130
-
131
-
132
-
133
-
134
-
135
-
136
-
137
-
138
-
139
-
140
-
141
-
142
-
143
-
144
-
145
-
146
-
147
-
148
-
149
-
150
-
151
-
152
-
153
-
154
-
155
-
156
-
157
-
158
-
159
-
160
-
161
-
162
-
163
-
164
-
165
-
166
-
167
-
168
-
169
-
170
-
171
-
172
-
173
-
174
-
175
-
176
-
177
-
178
-
179
-
180
-
181
-
182
-
183
-
184
-
185
-
186
-
187
-
188
 |
 |
