Panasonic PT-DZ12000U Operating Instructions - Page 13
Bottom
 |
UPC - 791871111550
View all Panasonic PT-DZ12000U manuals
Add to My Manuals
Save this manual to your list of manuals |
Page 13 highlights
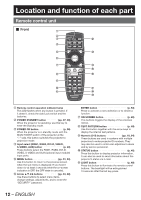
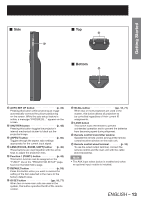
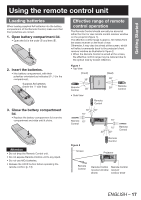
Getting Started „ Side t „ Top u „ Bottom v l AUTO SET UP button p. 49) Pressing this button while projecting an image automatically corrects the picture positioning on the screen. While the auto setup feature is active, a message "PROGRESS..." appears on the screen. m SHUTTER button p. 48) Pressing this button toggles the projector's internal mechanical shutter to black out the projected image. n ASPECT button p. 50) Toggles through the aspect ratio settings appropriate for the current input signal. o LENS (FOCUS, ZOOM, SHIFT) buttonŋŋŋ (p. 40) These buttons are used together with the arrow keys to adjust the projection lens. p Function 1 (FUNC1) button p. 49) This button function can be assigned on the "FUNC1" line of the "PROJECTOR SETUP" page, found on the Main Menu page. q DEFAULT button p. 53) Press this button when you want to restore the setting of the item selected in the menu to the factory default value. r ID SET button pp. 18, 77) When two or more main units are used in the system, this button specifies the ID of the remote control. s ID ALL button pp. 18, 77) When two or more projectors are used in the system, this button allows all projectors to be controlled regardless of their current ID assignments. t LOCK button This switch locks the remote to prevent unintended operation and to prevent the batteries from becoming spent during shipment. u Remote control transmitter window Operate the remote control aiming at the remote control receiver window on the main unit. v Remote control wired terminal p. 18) To use the wired output terminal, connect the remote control and the main unit with the cable (sold separately). Note • The AUX input select button is enabled only when an optional input module is installed. ENGLISH - 13
-
 1
1 -
2
-
3
-
4
-
5
-
6
-
7
-
 8
8 -
 9
9 -
 10
10 -
 11
11 -
 12
12 -
 13
13 -
 14
14 -
 15
15 -
 16
16 -
 17
17 -
 18
18 -
19
-
20
-
21
-
22
-
23
-
24
-
25
-
26
-
27
-
28
-
29
-
30
-
31
-
32
-
33
-
34
-
35
-
36
-
37
-
38
-
39
-
40
-
41
-
42
-
43
-
44
-
45
-
46
-
47
-
48
-
49
-
50
-
51
-
52
-
53
-
54
-
55
-
56
-
57
-
58
-
59
-
60
-
61
-
62
-
63
-
64
-
65
-
66
-
67
-
68
-
69
-
70
-
71
-
72
-
73
-
74
-
75
-
76
-
77
-
78
-
79
-
80
-
81
-
82
-
83
-
84
-
85
-
86
-
87
-
88
-
89
-
90
-
91
-
92
-
93
-
94
-
95
-
96
-
97
-
98
-
99
-
100
-
101
-
102
-
103
-
104
-
105
-
106
-
107
-
108
-
109
-
110
-
111
-
112
-
113
-
114
-
115
-
116
-
117
-
118
-
119
-
120
-
121
-
122
-
123
-
124
-
125
-
126
-
127
-
128
-
129
-
130
-
131
-
132
-
133
-
134
-
135
-
136
-
137
-
138
 |
 |
