Panasonic PT-DZ12000U Operating Instructions - Page 37
Projection
 |
UPC - 791871111550
View all Panasonic PT-DZ12000U manuals
Add to My Manuals
Save this manual to your list of manuals |
Page 37 highlights
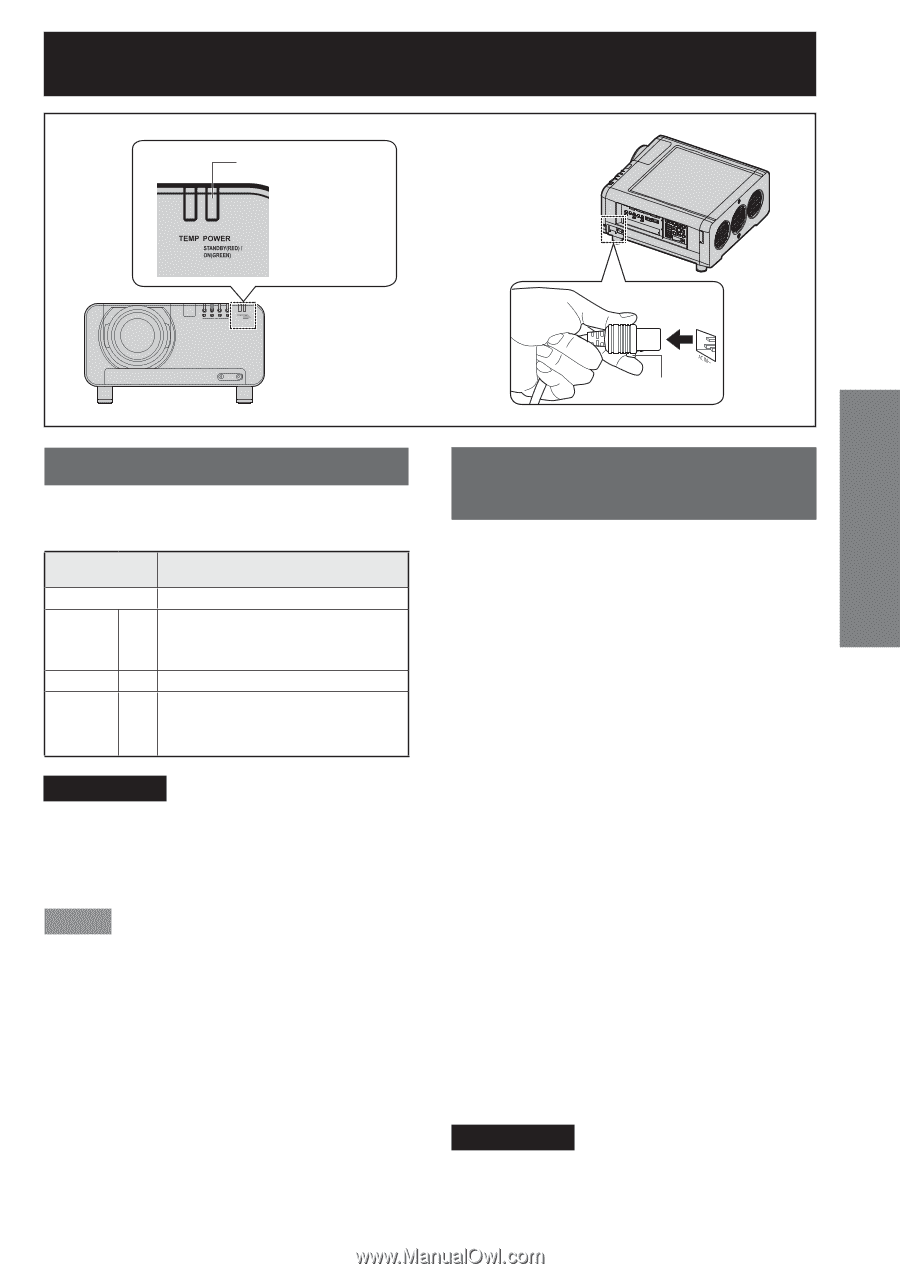
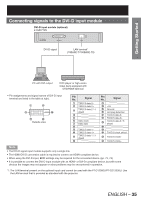
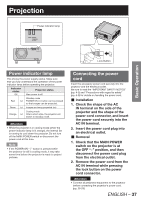
Projection Power indicator lamp Basic Operation FILTER CLEANING OPEN CLOSE Lock Button Power indicator lamp This shows the power supply status. Make sure that you fully understand the operation of the power indicator lamp before operating the projector. Indicator status Off Projector status Main power is off Standby mode Red Lit POWER ON ( | ) button can be pressed so that images can be projected. Green Lit Images are being projected (on) Orange Cooling mode Lit After a short while, the projector will switch to standby mode. Attention • While the projector is in cooling mode (when the power indicator lamp is lit orange), the internal fan is running to cool down the projector. Do not turn off the MAIN POWER switch or disconnect the power cord at this time. Note • If the POWER ON " | " button is pressed while the projector is still in cooling mode, it may take some time before the projector is ready to project pictures. Connecting the power cord Insert the accessory power cord securely into the projector and the electrical outlet. Be sure to read the "IMPORTANT SAFETY NOTICE" (pp. 4-5) and "Precautions with regard to safety" (pp. 6-9) for details on handling the power cord. „ Installation 1. Check the shape of the AC IN terminal on the side of the projector and the shape of the power cord connector, and insert the power cord securely into the AC IN terminal. 2. Insert the power cord plug into an electrical outlet. „ Removal 1. Check that the MAIN POWER switch on the projector is at the OFF "○" position, and then disconnect the power cord plug from the electrical outlet. 2. Remove the power cord from the AC IN terminal while pressing the lock button on the power cord connector. Attention • Connect all peripheral equipment to the projector before connecting the projector's power cord. (pp. 28-29) ENGLISH - 37
-
 1
1 -
2
-
3
-
4
-
5
-
6
-
7
-
8
-
9
-
10
-
11
-
12
-
13
-
14
-
15
-
16
-
17
-
18
-
19
-
20
-
21
-
22
-
23
-
24
-
25
-
26
-
27
-
28
-
29
-
30
-
31
-
 32
32 -
 33
33 -
 34
34 -
 35
35 -
 36
36 -
 37
37 -
 38
38 -
 39
39 -
 40
40 -
 41
41 -
 42
42 -
43
-
44
-
45
-
46
-
47
-
48
-
49
-
50
-
51
-
52
-
53
-
54
-
55
-
56
-
57
-
58
-
59
-
60
-
61
-
62
-
63
-
64
-
65
-
66
-
67
-
68
-
69
-
70
-
71
-
72
-
73
-
74
-
75
-
76
-
77
-
78
-
79
-
80
-
81
-
82
-
83
-
84
-
85
-
86
-
87
-
88
-
89
-
90
-
91
-
92
-
93
-
94
-
95
-
96
-
97
-
98
-
99
-
100
-
101
-
102
-
103
-
104
-
105
-
106
-
107
-
108
-
109
-
110
-
111
-
112
-
113
-
114
-
115
-
116
-
117
-
118
-
119
-
120
-
121
-
122
-
123
-
124
-
125
-
126
-
127
-
128
-
129
-
130
-
131
-
132
-
133
-
134
-
135
-
136
-
137
-
138
 |
 |