Panasonic PT-DZ12000U Operating Instructions - Page 47
◄►, ▲▼◄►
 |
UPC - 791871111550
View all Panasonic PT-DZ12000U manuals
Add to My Manuals
Save this manual to your list of manuals |
Page 47 highlights
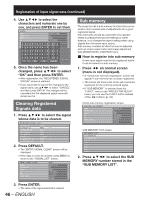
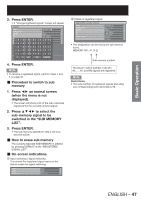
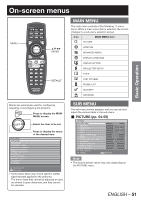
Basic Operation 3. Press ENTER. • A "Change registered signals" screen will appear. RENAME NAME SXGA60-A1 MEMORY NO A1 INPUT RGB1 fH 64.00kHz fV 60.00Hz SYNAC.SBTACTE D E F G H I J K HL(PMOS)N O P Q R S T U V W X Y Z V;(P:OS), . abcdefghijklmno pqrstuvwxyz/+-* 0123456789 _@[] < > BS OK CANCEL 4. Press ENTER. Note • To rename a registered signal, perform steps 4 and 5 on page 46. „ Procedure to switch to sub memory 1. Press ◄► on normal screen (when the menu is not displayed). • The screen will show a list of the sub-memories registered for the currently entered signal. 2. Press to select the sub-memory signal to be switched in the "SUB MEMORY LIST". 3. Press ENTER. • The sub-memory selected in step 2 will now become active. „ How to erase sub memory The currently selected SUB MEMORY is deleted by pressing DEFAULT at the "REGISTERED SIGNAL LIST". „ On-screen indications 1 Input switching / signal switching This shows the registered signal name on the status screen for signal switching. INPUT NAME MEMORY NO RGB1 RGB A1(1-2) 2 Details of registered signal REGISTERED SIGNAL STATUS NAME MEMORY NO INPUT fH fV SYNC.STATE SXGA60-A1 A5 (1-2) RGB1 63.98kHz 60.02Hz H(POS) V(POS) • The designation can be set by the sub memory items. MEMORY NO : A1 (1-2) Sub memory number The place in which address code (A1, A2, ..., H7 and H8) signals are registered Note Restrictions • The total number of registered signals (including any corresponding sub-memories) is 96. ENGLISH - 47
-
 1
1 -
2
-
3
-
4
-
5
-
6
-
7
-
8
-
9
-
10
-
11
-
12
-
13
-
14
-
15
-
16
-
17
-
18
-
19
-
20
-
21
-
22
-
23
-
24
-
25
-
26
-
27
-
28
-
29
-
30
-
31
-
32
-
33
-
34
-
35
-
36
-
37
-
38
-
39
-
40
-
41
-
 42
42 -
 43
43 -
 44
44 -
 45
45 -
 46
46 -
 47
47 -
 48
48 -
 49
49 -
 50
50 -
 51
51 -
 52
52 -
53
-
54
-
55
-
56
-
57
-
58
-
59
-
60
-
61
-
62
-
63
-
64
-
65
-
66
-
67
-
68
-
69
-
70
-
71
-
72
-
73
-
74
-
75
-
76
-
77
-
78
-
79
-
80
-
81
-
82
-
83
-
84
-
85
-
86
-
87
-
88
-
89
-
90
-
91
-
92
-
93
-
94
-
95
-
96
-
97
-
98
-
99
-
100
-
101
-
102
-
103
-
104
-
105
-
106
-
107
-
108
-
109
-
110
-
111
-
112
-
113
-
114
-
115
-
116
-
117
-
118
-
119
-
120
-
121
-
122
-
123
-
124
-
125
-
126
-
127
-
128
-
129
-
130
-
131
-
132
-
133
-
134
-
135
-
136
-
137
-
138
 |
 |
