Panasonic PT-DZ12000U Operating Instructions - Page 15
▲▼◄►
 |
UPC - 791871111550
View all Panasonic PT-DZ12000U manuals
Add to My Manuals
Save this manual to your list of manuals |
Page 15 highlights
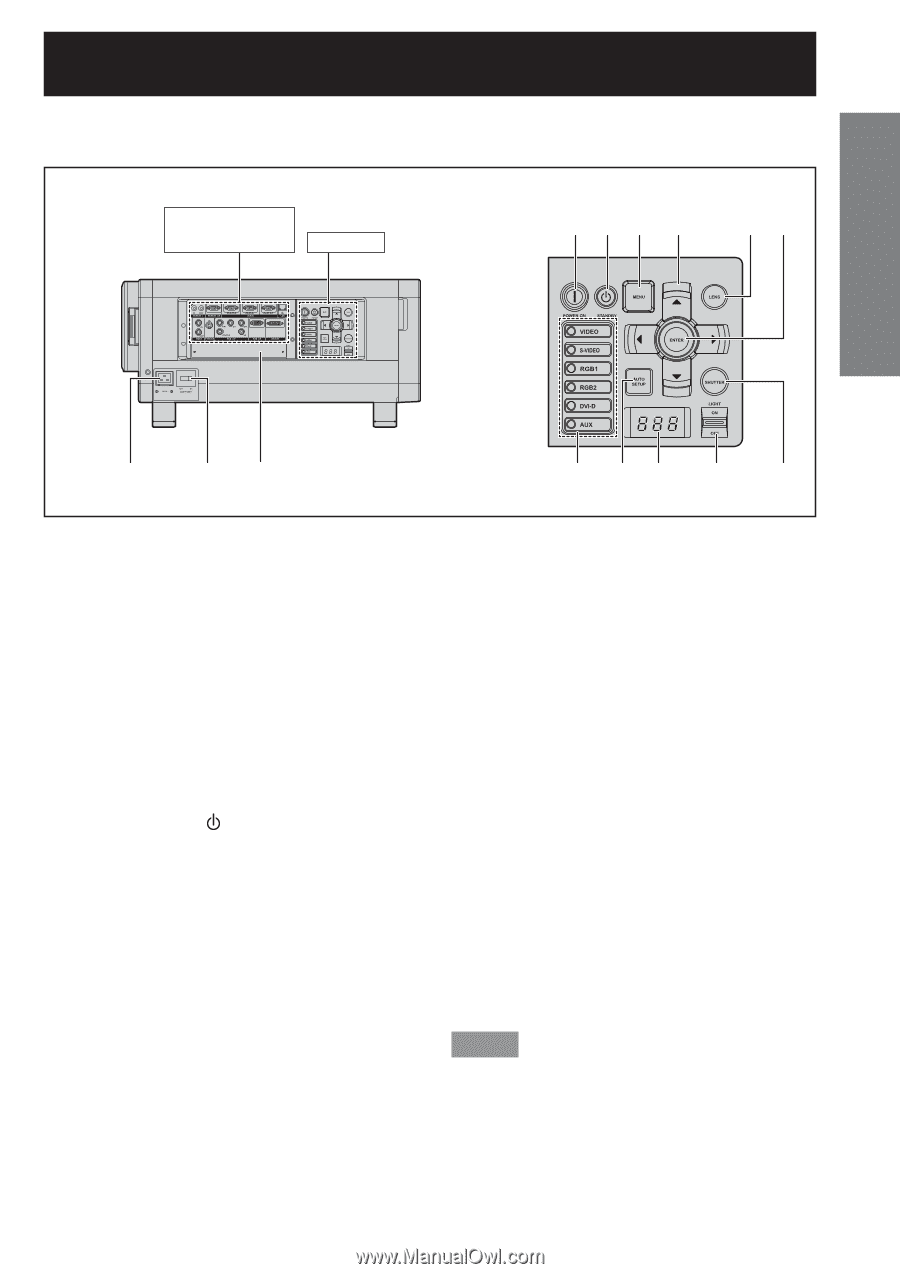
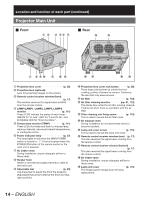
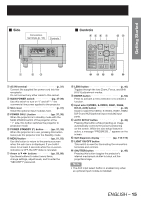
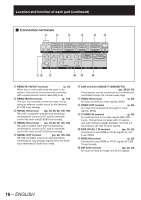
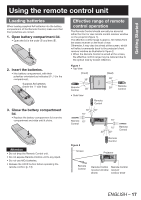
Getting Started „ Side Connection terminals (p. 16) Controls „ Controls 456 7 89 1 23 j kl m n 1 AC IN terminal p. 37) Connect the supplied line power cord into this receptacle. Do not connect any other cable to this socket. 2 MAIN POWER switch pp. 37-39) Use this switch to turn on "I" and off "○" the commercial line power applied to the projector. 3 Slot cover p. 31) Install the optional input modules here. 4 POWER ON ( I ) button pp. 37, 38) When the projector is in standby mode with the MAIN POWER switch of the projector at the " l " side, this button switches the projector to projection mode. 5 POWER STANDBY ( ) button pp. 37, 39) When the projector is in use, pressing this button twice puts the projector into the Standby mode. 6 MENU button pp. 51, 53) Use this button to return to the previous screen when the sub menu is displayed. If you hold it down for at least 3 seconds while the on-screen indication is OFF, the OFF state is canceled. 7 Arrow buttons pp. 53, 88) Use these buttons to select menu items, change settings, adjust levels, and to enter the "SECURITY" password. 8 LENS button p. 40) Toggles through the lens Zoom, Focus, and Shift (H & V) adjustment modes. 9 ENTER button p. 53) Press to activate a menu selection or to initiate a function. j Input select (VIDEO, S-VIDEO, RGB1, RGB2, DVI-D, AUX) button p. 48) Used to select the VIDEO, S-VIDEO, RGB1, RGB2, DVI-D and AUX (optional input module) input ports. k AUTO SETUP button p. 49) Pressing this button while projecting an image automatically corrects the picture positioning on the screen. While the auto setup feature is active, a message "PROGRESS..." appears on the screen. l Self-diagnosis display pp. 118-119) m LIGHT ON/OFF button This switch is used for illuminating the connection terminals and controls. n SHUTTER button p. 48) Pressing this button toggles the projector's internal mechanical shutter to black out the projected image. Note • The AUX input select button is enabled only when an optional input module is installed. ENGLISH - 15
-
 1
1 -
2
-
3
-
4
-
5
-
6
-
7
-
8
-
9
-
 10
10 -
 11
11 -
 12
12 -
 13
13 -
 14
14 -
 15
15 -
 16
16 -
 17
17 -
 18
18 -
 19
19 -
 20
20 -
21
-
22
-
23
-
24
-
25
-
26
-
27
-
28
-
29
-
30
-
31
-
32
-
33
-
34
-
35
-
36
-
37
-
38
-
39
-
40
-
41
-
42
-
43
-
44
-
45
-
46
-
47
-
48
-
49
-
50
-
51
-
52
-
53
-
54
-
55
-
56
-
57
-
58
-
59
-
60
-
61
-
62
-
63
-
64
-
65
-
66
-
67
-
68
-
69
-
70
-
71
-
72
-
73
-
74
-
75
-
76
-
77
-
78
-
79
-
80
-
81
-
82
-
83
-
84
-
85
-
86
-
87
-
88
-
89
-
90
-
91
-
92
-
93
-
94
-
95
-
96
-
97
-
98
-
99
-
100
-
101
-
102
-
103
-
104
-
105
-
106
-
107
-
108
-
109
-
110
-
111
-
112
-
113
-
114
-
115
-
116
-
117
-
118
-
119
-
120
-
121
-
122
-
123
-
124
-
125
-
126
-
127
-
128
-
129
-
130
-
131
-
132
-
133
-
134
-
135
-
136
-
137
-
138
 |
 |