Panasonic PT-DZ12000U Operating Instructions - Page 21
Projected range using geometric adjustment
 |
UPC - 791871111550
View all Panasonic PT-DZ12000U manuals
Add to My Manuals
Save this manual to your list of manuals |
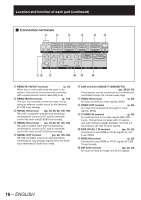
Page 21 highlights
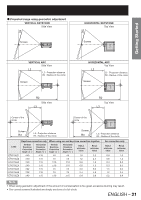
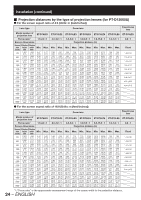
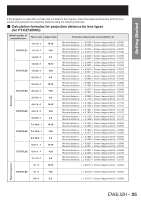
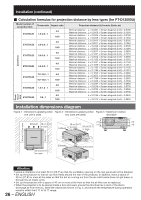
Getting Started z Projected range using geometric adjustment VERTICAL KEYSTONE Side View Ћ Screen HORIZONTAL KEYSTONE Top View Ќ Screen VERTICAL ARC Side View L2 L2 : Projection distance R2 : Radius of the circle Screen HORIZONTAL ARC Top View L2 L2 : Projection distance R2 : Radius of the circle Screen R2 Side View L3 R2 Top View L3 Center of the circle Center of the circle Screen R3 L3 : Projection distance R3 : Radius of the circle Screen R3 L3 : Projection distance R3 : Radius of the circle Lens ET-D75LE1 ET-D75LE2 ET-D75LE3 ET-D75LE4 ET-D75LE5 ET-D75LE6 ET-D75LE8 Keystone correction only Vertical Keystone Correction Angle Ћ( ˃) Horizontal Keystone Correction Angle Ќ( ˃) ʶ40 ʶ15 ʶ40 ʶ15 ʶ40 ʶ15 ʶ40 ʶ15 ʶ22 ʶ15 ʶ28 ʶ10 ʶ40 ʶ15 When using arc and keystone correction together Vertical Keystone Correction Angle Ћ( ˃) Horizontal Keystone Correction Angle Ќ( ˃) R2/L2 minimum value R3/L3 minimum value ʶ5 ʶ5 1.6 3.2 ʶ5 ʶ5 1.2 2.4 ʶ10 ʶ10 0.8 1.6 ʶ10 ʶ15 0.6 1.0 ʶ5 ʶ5 3.0 6.0 ʶ5 ʶ5 2.4 4.8 ʶ10 ʶ15 0.4 0.8 Arc correction only R2/L2 minimum value R3/L3 minimum value 0.8 1.6 0.6 1.2 0.4 0.8 0.3 0.5 1.5 3.0 1.2 2.4 0.2 0.4 Note • When using geometric adjustment, if the amount of compensation is too great, excessive blurring may result. • The curved screens illustrated are simply sections of a full circle. ENGLISH - 21
-
 1
1 -
2
-
3
-
4
-
5
-
6
-
7
-
8
-
9
-
10
-
11
-
12
-
13
-
14
-
15
-
 16
16 -
 17
17 -
 18
18 -
 19
19 -
 20
20 -
 21
21 -
 22
22 -
 23
23 -
 24
24 -
 25
25 -
 26
26 -
27
-
28
-
29
-
30
-
31
-
32
-
33
-
34
-
35
-
36
-
37
-
38
-
39
-
40
-
41
-
42
-
43
-
44
-
45
-
46
-
47
-
48
-
49
-
50
-
51
-
52
-
53
-
54
-
55
-
56
-
57
-
58
-
59
-
60
-
61
-
62
-
63
-
64
-
65
-
66
-
67
-
68
-
69
-
70
-
71
-
72
-
73
-
74
-
75
-
76
-
77
-
78
-
79
-
80
-
81
-
82
-
83
-
84
-
85
-
86
-
87
-
88
-
89
-
90
-
91
-
92
-
93
-
94
-
95
-
96
-
97
-
98
-
99
-
100
-
101
-
102
-
103
-
104
-
105
-
106
-
107
-
108
-
109
-
110
-
111
-
112
-
113
-
114
-
115
-
116
-
117
-
118
-
119
-
120
-
121
-
122
-
123
-
124
-
125
-
126
-
127
-
128
-
129
-
130
-
131
-
132
-
133
-
134
-
135
-
136
-
137
-
138
 |
 |
