Panasonic PT-DZ12000U Operating Instructions - Page 78
Installation Setting, Altitude Mode, Direction
 |
UPC - 791871111550
View all Panasonic PT-DZ12000U manuals
Add to My Manuals
Save this manual to your list of manuals |
Page 78 highlights
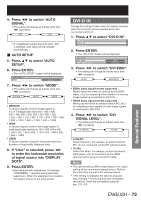
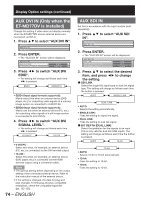
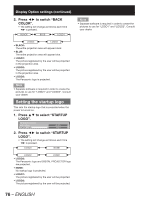
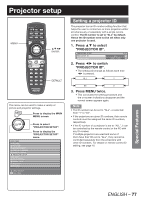
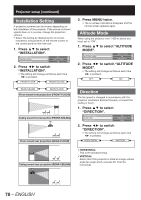
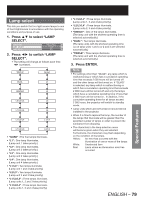
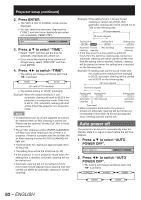
Projector setup (continued) Installation Setting A projection scheme can be chosen depending on the installation of the projector. If the picture is shown upside down or in reverse, change the projection scheme. • Select the setting by displaying the on-screen indications using buttons of the remote control or the control panel on the main unit. 1. Press ▲▼ to select "INSTALLATION". PROJECTOR ID INSTALLATION ALTITUDE MODE ALL FRONT-FLOOR ON 2. Press ◄► to switch "INSTALLATION". • The setting will change as follows each time ◄► is pressed. FRONT-FLOOR FRONT-CELING REAR-CELING REAR-FLOOR Floor mount front projection (FRONT-FLOOR) Ceiling mount front projection (FRONT-CEILING) Floor mount rear projection (REAR-FLOOR) 3. Press MENU twice. • The on-screen indications disappear and the normal screen appears again. Altitude Mode When using the projector over 1 400 m above sea level, set to "ON". 1. Press ▲▼ to select "ALTITUDE MODE". INSTALLATION ALTITUDE MODE DIRECTION FRONT-FLOOR ON HORIZONTAL 2. Press ◄► to switch "ALTITUDE MODE". • The setting will change as follows each time ◄► is pressed. OFF ON Direction The fan speed is changed in accordance with the projector orientation (pointed forward, or toward the ceiling or floor) 1. Press ▲▼ to select "DIRECTION". ALTITUDE MODE DIRECTION LAMP SELECT ON HORIZONTAL QUAD 2. Press ◄► to switch "DIRECTION". • The setting will change as follows each time ◄► is pressed. HORIZONTAL VERTICAL Ceiling mount rear projection (REAR-CEILING) • HORIZONTAL: This is the standard setup. • VERTICAL: Select this if the projector is tilted at a large vertical angle (an angle which exceeds 30˃from the horizontal). 78 - ENGLISH
-
 1
1 -
2
-
3
-
4
-
5
-
6
-
7
-
8
-
9
-
10
-
11
-
12
-
13
-
14
-
15
-
16
-
17
-
18
-
19
-
20
-
21
-
22
-
23
-
24
-
25
-
26
-
27
-
28
-
29
-
30
-
31
-
32
-
33
-
34
-
35
-
36
-
37
-
38
-
39
-
40
-
41
-
42
-
43
-
44
-
45
-
46
-
47
-
48
-
49
-
50
-
51
-
52
-
53
-
54
-
55
-
56
-
57
-
58
-
59
-
60
-
61
-
62
-
63
-
64
-
65
-
66
-
67
-
68
-
69
-
70
-
71
-
72
-
 73
73 -
 74
74 -
 75
75 -
 76
76 -
 77
77 -
 78
78 -
 79
79 -
 80
80 -
 81
81 -
 82
82 -
 83
83 -
84
-
85
-
86
-
87
-
88
-
89
-
90
-
91
-
92
-
93
-
94
-
95
-
96
-
97
-
98
-
99
-
100
-
101
-
102
-
103
-
104
-
105
-
106
-
107
-
108
-
109
-
110
-
111
-
112
-
113
-
114
-
115
-
116
-
117
-
118
-
119
-
120
-
121
-
122
-
123
-
124
-
125
-
126
-
127
-
128
-
129
-
130
-
131
-
132
-
133
-
134
-
135
-
136
-
137
-
138
 |
 |
