Panasonic PT-DZ12000U Operating Instructions - Page 84
Load all user data, Initialize, Service password
 |
UPC - 791871111550
View all Panasonic PT-DZ12000U manuals
Add to My Manuals
Save this manual to your list of manuals |
Page 84 highlights
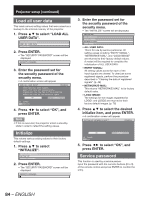
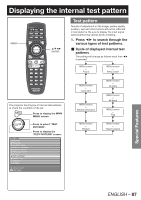
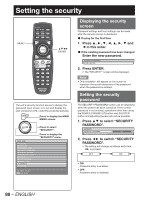
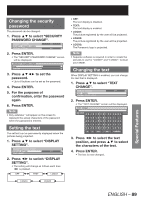
Projector setup (continued) Load all user data This loads various setting values that were saved as a backup to the internal memory of the projector. 1. Press ▲▼ to select "LOAD ALL USER DATA". SAVE ALL USER DATA LOAD ALL USER DATA INITIALIZE 2. Press ENTER. • The "SECURITY PASSWORD" screen will be displayed. SECURITY PASSWORD 3. Enter the password set for the security password of the security menu. • A confirmation screen will appear. LOAD ALL USER DATA? PROGRESS After data has been loaded, power will turn off automatically. Please wait for the fan to finish cooling before you turn on the projector again. OK CANCEL CHANGE ENTER EXECUTE 4. Press ◄► to select "OK", and press ENTER. Note • If this is executed, the projector enters a standby state in order to reflect the setting values. Initialize This returns various setting values to their factory default settings. 1. Press ▲▼ to select "INITIALIZE". LOAD ALL USER DATA INITIALIZE SERVICE PASSWORD 2. Press ENTER. • The "SECURITY PASSWORD" screen will be displayed. SECURITY PASSWORD 3. Enter the password set for the security password of the security menu. • The "INITIALIZE" screen will be displayed. INITIALIZE ALL USER DATA ENTRY SIGNAL NETWORK/E-MAIL LOGO IMAGE • ALL USER DATA: This is for use by service personnel. All setting values including "ENTRY SIGNAL", "NETWORK/E-MAIL", and "LOGO IMAGE" are returned to their factory default values. A restart will be required to complete the initialization of ALL USER DATA. • ENTRY SIGNAL: All setting values saved for each of the input signals are cleared. To clear just some registered signals, perform the procedure described in "Clearing the data of registered signals". (p. 46) • NETWORK/E-MAIL: This returns "NETWORK/E-MAIL" to its factory default value. • LOGO IMAGE: The settings for the images registered for LOGO1 and LOGO2 are returned to their factory default images. (p. 76) 4. Press ▲▼ to select the desired initialize item, and press ENTER. • A confirmation screen will appear. INITIALIZE NETWORK/E-MAIL? PROGRESS OK CANCEL CHANGE ENTER SET 5. Press ◄► to select "OK", and press ENTER. Service password This function is used by a service person. Input the password with the numeric buttons (0 to 9) of the remote control and press ENTER to confirm the entry. 84 - ENGLISH
-
 1
1 -
2
-
3
-
4
-
5
-
6
-
7
-
8
-
9
-
10
-
11
-
12
-
13
-
14
-
15
-
16
-
17
-
18
-
19
-
20
-
21
-
22
-
23
-
24
-
25
-
26
-
27
-
28
-
29
-
30
-
31
-
32
-
33
-
34
-
35
-
36
-
37
-
38
-
39
-
40
-
41
-
42
-
43
-
44
-
45
-
46
-
47
-
48
-
49
-
50
-
51
-
52
-
53
-
54
-
55
-
56
-
57
-
58
-
59
-
60
-
61
-
62
-
63
-
64
-
65
-
66
-
67
-
68
-
69
-
70
-
71
-
72
-
73
-
74
-
75
-
76
-
77
-
78
-
 79
79 -
 80
80 -
 81
81 -
 82
82 -
 83
83 -
 84
84 -
 85
85 -
 86
86 -
 87
87 -
 88
88 -
 89
89 -
90
-
91
-
92
-
93
-
94
-
95
-
96
-
97
-
98
-
99
-
100
-
101
-
102
-
103
-
104
-
105
-
106
-
107
-
108
-
109
-
110
-
111
-
112
-
113
-
114
-
115
-
116
-
117
-
118
-
119
-
120
-
121
-
122
-
123
-
124
-
125
-
126
-
127
-
128
-
129
-
130
-
131
-
132
-
133
-
134
-
135
-
136
-
137
-
138
 |
 |