Panasonic PT-DZ12000U Operating Instructions - Page 36
How to install and remove the projection lens optional
 |
UPC - 791871111550
View all Panasonic PT-DZ12000U manuals
Add to My Manuals
Save this manual to your list of manuals |
Page 36 highlights
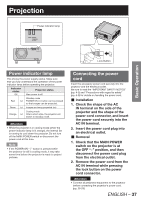
How to install and remove the projection lens (optional) Adjust the lens shift position so that it is at the home position (p. 41) before installing or removing the projection lens. Attention • Remove the dust-proof sponge from the lens fitting of the projector before installing the projection lens. (Keep the dust-proof sponge in a safe place for later use if needed.) • After removing the projection lens, install the dustproof sponge to the lens fitting of the projector in order to stop dust from getting inside the projector. How to install the projection lens 1. While pressing the projection lens cover lock button, pull the cover forward to remove it. 3. Push the projection lens cover in until it clicks into place. How to remove the projection lens 1. While pressing the projection lens cover lock button, pull the cover forward to remove it. FILTER CLEANING OPEN CLOSE Projection lens cover lock button 2. Align the mark (orange) on the projection lens with the mark on the projector ( ), and then insert the lens and turn it clockwise until it clicks into place. FILTER CLEANING OPEN CLOSE Projection lens cover lock button 2. While holding down the projection lens lock button, turn the projection lens counter clockwise, and then pull it off. Mark (orange) Projection lens lock button 36 - ENGLISH
-
 1
1 -
2
-
3
-
4
-
5
-
6
-
7
-
8
-
9
-
10
-
11
-
12
-
13
-
14
-
15
-
16
-
17
-
18
-
19
-
20
-
21
-
22
-
23
-
24
-
25
-
26
-
27
-
28
-
29
-
30
-
 31
31 -
 32
32 -
 33
33 -
 34
34 -
 35
35 -
 36
36 -
 37
37 -
 38
38 -
 39
39 -
 40
40 -
 41
41 -
42
-
43
-
44
-
45
-
46
-
47
-
48
-
49
-
50
-
51
-
52
-
53
-
54
-
55
-
56
-
57
-
58
-
59
-
60
-
61
-
62
-
63
-
64
-
65
-
66
-
67
-
68
-
69
-
70
-
71
-
72
-
73
-
74
-
75
-
76
-
77
-
78
-
79
-
80
-
81
-
82
-
83
-
84
-
85
-
86
-
87
-
88
-
89
-
90
-
91
-
92
-
93
-
94
-
95
-
96
-
97
-
98
-
99
-
100
-
101
-
102
-
103
-
104
-
105
-
106
-
107
-
108
-
109
-
110
-
111
-
112
-
113
-
114
-
115
-
116
-
117
-
118
-
119
-
120
-
121
-
122
-
123
-
124
-
125
-
126
-
127
-
128
-
129
-
130
-
131
-
132
-
133
-
134
-
135
-
136
-
137
-
138
 |
 |
