Panasonic PT-DZ12000U Operating Instructions - Page 53
Basic Operation, Using the menu screens, Resetting to the factory, default
 |
UPC - 791871111550
View all Panasonic PT-DZ12000U manuals
Add to My Manuals
Save this manual to your list of manuals |
Page 53 highlights
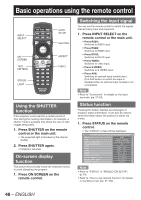
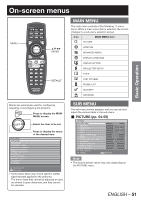
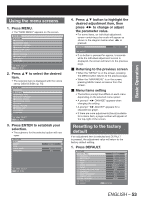
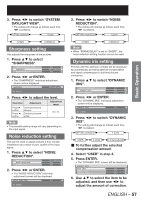
Basic Operation Using the menu screens 1. Press MENU. • The "MAIN MENU" appears on the screen. MAIN MENU PICTURE POSITION ADVANCED MENU DISPLAY LANGUAGE DISPLAY OPTION PROJECTOR SETUP P IN P TEST PATTERN SIGNAL LIST SECURITY NETWORK MENU SELECT ENTER SUB MENU 2. Press ▲▼ to select the desired item. • The selected item is displayed with the colors set by OSD DESIGN. (p. 75) MAIN MENU PICTURE POSITION ADVANCED MENU DISPLAY LANGUAGE DISPLAY OPTION PROJECTOR SETUP P IN P TEST PATTERN SIGNAL LIST SECURITY NETWORK MENU SELECT ENTER SUB MENU 3. Press ENTER to establish your selection. • The submenu for the selected option will now open. POSITION SHIFT ASPECT ZOOM CLOCK PHASE GEOMETORY DEFAULT 0 OFF MENU SELECT ENTER SUB MENU 4. Press ▲▼ button to highlight the desired adjustment item, then press ◄► to change or adjust the parameter value. • For some items, an individual adjustment screen containing a bar scale will appear as shown in the diagram below when ◄► is pressed. CONTRAST 0 ADJUST • If no button is pressed for approx. 5 seconds while the individual adjustment screen is displayed, the screen will return to the previous page. „ Returning to the previous screen • When the "MENU" is on the screen, pressing the MENU button returns to the previous page. • When the "MAIN MENU" is on the screen, pressing MENU clears all menus from the screen. „ Menu items setting • The bottom prompt line differs on each menu depending on the selected menu option: • A prompt "◄► CHANGE" appears when changing the setting. • A prompt "◄► ADJUST" appears for a separate bar graph. • If there are more adjustments (items) available for a menu item, a page number will appear at the top-right of the screen. Resetting to the factory default If an adjustment item is selected and DEFAULT is pressed, the adjustment value will return to the factory default setting. 1. Press DEFAULT. PICTURE PICTURE MODE CONTRAST BRIGHTNESS COLOR TINT COLOR TEMPERATURE GAMMA SYSTEM DAYLIGHT VIEW SHARPNESS NOISE REDUCTION DYNAMIC IRIS SYSTEM SELECTOR MENU SELECT CHANGE STANDARD 0 0 0 0 DEFAULT DEFAULT OFF 0 OFF OFF AUTO1 ENTER REGISTER ENGLISH - 53
-
 1
1 -
2
-
3
-
4
-
5
-
6
-
7
-
8
-
9
-
10
-
11
-
12
-
13
-
14
-
15
-
16
-
17
-
18
-
19
-
20
-
21
-
22
-
23
-
24
-
25
-
26
-
27
-
28
-
29
-
30
-
31
-
32
-
33
-
34
-
35
-
36
-
37
-
38
-
39
-
40
-
41
-
42
-
43
-
44
-
45
-
46
-
47
-
 48
48 -
 49
49 -
 50
50 -
 51
51 -
 52
52 -
 53
53 -
 54
54 -
 55
55 -
 56
56 -
 57
57 -
 58
58 -
59
-
60
-
61
-
62
-
63
-
64
-
65
-
66
-
67
-
68
-
69
-
70
-
71
-
72
-
73
-
74
-
75
-
76
-
77
-
78
-
79
-
80
-
81
-
82
-
83
-
84
-
85
-
86
-
87
-
88
-
89
-
90
-
91
-
92
-
93
-
94
-
95
-
96
-
97
-
98
-
99
-
100
-
101
-
102
-
103
-
104
-
105
-
106
-
107
-
108
-
109
-
110
-
111
-
112
-
113
-
114
-
115
-
116
-
117
-
118
-
119
-
120
-
121
-
122
-
123
-
124
-
125
-
126
-
127
-
128
-
129
-
130
-
131
-
132
-
133
-
134
-
135
-
136
-
137
-
138
 |
 |
