Panasonic PT-DZ12000U Operating Instructions - Page 62
Adjusting the zoom ratio, Clock phase adjustment, Adjusting the geometry
 |
UPC - 791871111550
View all Panasonic PT-DZ12000U manuals
Add to My Manuals
Save this manual to your list of manuals |
Page 62 highlights
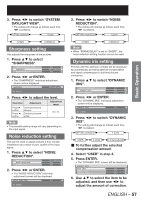
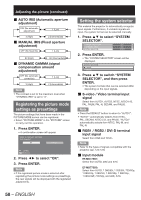
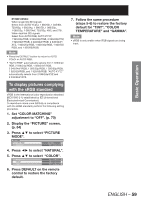
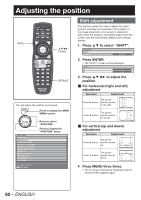
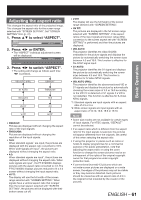
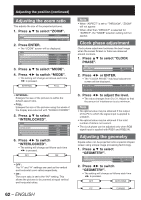
Adjusting the position (continued) Adjusting the zoom ratio This adjusts the size of the projected pictures. 1. Press ▲▼ to select "ZOOM". ASPECT ZOOM CLOCK PHASE DEFAULT 0 2. Press ENTER. • The "ZOOM" screen will be displayed. ZOOM MODE INTERLOCKED V H HV INTERNAL OFF 100% 100% 100% 3. Press ▲▼ to select "MODE". 4. Press ◄► to switch "MODE". • The setting will change as follows each time ◄► is pressed. INTERNAL FULL • INTERNAL: Enlarges the size of the pictures to within the default aspect ratio. • FULL: Enlarges the size of the pictures using the whole of the display area selected with "SCREEN FORMAT". 5. Press ▲▼ to select "INTERLOCKED". ZOOM MODE INTERLOCKED V H HV INTERNAL OFF 100% 100% 100% 6. Press ◄► to switch "INTERLOCKED". • The setting will change as follows each time ◄► is pressed. OFF ON • OFF : The "V" and "H" settings are used as the vertical and horizontal zoom ratios respectively. • ON : The zoom ratio is set to the "HV" setting. This allows the pictures to be zoomed at equal vertical and horizontal ratios. 62 - ENGLISH Note • When "ASPECT" is set to "THROUGH", "ZOOM" will not appear. • When other than "DEFAULT" is selected for "ASPECT", the "MODE" selection setting will not appear. Clock phase adjustment Clock phase adjustment achieves the best image when the screen flickers or halos are observed around contours. 1. Press ▲▼ to select "CLOCK PHASE". ZOOM CLOCK PHASE GEOMETORY 0 OFF 2. Press ◄► or ENTER. • The "CLOCK PHASE" individual adjustment screen will be displayed. CLOCK PHASE 0 ADJUST 3. Press ◄► to adjust the level. • The value changes from 0 to 31. Adjust so that the amount of interference is at a minimum. Note • No optimal value may be obtained if the output of the PC to which the signal input is applied is unstable. • No optimal value may be obtained if the total number of dots is not correct. • The clock phase can be adjusted only when RGB signal input is applied with RGB1 and RGB2 IN. Adjusting the geometry Square video can be projected onto a special shaped screen using unique image processing technology. 1. Press ▲▼ to select "GEOMETRY". ZOOM CLOCK PHASE GEOMETRY 0 OFF 2. Press ◄► to switch "GEOMETRY". • The setting will change as follows each time ◄► is pressed. OFF KEYSTONE PC CURVED
-
 1
1 -
2
-
3
-
4
-
5
-
6
-
7
-
8
-
9
-
10
-
11
-
12
-
13
-
14
-
15
-
16
-
17
-
18
-
19
-
20
-
21
-
22
-
23
-
24
-
25
-
26
-
27
-
28
-
29
-
30
-
31
-
32
-
33
-
34
-
35
-
36
-
37
-
38
-
39
-
40
-
41
-
42
-
43
-
44
-
45
-
46
-
47
-
48
-
49
-
50
-
51
-
52
-
53
-
54
-
55
-
56
-
 57
57 -
 58
58 -
 59
59 -
 60
60 -
 61
61 -
 62
62 -
 63
63 -
 64
64 -
 65
65 -
 66
66 -
 67
67 -
68
-
69
-
70
-
71
-
72
-
73
-
74
-
75
-
76
-
77
-
78
-
79
-
80
-
81
-
82
-
83
-
84
-
85
-
86
-
87
-
88
-
89
-
90
-
91
-
92
-
93
-
94
-
95
-
96
-
97
-
98
-
99
-
100
-
101
-
102
-
103
-
104
-
105
-
106
-
107
-
108
-
109
-
110
-
111
-
112
-
113
-
114
-
115
-
116
-
117
-
118
-
119
-
120
-
121
-
122
-
123
-
124
-
125
-
126
-
127
-
128
-
129
-
130
-
131
-
132
-
133
-
134
-
135
-
136
-
137
-
138
 |
 |
