Panasonic PT-DZ12000U Operating Instructions - Page 74
AUX DVI IN Only when the, ET-MD77DV is installed, AUX SDI
 |
UPC - 791871111550
View all Panasonic PT-DZ12000U manuals
Add to My Manuals
Save this manual to your list of manuals |
Page 74 highlights
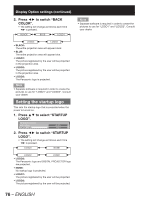
Display Option settings (continued) AUX DVI IN (Only when the ET-MD77DV is installed) Change this setting if video does not display normally when the ET-MD77DV and an external device are connected via DVI-D. 1. Press ▲▼ to select "AUX DVI IN". DVI-D IN AUX DVI IN AUX SDI IN 2. Press ENTER. • The "AUX DVI IN" screen will be displayed. AUX DVI IN AUX DVI EDID AUX DVI SIGNAL LEVEL EDID1 0-255:PC 3. Press ◄► to switch "AUX DVI EDID". • The setting will change as follows each time ◄► is pressed. EDID1 EDID2(PC) • EDID1 (Input signal formats supported) : Mainly select this when an external device (DVD player, etc.) for outputting video signals of a moving image system is connected to AUX DVI IN. • EDID2 (Input signal formats supported) : Mainly use this when an external device (PC, etc.) for outputting video signals of a still image system is connected to AUX DVI IN. 4. Press ◄► to switch "AUX DVI SIGNAL LEVEL". • The setting will change as follows each time ◄► is pressed. 0-255:PC 16-235 • 0-255:PC : Select this when, for example, an external device (PC, etc.) is connected via the DVI terminal output. • 16-235 : Select this when, for example, an external device (DVD player, etc.) is connected via the HDMI terminal output using a conversion cable. Note • The optimal setting differs depending on the output setting of the connected external device. Refer to the instruction manual of the external device. • If the setting is changed, the data for plug and play changes. For the plug and play compatible resolutions, check the compatible signal list (pp. 122-123). 74 - ENGLISH AUX SDI IN Set this in accordance with the input module (sold separately). 1. Press ▲▼ to select "AUX SDI IN". AUX DVI IN AUX SDI IN ON-SCREEN DISPLAY 2. Press ENTER. • The "AUX SDI IN" screen will be displayed. AUX SDI IN SDI LINK BIT DEPTH(DUAL LINK) SDI SIGNAL LEVEL AUTO AUTO 64-940 3. Press ▲▼ to select the desired item, and press ◄► to change the setting. z SDI LINK Select the single link signal type or dual link signal type. The setting will change as follows each time the button is pressed. AUTO SINGLE LINK DUAL LINK • AUTO: Selects the setting automatically. • SINGLE LINK: Fixes the setting to signal link signal. • DUAL LINK: Fixes the setting to dual link signal. z BIT DEPTH (DUAL LINK) Select the gradation for the signals to be input. This is only valid for dual link RGB inputs. The setting will change as follows each time the button is pressed. AUTO 12-bit 10-bit • AUTO: Selects 12-bit or 10-bit automatically. • 12-bit: Fixes the setting to 12-bit. • 10-bit: Fixes the setting to 10-bit.
-
 1
1 -
2
-
3
-
4
-
5
-
6
-
7
-
8
-
9
-
10
-
11
-
12
-
13
-
14
-
15
-
16
-
17
-
18
-
19
-
20
-
21
-
22
-
23
-
24
-
25
-
26
-
27
-
28
-
29
-
30
-
31
-
32
-
33
-
34
-
35
-
36
-
37
-
38
-
39
-
40
-
41
-
42
-
43
-
44
-
45
-
46
-
47
-
48
-
49
-
50
-
51
-
52
-
53
-
54
-
55
-
56
-
57
-
58
-
59
-
60
-
61
-
62
-
63
-
64
-
65
-
66
-
67
-
68
-
 69
69 -
 70
70 -
 71
71 -
 72
72 -
 73
73 -
 74
74 -
 75
75 -
 76
76 -
 77
77 -
 78
78 -
 79
79 -
80
-
81
-
82
-
83
-
84
-
85
-
86
-
87
-
88
-
89
-
90
-
91
-
92
-
93
-
94
-
95
-
96
-
97
-
98
-
99
-
100
-
101
-
102
-
103
-
104
-
105
-
106
-
107
-
108
-
109
-
110
-
111
-
112
-
113
-
114
-
115
-
116
-
117
-
118
-
119
-
120
-
121
-
122
-
123
-
124
-
125
-
126
-
127
-
128
-
129
-
130
-
131
-
132
-
133
-
134
-
135
-
136
-
137
-
138
 |
 |
