Samsung SCH-U900 User Manual - Page 135
Samsung SCH-U900 Manual
 |
View all Samsung SCH-U900 manuals
Add to My Manuals
Save this manual to your list of manuals |
Page 135 highlights
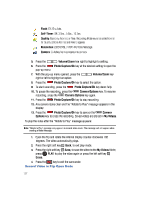
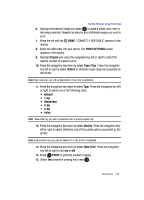
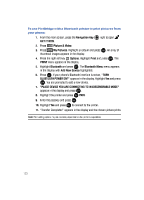
Printing Pictures Using PictBridge 6. Highlight the desired image and press OK to place a check mark next to the image selected. Repeat this step for any additional images you wish to print. 7. Press the left soft key DONE. "CONNECT A USB CABLE" appears in the display. 8. Insert the USB cable into your phone. The PRINT SETTINGS screen appears in the display. 9. Highlight Copies and press the navigation key left or right to select the desired number of copies to print. 10. Press the navigation key down to select Paper Size. Press the navigation key left or right to select Default or whatever paper sizes are supported by the printer. Note: Paper sizes may vary and are dependent on the printer's capabilities. 11. Press the navigation key down to select Type. Press the navigation key left or right to select one of the following sizes: • Default • 1-Up • Borderless • 2-Up • 4-Up • Index Note: These sizes may vary and are dependent on the printer's capabilities. 12. Press the navigation key down to select Quality. Press the navigation key left or right to select Default or one of the quality options supported by the printer. Note: Quality options may vary and are dependent on the printer's capabilities. 13. Press the navigation key down to select Date Print. Press the navigation key left or right to turn on or off. 14. Press OK PRINT to print the marked image(s). 15. Select Yes to confirm printing and press OK . Multimedia 132
-
 1
1 -
2
-
3
-
4
-
5
-
6
-
7
-
8
-
9
-
10
-
11
-
12
-
13
-
14
-
15
-
16
-
17
-
18
-
19
-
20
-
21
-
22
-
23
-
24
-
25
-
26
-
27
-
28
-
29
-
30
-
31
-
32
-
33
-
34
-
35
-
36
-
37
-
38
-
39
-
40
-
41
-
42
-
43
-
44
-
45
-
46
-
47
-
48
-
49
-
50
-
51
-
52
-
53
-
54
-
55
-
56
-
57
-
58
-
59
-
60
-
61
-
62
-
63
-
64
-
65
-
66
-
67
-
68
-
69
-
70
-
71
-
72
-
73
-
74
-
75
-
76
-
77
-
78
-
79
-
80
-
81
-
82
-
83
-
84
-
85
-
86
-
87
-
88
-
89
-
90
-
91
-
92
-
93
-
94
-
95
-
96
-
97
-
98
-
99
-
100
-
101
-
102
-
103
-
104
-
105
-
106
-
107
-
108
-
109
-
110
-
111
-
112
-
113
-
114
-
115
-
116
-
117
-
118
-
119
-
120
-
121
-
122
-
123
-
124
-
125
-
126
-
127
-
128
-
129
-
 130
130 -
 131
131 -
 132
132 -
 133
133 -
 134
134 -
 135
135 -
 136
136 -
 137
137 -
 138
138 -
 139
139 -
 140
140 -
141
-
142
-
143
-
144
-
145
-
146
-
147
-
148
-
149
-
150
-
151
-
152
-
153
-
154
-
155
-
156
-
157
-
158
-
159
-
160
-
161
-
162
-
163
-
164
-
165
-
166
-
167
-
168
-
169
-
170
-
171
-
172
-
173
-
174
-
175
-
176
-
177
-
178
-
179
-
180
-
181
 |
 |