Samsung SGH-T839 User Manual (user Manual) (ver.f9) (English) - Page 182
Time Management, Calendar, Applications, Go to, Create, Settings
 |
View all Samsung SGH-T839 manuals
Add to My Manuals
Save this manual to your list of manuals |
Page 182 highlights
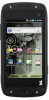
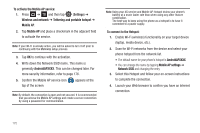
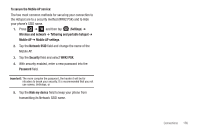
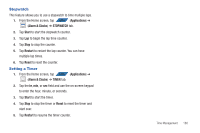
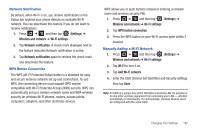
Section 11: Time Management This section describes how you can manage time using timerelated applications such as the Calendar, Alarm Clock, Analog or Digital clock, and the World clock. Calendar With the Calendar feature, you can consult the calendar by day, week, or month, create events, and set an alarm to act as a reminder. Important!: You must have previously added an account (Facebook, Microsoft Exchange ActiveSync, or Google) prior to using the Calendar. 1. From the Home screen, tap APPS (Applications) ➔ S M T W T F 1 2 3 4 5 (Calendar). The Calendar displays four tabs: 7 8 9 10 11 12 14 15 16 17 18 19 • Month: displays the Month view. • Week: displays the Week view. • Day: displays the Day view. • List: allows you to search for events for the selected Month, Week, or Day. Or you can look for events for a future date. 2. Press and select one of the following options: • Search: allows you to search within your current events. • Create: creates a new Event. 177 • Go to: displays a specific date. • Today: displays the date highlighted with a Blue box highlighting the date. • Delete: allows you to delete All events, All events before today, or an individual event. • Settings: displays a list of configurable settings. Creating a Calendar Event 1. From the Home screen, tap (Calendar). S M T W T F 1 2 3 4 5 7 8 9 10 11 12 14 15 16 17 18 19 2. From the Month tab, press APPS (Applications) ➔ ➔ Create. Calendar Settings Using the Calendar settings you can select the day with which you want the calendar to begin. You also select how you want to view the calendar, by Month, Week, or Day or determine how to manage events, notifications, sounds, and defaults reminders. 1. From the Home screen, tap APPS (Applications) ➔ S M T W T F 1 2 3 4 5 . 7 8 9 10 11 12 14 15 16 17 18 19 2. Press ➔ Settings.
-
 1
1 -
2
-
3
-
4
-
5
-
6
-
7
-
8
-
9
-
10
-
11
-
12
-
13
-
14
-
15
-
16
-
17
-
18
-
19
-
20
-
21
-
22
-
23
-
24
-
25
-
26
-
27
-
28
-
29
-
30
-
31
-
32
-
33
-
34
-
35
-
36
-
37
-
38
-
39
-
40
-
41
-
42
-
43
-
44
-
45
-
46
-
47
-
48
-
49
-
50
-
51
-
52
-
53
-
54
-
55
-
56
-
57
-
58
-
59
-
60
-
61
-
62
-
63
-
64
-
65
-
66
-
67
-
68
-
69
-
70
-
71
-
72
-
73
-
74
-
75
-
76
-
77
-
78
-
79
-
80
-
81
-
82
-
83
-
84
-
85
-
86
-
87
-
88
-
89
-
90
-
91
-
92
-
93
-
94
-
95
-
96
-
97
-
98
-
99
-
100
-
101
-
102
-
103
-
104
-
105
-
106
-
107
-
108
-
109
-
110
-
111
-
112
-
113
-
114
-
115
-
116
-
117
-
118
-
119
-
120
-
121
-
122
-
123
-
124
-
125
-
126
-
127
-
128
-
129
-
130
-
131
-
132
-
133
-
134
-
135
-
136
-
137
-
138
-
139
-
140
-
141
-
142
-
143
-
144
-
145
-
146
-
147
-
148
-
149
-
150
-
151
-
152
-
153
-
154
-
155
-
156
-
157
-
158
-
159
-
160
-
161
-
162
-
163
-
164
-
165
-
166
-
167
-
168
-
169
-
170
-
171
-
172
-
173
-
174
-
175
-
176
-
 177
177 -
 178
178 -
 179
179 -
 180
180 -
 181
181 -
 182
182 -
 183
183 -
 184
184 -
 185
185 -
 186
186 -
 187
187 -
188
-
189
-
190
-
191
-
192
-
193
-
194
-
195
-
196
-
197
-
198
-
199
-
200
-
201
-
202
-
203
-
204
-
205
-
206
-
207
-
208
-
209
-
210
-
211
-
212
-
213
-
214
-
215
-
216
-
217
-
218
-
219
-
220
-
221
-
222
-
223
-
224
-
225
-
226
-
227
-
228
-
229
-
230
-
231
-
232
-
233
-
234
-
235
-
236
-
237
-
238
-
239
-
240
-
241
-
242
-
243
-
244
-
245
-
246
-
247
-
248
-
249
-
250
-
251
-
252
-
253
-
254
-
255
-
256
-
257
-
258
-
259
 |
 |
