Brother International XL-6452 User Manual - French - Page 57
illeSere, pieces, ecrercr, canine
 |
View all Brother International XL-6452 manuals
Add to My Manuals
Save this manual to your list of manuals |
Page 57 highlights
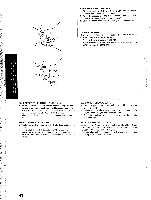
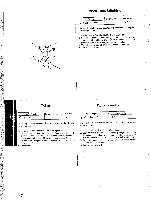
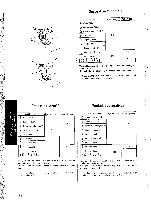
A Htl !HI C Elastic Stitching Pattern j: (Elastic Stitch) Stitch Length F-2.5 Stitch Width 3-5 The Elastic Stitch can be used for 3 functions: mending, sewing elastic or joining fabric. Each is explained below. Set the Pattern Selection Dial to Elastic Stitch. MENDING 1. Place the reinforcement fabric under area to be mended. 2. Following the line of the tear, sew using the Elastic Stitch as illustrated in fig. A . SEWING ELASTIC 1. Place the elastic on the fabric. 2. As you sew, stretch the elastic both in the front and behind the presser foot as shown in fig. B . JOINING FABRIC The Elastic Stitch can be used to join two pieces of fabric together and is very effective when sewing knitted fabrics. When nylon thread is used, the stitch will not be visible. 1. Place the edge of the two pieces of fabric together and center them under the presser loot. 2. Sew them together using the Elastic Stitch taking care to keep the two fabric edges close together as shown in fig. C Point elastique Puntada elastica Models de point (Point diast Unto Longueur de paint Largeur (le point F-2,5 3-5 i.e point ((last irate possizile trolls ii netions principales: Ic raccommodage la couture d'Ulnstir ies on 'lasso ilnlage de tissns. Chnetmc sic ees troi. 'Nunions sc irouvc dclaiilic ci-d ,woos. Moire Ic stlIccienr de nualele de mint sur Ic point dlast lune. REPRISAGE I . Placer la toile de rex' t sees Li mile i-i repriser. 2. Condit en suivani hi Iigne de In ddeligure. Condo, an point dlaslique commc Ic motive la fig. A. COUTURE DiELAS'FIQUES I . Placer illastique stir le 2. A illeSere (pie l'on mud, tend de-biche (voir fig. II). I'dlaslique de part ct d'aulrc du pied- ASSEMBLAGE DE TISSUS I.e point elastique petit servir II assembler deux morceaux de iissu. II s'avere pulticuli@mmcnl ethic:ice pony Iti couture de incu rs. Avec du nylon, In couture sera invisible. I . Placer hard it hard Ics deux pieces de l issa el Ics ecrercr sons le piedde-hiche. 2. Les assembler twee le point Oath kiln', en pitman hien spin de girder les deux pieces laird n hurl, canine is nutting In fig.C. Modelo de puntada Largo de puntada Ancho de puntada (puniarla elastica) F-2,5 3-5 • Se puede Lear la puntada elastica para tres operaciones: los remiendos la inserci6n de gomas elasticas y como puntada de union pars junta dos tejidds. Fonga el 'Selector de puntatlas on la puntada cl,sties. REMIEN DOS I. Cr/lot-0e la cola de refuerzo debajo de la zona a rematar. 2. Siguie6clo In Ifnea de la rasgadura, cosa con la puntada elastica tat coma iilustrado en In fig. A. INSERCION DE GOMAS ELASTICAS 1. Poing,' In grata sobre el tejido. 2. A meci:irla quo este cosiendo, estire el elastica tanto delanto coma (tetras del prensatelas tat coma se muestra en la fig. B, PUNTADIA DE UNION I a mintarta elfisl len puerle servir pain unir dos trozos de leiido y resulla luny rficienlo para In custom da prenclas de punlo. Si se usa un lido de nildn, In puntada rosultarii I . lunte las orillas de ambos trozos de tejido y centreias debajo del prensatelas. 2. Cosal4 juntas con la puntada eldstica, teniendo sumo cuidado en inantoner las dos ori Ias do los lolldos may juntas, (al come se aprec la en la fig. C. 48
-
 1
1 -
2
-
3
-
4
-
5
-
6
-
7
-
8
-
9
-
10
-
11
-
12
-
13
-
14
-
15
-
16
-
17
-
18
-
19
-
20
-
21
-
22
-
23
-
24
-
25
-
26
-
27
-
28
-
29
-
30
-
31
-
32
-
33
-
34
-
35
-
36
-
37
-
38
-
39
-
40
-
41
-
42
-
43
-
44
-
45
-
46
-
47
-
48
-
49
-
50
-
51
-
 52
52 -
 53
53 -
 54
54 -
 55
55 -
 56
56 -
 57
57 -
 58
58 -
 59
59 -
 60
60 -
 61
61 -
 62
62 -
63
-
64
-
65
-
66
-
67
-
68
-
69
-
70
-
71
-
72
-
73
-
74
-
75
-
76
-
77
-
78
-
79
-
80
-
81
-
82
-
83
-
84
-
85
-
86
-
87
-
88
-
89
-
90
-
91
-
92
-
93
-
94
-
95
-
96
-
97
-
98
 |
 |
