Brother International XL-6452 User Manual - French - Page 71
Costura, botones
 |
View all Brother International XL-6452 manuals
Add to My Manuals
Save this manual to your list of manuals |
Page 71 highlights
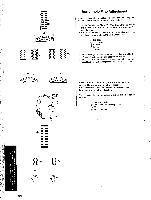
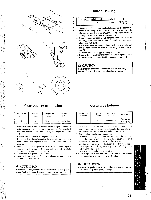
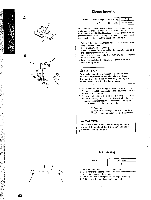
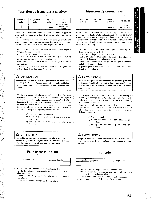
Button Sewing O O r. Pattern Stitch Length 0 Stitch Width Less than 5 Foot Zigzag Presser Foot 1. Measure the distance between the holes and set the appropriate stitch width using the Stitch Width Dial. For example, if the distance between the holes Is 1.5 mm, set the stitch width to 1.5. 2. Change the foot to the Zigzag presser foot. 3. Remove the power supply plug from the outlet. And place the darning plate on the needle plate. Connect the power supply plug into a wall outlet. 4. Place a button between the foot and the fabric and make sure that the needle enters the holes without hitting the button. if it hits see Step 1. 5. At a slow speed, sew approximately 10 stitches. 6. Remove the material from the machine. Cut the upper and lower threads and tie both threads at the back of the material. A CAUTION . Make sure the needle does not strike the button during sewing. The needle may break, leading to Injury. at Pour coudre un bouton Costura de botones Moclele de point Longticur de point 0 Largeur de point Pied-de -biche Moins cic 5 Pied pour zigzag Modelo de puntada Largo de puntada 0 t Ancho de puntada Menos de 5 Prensatc las Prensalelas para zigzag Mesmer Is distance entre les Innis du houlon et ittler la lingur de point appropridc a raidc du scilcdeur correspond; nt. Par cxcinplc, sl hi distance entre les irons cal de I,5 mm, regler la argeor de point stir I _5. 2. liemplacer le pied habitue] par tin pied pour zigiac. 3. INThrancher Ic cordon ((Mimetic:Mon tic la prise. Placer la plaque rcpriscr sur la plaque cl'aiguille. Brancher la lithe d'alimcntation uric prise secictir. 4. Placer on bouton entre le pied Cl Ic tissu et veiller iI cc que l'aiguille pique dans les irons sours licurter le NILIIO11. Si jamais die lienne le bottom, veinIlez vials teporier all point I. 5. Coudrc environ 10 points n taible vilest. 6. Renrer lc lissu dc In machine. Cooper les fillinfericur et supi3rieur ptiis les noucr sur Venvers du tissu. A ATTENTION Pendant In couture, veillez A ce que l'aiguille ne touche pas le bouton. L'aiguilic risque dc easser et vans pourricz volts blesser. 1. Mida la distal cia entre los orificios y ajuste el ancho de printacla correspondiente con el selector adecuado. Por ejemplo, si in distancia es rle 1,5 mm, ajuste el ancho do puntada en 1,5. 2. Cambie el pi Tisatelas por ono para zigzag. 3. Desenclarfe I i clavija de alimentacirin de Li tom de corriente, y ponga la Plata de zurcir en la placa de la aguja. Conecte ei enchufe de alimentation a una tcona de corriente. 4. Coloque on botOn entre el prensatelas y el tejido y asegtirese de que la aguja pase por los agujeros sin picar el boron. Si golpea el boton, v6ase el punto 1. 5. Cosa linos iu punladas a 'raja veto( idad. 6. Retire ci tejidu tie la mziquina. Corte los lidos inferior y superior y 'raga un nuclo con ambos en el revels del tejido. A PRECAUCION AsegUrese de que la aguja no roza ci boton mientras cost. La aguja podria romperse y causar lesiones. 7 0 H Z Zz CO C. - O = - 7 • OO z cj LL. li m E- yr C U 62
-
 1
1 -
2
-
3
-
4
-
5
-
6
-
7
-
8
-
9
-
10
-
11
-
12
-
13
-
14
-
15
-
16
-
17
-
18
-
19
-
20
-
21
-
22
-
23
-
24
-
25
-
26
-
27
-
28
-
29
-
30
-
31
-
32
-
33
-
34
-
35
-
36
-
37
-
38
-
39
-
40
-
41
-
42
-
43
-
44
-
45
-
46
-
47
-
48
-
49
-
50
-
51
-
52
-
53
-
54
-
55
-
56
-
57
-
58
-
59
-
60
-
61
-
62
-
63
-
64
-
65
-
 66
66 -
 67
67 -
 68
68 -
 69
69 -
 70
70 -
 71
71 -
 72
72 -
 73
73 -
 74
74 -
 75
75 -
 76
76 -
77
-
78
-
79
-
80
-
81
-
82
-
83
-
84
-
85
-
86
-
87
-
88
-
89
-
90
-
91
-
92
-
93
-
94
-
95
-
96
-
97
-
98
 |
 |
