Brother International XL-6452 User Manual - French - Page 70
Comm.
 |
View all Brother International XL-6452 manuals
Add to My Manuals
Save this manual to your list of manuals |
Page 70 highlights
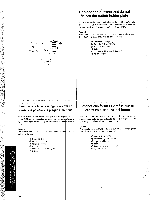
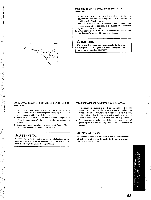
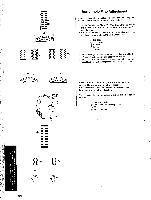
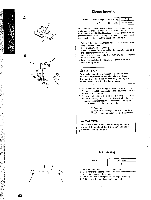
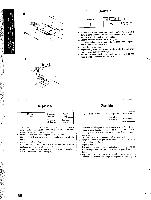
When the buttonhole is not sewn correctly: There are two different procedures for correcting buttonhole sewing, depending on which part of the buttonhole is not sewn correctly. A Correction Procedure 1 (See fig. A ) 1. Raise the Presser Foot Lever. then remove the fabric, upper thread and lower thread. 2. Pull the buttonhole lever slight) i toward you. 3. Sew about 10 stitches with nc fabric, upper thread, or lower thread in the machine. 4. Place the fabric under the presser foot, and set the upper and lower thread again, then lightly push the buttonhole lever toward the back of the machine and sew the buttonhole from the beginning. B Correction Procedure 2 (See fig. 13 ) 1. Raise the Presser Foot Lever, I hen remove the fabric and all of the sewn thread. 2. Place the fabric under the presser foot again, then lightly push the buttonhole lever toward the hack of the machine and sew the buttonhole from the beginning. NOTE: When you are finished sewing all Buttonholes be sure to raise the buttonhole lever. If the buttonhole lever is pushed ioward the back of the machine while sewing any stitch other than ;i buttonhole, the buttonhole teed will be used and the stitch will nol be sewn correctly. If the buttonhole lever is accidentally pushed when you are sewing a stitch other than a buttonhole, remove the fabric and thread from the machine, raise the buttonhole lever, and sew about 20 stitches. Then sew the intended stitch. Lorsque la couture de la boolonniere n'est pas correcte: Vous pouvez corriger la couture d'tme boutonniere de deux manieres differentes, scion In pantie de in boutonniere runniest pas Hen COMM. Wiliode de correction I (voir I. Lever Ic levier du pied de biche, enlever le tissu, le fil supdricur et le fit infdrieur. 2. Tirer Idgerement le levier des boutonnieres vets soi. 3. Coudre environ 10 points sans tissu, avec le lit supdrieur et le fit in fdricur clans la machine. 4. Mettre le tissu sous le pied de biehe et remettre les fits supdricur et infdrieur. Puis pousser ICgerement lc levier des boutonnieres vers Earner° de la machine et coudre la boutonniere depots le cldbui. Cfel co Cc O Tu nor0 c 5 '7'. [j 0 2 OSI nF i m z cn O t-',1- m LZID Mdthodc do correction 2 (voir fig.li) I. Relevcr le levier do pied-de-biche puis retirer Ic Ussu et tout to fiI cousu. 2. Remettre le tissu sous le pied-de-biehe puis pousser lagerement le levier des boutonnieres vers l'arriere de la machine ci coudre la boutonniere depuis le ddlitu. REMARQUE: Lorsque la boutonniere est tenninee, no pas oublier de retever le levier. Si vous poussez lc levier des boutonnieres yens l'arriere de la machine pendant In couture d'un point mitre mimic boutonniere, sans coudre de boutonniere, l'entrainement pour boutonnieres sera utilist5 et to point tic sena pas correct. Si le levier est poussd aceidemellement lot's de In couture d' un autre point, enlevez lc tissu et titer Ic fit do la machine, lever le levier do boutonniere el coudre 20 points. Coudre mak Ic point souhaili1. Ojales mat cosidos: Existen dos procedimientos diferer Iles para corregir el cosido de los ojales, en funciOn de la parte del ojal qua se ha cosido de forma incorre, la. Procedirniento de correccian 1 (V rase fig. A) 1. Suba la palanca del prensatel: . y despues retire el Hide, y los hilos superior e interior. 2. Tire ligeramente hacia usted dr , la palanca de ojales. 3. Cosa unas diet puntadas sin d tejido, ni los kilos superior e inferior en la maquina. 4. Ponga el tejido clebajo del prett;atela, y vuelva a colocar los kilos superior e inferior, presione I geramente la palanca de ()idles hacia la parte basera de la I .riquina y cosa el ojal desde el prim ipio. Procedimiento de correccion 2 (v, .,.ase fig. B) 1. Leval-Ile In palanca del prensat( las y retire el tejido y loci° el kilo cosido. 2. Vuelva n colocar in tejiclo 4 ,bajn del prensatelas, presione ligeramente la palanca de 01 des hacia la parte baser° de la y cosa el ojal desde rl principio. NOTA: Cuanclo haya terminado de coser silos los ojales, asegut ese de subir la palanca de ojales. Si se empuja hacia la parte poste . ior de la maquina In palanca de ojales al coser una puntarla que sea un ojal, entrara en accirin la a limentacion do ojales y In punia. 1.1 no se casein cone< iameni 0. Si emp'ija nccidenta Intent(' Its pal, pica de ojales cuanclo este cnsiendo con una puntada que no sea h, de retire el !Oil(' y el hilo de la maquina, suba la palanca de njal es, y cosa una 2t1 puntadas. Despues cosy con la puntada realmente quiere. 61
-
 1
1 -
2
-
3
-
4
-
5
-
6
-
7
-
8
-
9
-
10
-
11
-
12
-
13
-
14
-
15
-
16
-
17
-
18
-
19
-
20
-
21
-
22
-
23
-
24
-
25
-
26
-
27
-
28
-
29
-
30
-
31
-
32
-
33
-
34
-
35
-
36
-
37
-
38
-
39
-
40
-
41
-
42
-
43
-
44
-
45
-
46
-
47
-
48
-
49
-
50
-
51
-
52
-
53
-
54
-
55
-
56
-
57
-
58
-
59
-
60
-
61
-
62
-
63
-
64
-
 65
65 -
 66
66 -
 67
67 -
 68
68 -
 69
69 -
 70
70 -
 71
71 -
 72
72 -
 73
73 -
 74
74 -
 75
75 -
76
-
77
-
78
-
79
-
80
-
81
-
82
-
83
-
84
-
85
-
86
-
87
-
88
-
89
-
90
-
91
-
92
-
93
-
94
-
95
-
96
-
97
-
98
 |
 |
