Canon PIXMA MX392 Manual - Page 110
In thumbnail view - printer software
 |
View all Canon PIXMA MX392 manuals
Add to My Manuals
Save this manual to your list of manuals |
Page 110 highlights
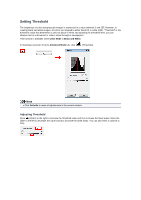
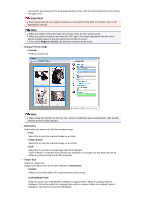
Documents are scanned in the long-edge binding format, with the end inserted to the ADF being the upper end. Important Some applications do not support continuous scanning from the ADF. For details, refer to the application's manual. Note When you select a document type, the unsharp mask function will be active. When you select an option other than the ADF types, the image adjustment function which adjusts images based on the document type will also be active. If you select Magazine (Color), the descreen function will be active. • Display Preview Image • Preview Performs a trial scan. Note When using the machine for the first time, scanner calibration starts automatically. Wait a while until the preview image appears. • Destination Select what you want to do with the scanned image. • Print Select this to print the scanned image on a printer. • Image display Select this to view the scanned image on a monitor. • OCR Select this to use the scanned image with OCR software. "OCR software" is software that converts text scanned as an image into text data that can be edited in word processors and other programs. • Output Size Select an output size. Output size options vary by the item selected in Destination. • Flexible Allows you to freely adjust the cropping frames (scan areas). In thumbnail view Drag the mouse over a thumbnail to display a cropping frame. When a cropping frame is displayed, the portion within the cropping frame will be scanned. When no cropping frame is displayed, each frame is scanned individually.
-
 1
1 -
2
-
3
-
4
-
5
-
6
-
7
-
8
-
9
-
10
-
11
-
12
-
13
-
14
-
15
-
16
-
17
-
18
-
19
-
20
-
21
-
22
-
23
-
24
-
25
-
26
-
27
-
28
-
29
-
30
-
31
-
32
-
33
-
34
-
35
-
36
-
37
-
38
-
39
-
40
-
41
-
42
-
43
-
44
-
45
-
46
-
47
-
48
-
49
-
50
-
51
-
52
-
53
-
54
-
55
-
56
-
57
-
58
-
59
-
60
-
61
-
62
-
63
-
64
-
65
-
66
-
67
-
68
-
69
-
70
-
71
-
72
-
73
-
74
-
75
-
76
-
77
-
78
-
79
-
80
-
81
-
82
-
83
-
84
-
85
-
86
-
87
-
88
-
89
-
90
-
91
-
92
-
93
-
94
-
95
-
96
-
97
-
98
-
99
-
100
-
101
-
102
-
103
-
104
-
 105
105 -
 106
106 -
 107
107 -
 108
108 -
 109
109 -
 110
110 -
 111
111 -
 112
112 -
 113
113 -
 114
114 -
 115
115 -
116
-
117
-
118
-
119
-
120
-
121
-
122
-
123
-
124
-
125
-
126
-
127
-
128
-
129
-
130
-
131
-
132
-
133
-
134
-
135
-
136
-
137
-
138
-
139
-
140
-
141
-
142
-
143
-
144
-
145
-
146
-
147
-
148
-
149
-
150
-
151
-
152
-
153
-
154
-
155
-
156
-
157
-
158
-
159
-
160
-
161
-
162
-
163
-
164
-
165
-
166
-
167
-
168
-
169
-
170
 |
 |