Canon PIXMA MX392 Manual - Page 119
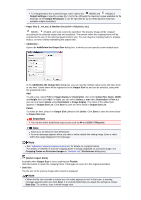
Thumbnail is displayed on the Toolbar, Whole Image is displayed on the Toolbar
 |
View all Canon PIXMA MX392 manuals
Add to My Manuals
Save this manual to your list of manuals |
Page 119 highlights
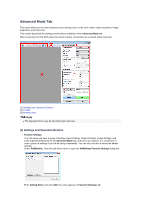
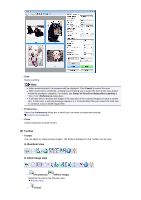
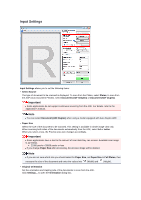
(3) Preview Area • Preview Area This is where a trial image appears after you click Preview. You can also check the results of the settings (image corrections, color adjustments, etc.) made in "Settings and Operation Buttons." When (Thumbnail) is displayed on the Toolbar Cropping frames are specified according to the document size, and thumbnails of scanned images are displayed. Only the images with the checkbox selected will be scanned. Note When multiple images are previewed, different outlines indicate different selection status. Focus Frame (thick blue outline): The displayed settings will be applied. Selected Frame (thin blue outline): The settings will be applied to the Focus Frame and Selected Frames simultaneously. You can select multiple images by clicking them while pressing the Ctrl key. Unselected (no outline): The settings will not be applied. When (Whole Image) is displayed on the Toolbar Items on the Platen are scanned and displayed as a single image. All portions in the cropping frames will be scanned. Note You can specify the cropping frame on the displayed image. In thumbnail view, you can only create one cropping frame per image. In whole image view, you can create multiple cropping frames. Adjusting Cropping Frames (ScanGear)
-
 1
1 -
2
-
3
-
4
-
5
-
6
-
7
-
8
-
9
-
10
-
11
-
12
-
13
-
14
-
15
-
16
-
17
-
18
-
19
-
20
-
21
-
22
-
23
-
24
-
25
-
26
-
27
-
28
-
29
-
30
-
31
-
32
-
33
-
34
-
35
-
36
-
37
-
38
-
39
-
40
-
41
-
42
-
43
-
44
-
45
-
46
-
47
-
48
-
49
-
50
-
51
-
52
-
53
-
54
-
55
-
56
-
57
-
58
-
59
-
60
-
61
-
62
-
63
-
64
-
65
-
66
-
67
-
68
-
69
-
70
-
71
-
72
-
73
-
74
-
75
-
76
-
77
-
78
-
79
-
80
-
81
-
82
-
83
-
84
-
85
-
86
-
87
-
88
-
89
-
90
-
91
-
92
-
93
-
94
-
95
-
96
-
97
-
98
-
99
-
100
-
101
-
102
-
103
-
104
-
105
-
106
-
107
-
108
-
109
-
110
-
111
-
112
-
113
-
 114
114 -
 115
115 -
 116
116 -
 117
117 -
 118
118 -
 119
119 -
 120
120 -
 121
121 -
 122
122 -
 123
123 -
 124
124 -
125
-
126
-
127
-
128
-
129
-
130
-
131
-
132
-
133
-
134
-
135
-
136
-
137
-
138
-
139
-
140
-
141
-
142
-
143
-
144
-
145
-
146
-
147
-
148
-
149
-
150
-
151
-
152
-
153
-
154
-
155
-
156
-
157
-
158
-
159
-
160
-
161
-
162
-
163
-
164
-
165
-
166
-
167
-
168
-
169
-
170
 |
 |