Canon PIXMA MX392 Manual - Page 49
Black and White
 |
View all Canon PIXMA MX392 manuals
Add to My Manuals
Save this manual to your list of manuals |
Page 49 highlights
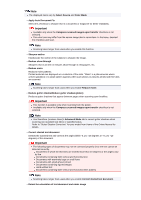
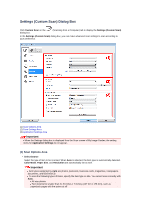
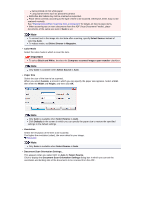
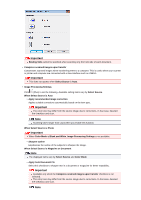
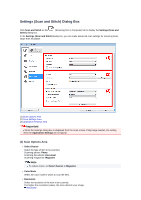
Items printed on thin white paper Long narrow items such as panoramic photos Reflective disc labels may not be scanned as expected. Place items correctly according to the type of item to be scanned. Otherwise, items may not be scanned correctly. See "Placing Items (When Scanning from a Computer)" for details on how to place items. When scanning two or more documents from the ADF (Auto Document Feeder), place documents of the same size even if Auto is set. Note To convert text in the image into text data after scanning, specify Select Source instead of selecting Auto. To reduce moire, set Select Source to Magazine. • Color Mode Select the color mode in which to scan the item. Important To select Black and White, deselect the Compress scanned images upon transfer checkbox. Note Only Color is available when Select Source is Auto. • Paper Size Select the size of the item to be scanned. When you select Custom, a screen in which you can specify the paper size appears. Select a Unit, then enter the Width and Height, and then click OK. Note Only Auto is available when Select Source is Auto. Click Defaults in the screen in which you can specify the paper size to restore the specified settings to the default settings. • Resolution Select the resolution of the item to be scanned. The higher the resolution (value), the more detail in your image. Resolution Note Only Auto is available when Select Source is Auto. • Document Scan Orientation Settings... This appears when you select ADF or Auto for Select Source. Click to display the Document Scan Orientation Settings dialog box in which you can set the orientation and binding side of the documents to be scanned from the ADF.
-
 1
1 -
2
-
3
-
4
-
5
-
6
-
7
-
8
-
9
-
10
-
11
-
12
-
13
-
14
-
15
-
16
-
17
-
18
-
19
-
20
-
21
-
22
-
23
-
24
-
25
-
26
-
27
-
28
-
29
-
30
-
31
-
32
-
33
-
34
-
35
-
36
-
37
-
38
-
39
-
40
-
41
-
42
-
43
-
 44
44 -
 45
45 -
 46
46 -
 47
47 -
 48
48 -
 49
49 -
 50
50 -
 51
51 -
 52
52 -
 53
53 -
 54
54 -
55
-
56
-
57
-
58
-
59
-
60
-
61
-
62
-
63
-
64
-
65
-
66
-
67
-
68
-
69
-
70
-
71
-
72
-
73
-
74
-
75
-
76
-
77
-
78
-
79
-
80
-
81
-
82
-
83
-
84
-
85
-
86
-
87
-
88
-
89
-
90
-
91
-
92
-
93
-
94
-
95
-
96
-
97
-
98
-
99
-
100
-
101
-
102
-
103
-
104
-
105
-
106
-
107
-
108
-
109
-
110
-
111
-
112
-
113
-
114
-
115
-
116
-
117
-
118
-
119
-
120
-
121
-
122
-
123
-
124
-
125
-
126
-
127
-
128
-
129
-
130
-
131
-
132
-
133
-
134
-
135
-
136
-
137
-
138
-
139
-
140
-
141
-
142
-
143
-
144
-
145
-
146
-
147
-
148
-
149
-
150
-
151
-
152
-
153
-
154
-
155
-
156
-
157
-
158
-
159
-
160
-
161
-
162
-
163
-
164
-
165
-
166
-
167
-
168
-
169
-
170
 |
 |