Canon PIXMA MX392 Manual - Page 58
Select Application
 |
View all Canon PIXMA MX392 manuals
Add to My Manuals
Save this manual to your list of manuals |
Page 58 highlights
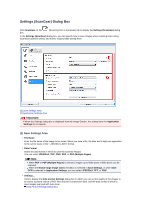
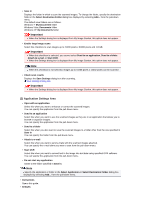
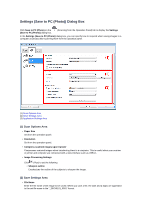
• Save in Displays the folder in which to save the scanned images. To change the folder, specify the destination folder in the Select Destination Folder dialog box displayed by selecting Add... from the pull-down menu. The default save folders are as follows. Windows 7: My Documents folder Windows Vista: Documents folder Windows XP: My Documents folder Important When the Settings dialog box is displayed from My Image Garden, this option does not appear. • Enable large image scans Select this checkbox to scan images up to 21000 pixels x 30000 pixels and 1.8 GB. Important When this checkbox is selected, you cannot select Send to an application, Send to a folder, Attach to e-mail, or Start OCR. When the Settings dialog box is displayed from My Image Garden, this option does not appear. Note When this checkbox is not selected, images up to 10208 pixels x 14032 pixels can be scanned. • Check scan results Displays the Save Settings dialog box after scanning. Save Settings Dialog Box Important When the Settings dialog box is displayed from My Image Garden, this option does not appear. (2) Application Settings Area • Open with an application Select this when you want to enhance or correct the scanned images. You can specify the application from the pull-down menu. • Send to an application Select this when you want to use the scanned images as they are in an application that allows you to browse or organize images. You can specify the application from the pull-down menu. • Send to a folder Select this when you also want to save the scanned images to a folder other than the one specified in Save in. You can specify the folder from the pull-down menu. • Attach to e-mail Select this when you want to send e-mails with the scanned images attached. You can specify the e-mail client you want to start from the pull-down menu. • Start OCR Select this when you want to convert text in the image into text data using specified OCR software. You can specify the application from the pull-down menu. • Do not start any application Saves to the folder specified in Save in. Note Specify the application or folder in the Select Application or Select Destination Folder dialog box displayed by selecting Add... from the pull-down menu. • Instructions Opens this guide. • Defaults
-
 1
1 -
2
-
3
-
4
-
5
-
6
-
7
-
8
-
9
-
10
-
11
-
12
-
13
-
14
-
15
-
16
-
17
-
18
-
19
-
20
-
21
-
22
-
23
-
24
-
25
-
26
-
27
-
28
-
29
-
30
-
31
-
32
-
33
-
34
-
35
-
36
-
37
-
38
-
39
-
40
-
41
-
42
-
43
-
44
-
45
-
46
-
47
-
48
-
49
-
50
-
51
-
52
-
 53
53 -
 54
54 -
 55
55 -
 56
56 -
 57
57 -
 58
58 -
 59
59 -
 60
60 -
 61
61 -
 62
62 -
 63
63 -
64
-
65
-
66
-
67
-
68
-
69
-
70
-
71
-
72
-
73
-
74
-
75
-
76
-
77
-
78
-
79
-
80
-
81
-
82
-
83
-
84
-
85
-
86
-
87
-
88
-
89
-
90
-
91
-
92
-
93
-
94
-
95
-
96
-
97
-
98
-
99
-
100
-
101
-
102
-
103
-
104
-
105
-
106
-
107
-
108
-
109
-
110
-
111
-
112
-
113
-
114
-
115
-
116
-
117
-
118
-
119
-
120
-
121
-
122
-
123
-
124
-
125
-
126
-
127
-
128
-
129
-
130
-
131
-
132
-
133
-
134
-
135
-
136
-
137
-
138
-
139
-
140
-
141
-
142
-
143
-
144
-
145
-
146
-
147
-
148
-
149
-
150
-
151
-
152
-
153
-
154
-
155
-
156
-
157
-
158
-
159
-
160
-
161
-
162
-
163
-
164
-
165
-
166
-
167
-
168
-
169
-
170
 |
 |