Canon PIXMA MX392 Manual - Page 145
Deleting Cropping Frames
 |
View all Canon PIXMA MX392 manuals
Add to My Manuals
Save this manual to your list of manuals |
Page 145 highlights
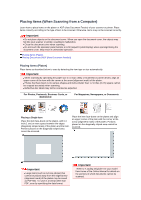
You can create multiple cropping frames and apply different scan settings to each cropping frame. You can also select multiple cropping frames by clicking them while pressing the Ctrl key. If you select multiple cropping frames and change the settings on a tab at the right of ScanGear, the settings will be applied to all the selected cropping frames. When you create a new cropping frame, it retains the settings of the latest cropping frame. Note Create up to 12 cropping frames. Scanning takes longer than usual when multiple cropping frames are selected. Deleting Cropping Frames In thumbnail view To delete a cropping frame, click an area outside the cropping frame on an image. In whole image view To delete a cropping frame, select it and click (Remove Cropping Frame) on the Toolbar. Alternatively, press the Delete key. When there are multiple cropping frames, all the selected cropping frames (active cropping frame and selected cropping frames) are deleted simultaneously.
-
 1
1 -
2
-
3
-
4
-
5
-
6
-
7
-
8
-
9
-
10
-
11
-
12
-
13
-
14
-
15
-
16
-
17
-
18
-
19
-
20
-
21
-
22
-
23
-
24
-
25
-
26
-
27
-
28
-
29
-
30
-
31
-
32
-
33
-
34
-
35
-
36
-
37
-
38
-
39
-
40
-
41
-
42
-
43
-
44
-
45
-
46
-
47
-
48
-
49
-
50
-
51
-
52
-
53
-
54
-
55
-
56
-
57
-
58
-
59
-
60
-
61
-
62
-
63
-
64
-
65
-
66
-
67
-
68
-
69
-
70
-
71
-
72
-
73
-
74
-
75
-
76
-
77
-
78
-
79
-
80
-
81
-
82
-
83
-
84
-
85
-
86
-
87
-
88
-
89
-
90
-
91
-
92
-
93
-
94
-
95
-
96
-
97
-
98
-
99
-
100
-
101
-
102
-
103
-
104
-
105
-
106
-
107
-
108
-
109
-
110
-
111
-
112
-
113
-
114
-
115
-
116
-
117
-
118
-
119
-
120
-
121
-
122
-
123
-
124
-
125
-
126
-
127
-
128
-
129
-
130
-
131
-
132
-
133
-
134
-
135
-
136
-
137
-
138
-
139
-
 140
140 -
 141
141 -
 142
142 -
 143
143 -
 144
144 -
 145
145 -
 146
146 -
 147
147 -
 148
148 -
 149
149 -
 150
150 -
151
-
152
-
153
-
154
-
155
-
156
-
157
-
158
-
159
-
160
-
161
-
162
-
163
-
164
-
165
-
166
-
167
-
168
-
169
-
170
 |
 |