Canon PIXMA MX392 Manual - Page 113
Preview Area
 |
View all Canon PIXMA MX392 manuals
Add to My Manuals
Save this manual to your list of manuals |
Page 113 highlights
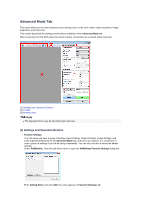
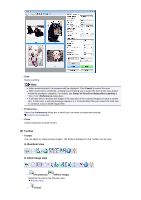
• (Thumbnail) / (Whole Image) Switches the view in the Preview area. Preview Area • (Rotate Left) Rotates the preview image 90 degrees counter-clockwise. - The result will be reflected in the scanned image. - The image returns to its original state when you preview again. • (Rotate Right) Rotates the preview image 90 degrees clockwise. - The result will be reflected in the scanned image. - The image returns to its original state when you preview again. • (Auto Crop) Displays and adjusts the cropping frame automatically to the size of the document displayed in the Preview area. The scan area is reduced every time you click this button if there are croppable areas within the cropping frame. • (Check All Frames) Available when two or more frames are displayed. Selects the checkboxes of the image in thumbnail view. • (Uncheck All Frames) Available when two or more frames are displayed. Deselects the checkboxes of the image in thumbnail view. • (Select All Frames) Available when two or more frames are displayed. Selects the images in thumbnail view and outlines them in blue. • (Select All Cropping Frames) Available when two or more cropping frames are specified. Turns the cropping frames into thick broken lines and applies the settings to all of them. • (Remove Cropping Frame) Removes the selected cropping frame. • (Information) Displays the version of ScanGear and the current scan settings (document type, etc.). • (Open Guide) Opens this page. (3) Preview Area • Preview Area This is where a trial image appears after you click Preview. You can also check the results of the settings (image corrections, color adjustments, etc.) made in "Settings and Operation Buttons." When (Thumbnail) is displayed on the Toolbar Cropping frames are specified according to the document size, and thumbnails of scanned images are displayed. Only the images with the checkbox selected will be scanned.
-
 1
1 -
2
-
3
-
4
-
5
-
6
-
7
-
8
-
9
-
10
-
11
-
12
-
13
-
14
-
15
-
16
-
17
-
18
-
19
-
20
-
21
-
22
-
23
-
24
-
25
-
26
-
27
-
28
-
29
-
30
-
31
-
32
-
33
-
34
-
35
-
36
-
37
-
38
-
39
-
40
-
41
-
42
-
43
-
44
-
45
-
46
-
47
-
48
-
49
-
50
-
51
-
52
-
53
-
54
-
55
-
56
-
57
-
58
-
59
-
60
-
61
-
62
-
63
-
64
-
65
-
66
-
67
-
68
-
69
-
70
-
71
-
72
-
73
-
74
-
75
-
76
-
77
-
78
-
79
-
80
-
81
-
82
-
83
-
84
-
85
-
86
-
87
-
88
-
89
-
90
-
91
-
92
-
93
-
94
-
95
-
96
-
97
-
98
-
99
-
100
-
101
-
102
-
103
-
104
-
105
-
106
-
107
-
 108
108 -
 109
109 -
 110
110 -
 111
111 -
 112
112 -
 113
113 -
 114
114 -
 115
115 -
 116
116 -
 117
117 -
 118
118 -
119
-
120
-
121
-
122
-
123
-
124
-
125
-
126
-
127
-
128
-
129
-
130
-
131
-
132
-
133
-
134
-
135
-
136
-
137
-
138
-
139
-
140
-
141
-
142
-
143
-
144
-
145
-
146
-
147
-
148
-
149
-
150
-
151
-
152
-
153
-
154
-
155
-
156
-
157
-
158
-
159
-
160
-
161
-
162
-
163
-
164
-
165
-
166
-
167
-
168
-
169
-
170
 |
 |