Canon PIXMA MX392 Manual - Page 22
Document - instructions
 |
View all Canon PIXMA MX392 manuals
Add to My Manuals
Save this manual to your list of manuals |
Page 22 highlights
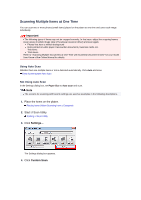
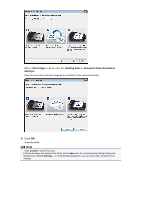
The IJ Scan Utility main screen appears. Note See the following pages for details on the setting items in the Settings dialog box. Settings (Document Scan) Dialog Box Settings (Custom Scan) Dialog Box 7. Click Document. Scanning starts. Note Click Cancel to cancel the scan. When Document (ADF Manual Duplex) is selected for Select Source, proceed to Step 8. 8. Follow the on-screen instructions to place the documents. Note The screens for scanning with Orientation set to Portrait are used as examples in the following descriptions. When Long edge is Selected for Binding Side in Document Scan Orientation Settings... Place the documents after rotating the output documents 180 degrees.
-
 1
1 -
2
-
3
-
4
-
5
-
6
-
7
-
8
-
9
-
10
-
11
-
12
-
13
-
14
-
15
-
16
-
 17
17 -
 18
18 -
 19
19 -
 20
20 -
 21
21 -
 22
22 -
 23
23 -
 24
24 -
 25
25 -
 26
26 -
 27
27 -
28
-
29
-
30
-
31
-
32
-
33
-
34
-
35
-
36
-
37
-
38
-
39
-
40
-
41
-
42
-
43
-
44
-
45
-
46
-
47
-
48
-
49
-
50
-
51
-
52
-
53
-
54
-
55
-
56
-
57
-
58
-
59
-
60
-
61
-
62
-
63
-
64
-
65
-
66
-
67
-
68
-
69
-
70
-
71
-
72
-
73
-
74
-
75
-
76
-
77
-
78
-
79
-
80
-
81
-
82
-
83
-
84
-
85
-
86
-
87
-
88
-
89
-
90
-
91
-
92
-
93
-
94
-
95
-
96
-
97
-
98
-
99
-
100
-
101
-
102
-
103
-
104
-
105
-
106
-
107
-
108
-
109
-
110
-
111
-
112
-
113
-
114
-
115
-
116
-
117
-
118
-
119
-
120
-
121
-
122
-
123
-
124
-
125
-
126
-
127
-
128
-
129
-
130
-
131
-
132
-
133
-
134
-
135
-
136
-
137
-
138
-
139
-
140
-
141
-
142
-
143
-
144
-
145
-
146
-
147
-
148
-
149
-
150
-
151
-
152
-
153
-
154
-
155
-
156
-
157
-
158
-
159
-
160
-
161
-
162
-
163
-
164
-
165
-
166
-
167
-
168
-
169
-
170
 |
 |
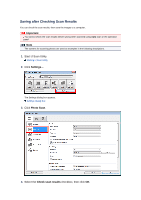
The IJ Scan Utility main screen appears.
Note
See the following pages for details on the setting items in the Settings dialog box.
Settings (Document Scan) Dialog Box
Settings (Custom Scan) Dialog Box
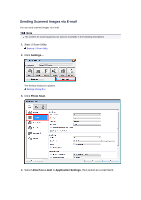
7.
Click
Document
.
Scanning starts.
Note
Click
Cancel
to cancel the scan.
When
Document (ADF Manual Duplex)
is selected for
Select Source
, proceed to Step 8.
8.
Follow the on-screen instructions to place the documents.
Note
The screens for scanning with
Orientation
set to
Portrait
are used as examples in the following
descriptions.
When
Long edge
is Selected for
Binding Side
in
Document Scan Orientation
Settings...
Place the documents after rotating the output documents 180 degrees.