Canon PIXMA MX392 Manual - Page 126
Image Adjustment, Reduce Show-through, Recommended, Color Settings, Preferences, Document, Magazine
 |
View all Canon PIXMA MX392 manuals
Add to My Manuals
Save this manual to your list of manuals |
Page 126 highlights
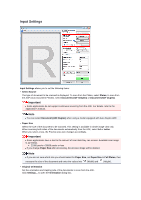
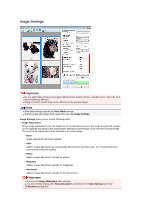
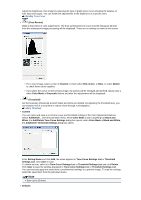
Note If the image is not adjusted properly with Auto, specify the document type. The color tone may change from the source image due to the Image Adjustment. In that case, set Image Adjustment to None. • Reduce Show-through Use this function to reduce show-through in duplex documents or lighten the base color in recycled paper and other colored paper when scanning documents. • OFF Show-through will not be reduced. • ON Select this to reduce show-through in duplex documents or lighten the base color. It is recommended that you normally select this setting. Important Reduce Show-through can be set when Recommended is selected on the Color Settings tab of the Preferences dialog box and Document or Magazine is selected for Image Adjustment. • Unsharp Mask Emphasizes the outline of the subjects to sharpen the image when scanning photos. • OFF Unsharp Mask will not be applied. • ON Emphasizes the outline of the subjects to sharpen the image. It is recommended that you normally select this setting. • Descreen Printed photos and pictures are displayed as a collection of fine dots. "Moire" is a phenomenon where uneven gradation or a stripe pattern appears when such photos or pictures printed with fine dots are scanned. Descreen is the function for reducing this moire effect. • OFF Moire will not be reduced. • ON Reduces moire. It is recommended that you normally select this setting. Note Even if Descreen is set to ON, some moire effects may remain if Unsharp Mask is set to ON. In that case, set Unsharp Mask to OFF. • Reduce Dust and Scratches Scanned photos may contain white dots caused by dust or scratches. Use this function to reduce such noise. • None Dust and scratches will not be reduced. • Low Select this to reduce small dust particles and scratches. Large ones may remain. • Medium It is recommended that you normally select this setting. • High Select this to reduce large dust particles and scratches; however, evidence of the reduction process may remain or delicate parts of the image may be removed. Important This function may not be effective for some types of photos. Note
-
 1
1 -
2
-
3
-
4
-
5
-
6
-
7
-
8
-
9
-
10
-
11
-
12
-
13
-
14
-
15
-
16
-
17
-
18
-
19
-
20
-
21
-
22
-
23
-
24
-
25
-
26
-
27
-
28
-
29
-
30
-
31
-
32
-
33
-
34
-
35
-
36
-
37
-
38
-
39
-
40
-
41
-
42
-
43
-
44
-
45
-
46
-
47
-
48
-
49
-
50
-
51
-
52
-
53
-
54
-
55
-
56
-
57
-
58
-
59
-
60
-
61
-
62
-
63
-
64
-
65
-
66
-
67
-
68
-
69
-
70
-
71
-
72
-
73
-
74
-
75
-
76
-
77
-
78
-
79
-
80
-
81
-
82
-
83
-
84
-
85
-
86
-
87
-
88
-
89
-
90
-
91
-
92
-
93
-
94
-
95
-
96
-
97
-
98
-
99
-
100
-
101
-
102
-
103
-
104
-
105
-
106
-
107
-
108
-
109
-
110
-
111
-
112
-
113
-
114
-
115
-
116
-
117
-
118
-
119
-
120
-
 121
121 -
 122
122 -
 123
123 -
 124
124 -
 125
125 -
 126
126 -
 127
127 -
 128
128 -
 129
129 -
 130
130 -
 131
131 -
132
-
133
-
134
-
135
-
136
-
137
-
138
-
139
-
140
-
141
-
142
-
143
-
144
-
145
-
146
-
147
-
148
-
149
-
150
-
151
-
152
-
153
-
154
-
155
-
156
-
157
-
158
-
159
-
160
-
161
-
162
-
163
-
164
-
165
-
166
-
167
-
168
-
169
-
170
 |
 |
