Cisco 7912G Administration Guide - Page 167
Step 3, Use the cfgfmt.exe tool to generate a binary profile file from the text file.
 |
UPC - 746320852409
View all Cisco 7912G manuals
Add to My Manuals
Save this manual to your list of manuals |
Page 167 highlights
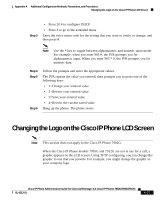
Appendix A Additional Configuration Methods, Parameters, and Procedures Changing the Logo on the Cisco IP Phone LCD Screen Step 3 Add the following line to the Cisco IP Phone profile file. Note For detailed information about using profile files, see the "TFTP Configuring" section on page A-2. Step 4 upgradelogo:imageID,TFTPServerID,image.logo where: • imageID is the same unique identifier that you specified in Step 1. • TFTPServerID is the IP address of the TFTP server on which the image.logo file is stored. If the image.logo file is stored on the same TFTP server as the Cisco IP Phone configuration file, replace TFTPServerID with the numeral 0. • image is the base file name of the image file. For example, if the image identifier is 10, the converted file is stored on the same TFTP server as the Cisco IP Phone configuration file, and the base name of the converted image file is mylogo, add the following line to the configuration file: upgradelogo:10,0,mylogo.logo Use the cfgfmt.exe tool to generate a binary profile file from the text file. Put the binary file in these locations: • The root directory on the TFTP server (C:\Program Files\cisco\tftppath) • The network locale directories on the TFTP server for each language that is supported by Cisco CallManager. The default network locale directory on the TFTP server is C:\Program Files\ cisco\tftppath\United_States. Note For detailed information about using the cfgfmt.exe tool, see the "Editing a Profile File and Converting it to Binary Format" section on page A-5. Step 5 Power cycle the phone. The new graphic appears when the phone restarts. Cisco IP Phone Administration Guide for Cisco CallManager 3.3, Cisco IP Phones 7902G/7905G/7912G OL-6313-01 A-29
-
 1
1 -
2
-
3
-
4
-
5
-
6
-
7
-
8
-
9
-
10
-
11
-
12
-
13
-
14
-
15
-
16
-
17
-
18
-
19
-
20
-
21
-
22
-
23
-
24
-
25
-
26
-
27
-
28
-
29
-
30
-
31
-
32
-
33
-
34
-
35
-
36
-
37
-
38
-
39
-
40
-
41
-
42
-
43
-
44
-
45
-
46
-
47
-
48
-
49
-
50
-
51
-
52
-
53
-
54
-
55
-
56
-
57
-
58
-
59
-
60
-
61
-
62
-
63
-
64
-
65
-
66
-
67
-
68
-
69
-
70
-
71
-
72
-
73
-
74
-
75
-
76
-
77
-
78
-
79
-
80
-
81
-
82
-
83
-
84
-
85
-
86
-
87
-
88
-
89
-
90
-
91
-
92
-
93
-
94
-
95
-
96
-
97
-
98
-
99
-
100
-
101
-
102
-
103
-
104
-
105
-
106
-
107
-
108
-
109
-
110
-
111
-
112
-
113
-
114
-
115
-
116
-
117
-
118
-
119
-
120
-
121
-
122
-
123
-
124
-
125
-
126
-
127
-
128
-
129
-
130
-
131
-
132
-
133
-
134
-
135
-
136
-
137
-
138
-
139
-
140
-
141
-
142
-
143
-
144
-
145
-
146
-
147
-
148
-
149
-
150
-
151
-
152
-
153
-
154
-
155
-
156
-
157
-
158
-
159
-
160
-
161
-
 162
162 -
 163
163 -
 164
164 -
 165
165 -
 166
166 -
 167
167 -
 168
168 -
 169
169 -
 170
170 -
 171
171 -
 172
172 -
173
-
174
-
175
-
176
-
177
-
178
-
179
-
180
-
181
-
182
-
183
-
184
 |
 |
