Cisco 7912G Administration Guide - Page 67
Verifying the Phone Startup Process
 |
UPC - 746320852409
View all Cisco 7912G manuals
Add to My Manuals
Save this manual to your list of manuals |
Page 67 highlights
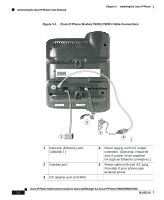
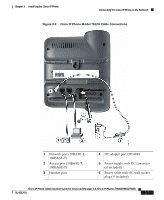
Chapter 3 Installing the Cisco IP Phone Verifying the Phone Startup Process Step 3 Step 4 Insert two screws into a wall stud, matching them to the two screw holes on the back of the phone. The keyholes fit standard phone jack mounts. Hang the phone on the wall. Verifying the Phone Startup Process After the Cisco IP Phone has power connected to it, the phone begins its startup process by cycling through the following steps. Cisco IP Phone 7902G The phone uses a combination of the three LEDs (handset, Hold, and Menu buttons) to indicate the phone startup process. After several minutes, startup is complete and your phone is ready to use. When all of the LEDs are off, you will hear a dial tone when you lift the handset. If the phone does not start up successfully, see "Checking the Light Indicators on a Cisco IP Phone 7902G" section on page 6-11. Cisco IP Phone Models 7905G/7912G 1. The handset light strip, Hold button, and Menu button flash on and off simultaneously. 2. The LCD screen displays the Cisco Systems, Inc., copyright screen. 3. The LCD screen displays these messages as the phone starts up: • Configuring VLAN • Configuring IP via DHCP • Configuring CM List • Opening address (where address is the IP address of the Cisco CallManager server) • Registering Cisco IP Phone Administration Guide for Cisco CallManager 3.3, Cisco IP Phones 7902G/7905G/7912G OL-6313-01 3-9
-
 1
1 -
2
-
3
-
4
-
5
-
6
-
7
-
8
-
9
-
10
-
11
-
12
-
13
-
14
-
15
-
16
-
17
-
18
-
19
-
20
-
21
-
22
-
23
-
24
-
25
-
26
-
27
-
28
-
29
-
30
-
31
-
32
-
33
-
34
-
35
-
36
-
37
-
38
-
39
-
40
-
41
-
42
-
43
-
44
-
45
-
46
-
47
-
48
-
49
-
50
-
51
-
52
-
53
-
54
-
55
-
56
-
57
-
58
-
59
-
60
-
61
-
 62
62 -
 63
63 -
 64
64 -
 65
65 -
 66
66 -
 67
67 -
 68
68 -
 69
69 -
 70
70 -
 71
71 -
 72
72 -
73
-
74
-
75
-
76
-
77
-
78
-
79
-
80
-
81
-
82
-
83
-
84
-
85
-
86
-
87
-
88
-
89
-
90
-
91
-
92
-
93
-
94
-
95
-
96
-
97
-
98
-
99
-
100
-
101
-
102
-
103
-
104
-
105
-
106
-
107
-
108
-
109
-
110
-
111
-
112
-
113
-
114
-
115
-
116
-
117
-
118
-
119
-
120
-
121
-
122
-
123
-
124
-
125
-
126
-
127
-
128
-
129
-
130
-
131
-
132
-
133
-
134
-
135
-
136
-
137
-
138
-
139
-
140
-
141
-
142
-
143
-
144
-
145
-
146
-
147
-
148
-
149
-
150
-
151
-
152
-
153
-
154
-
155
-
156
-
157
-
158
-
159
-
160
-
161
-
162
-
163
-
164
-
165
-
166
-
167
-
168
-
169
-
170
-
171
-
172
-
173
-
174
-
175
-
176
-
177
-
178
-
179
-
180
-
181
-
182
-
183
-
184
 |
 |
